
As soon as I unroll that buttery crescent dough, nostalgia washes over me like a warm hug from my grandmother, who always knew how to whip up something satisfying. Today, I’m excited to share one of my favorites: Cheesy Chicken Crescent Rolls. This easy recipe combines flaky dough and a creamy filling of shredded chicken and melted cheese, making it a go-to comfort food that’s perfect for both busy weeknights and festive gatherings. Whether you need a quick appetizer or a cozy main dish, these delightful rolls promise to bring everyone to the table—and they’re easily customizable! Ready to discover the secret to creating these golden-brown masterpieces? Let’s dive in!

Why Are These Rolls a Must-Try?
Comforting, there’s nothing quite like biting into a warm, flaky crescent roll filled with cheesy goodness. Quick and Easy, this recipe requires minimal prep and can be ready in under 30 minutes—perfect for those busy evenings! Versatile, customize with your favorite ingredients like spinach or peppers for an added twist; the possibilities are endless! Crowd-Pleaser, whether it’s a family gathering or game night, these rolls are sure to impress everyone at the table. And if you enjoy quick, satisfying meals, check out my Southern Cheesy Chicken or Mediterranean Chicken Gyros for more delightful options!
Cheesy Chicken Crescent Rolls Ingredients
Get ready to make these delightful Cheesy Chicken Crescent Rolls!
For the Dough
• Crescent Roll Dough – Provides the flaky, buttery texture. Substitute with puff pastry or biscuit dough if unavailable.
For the Filling
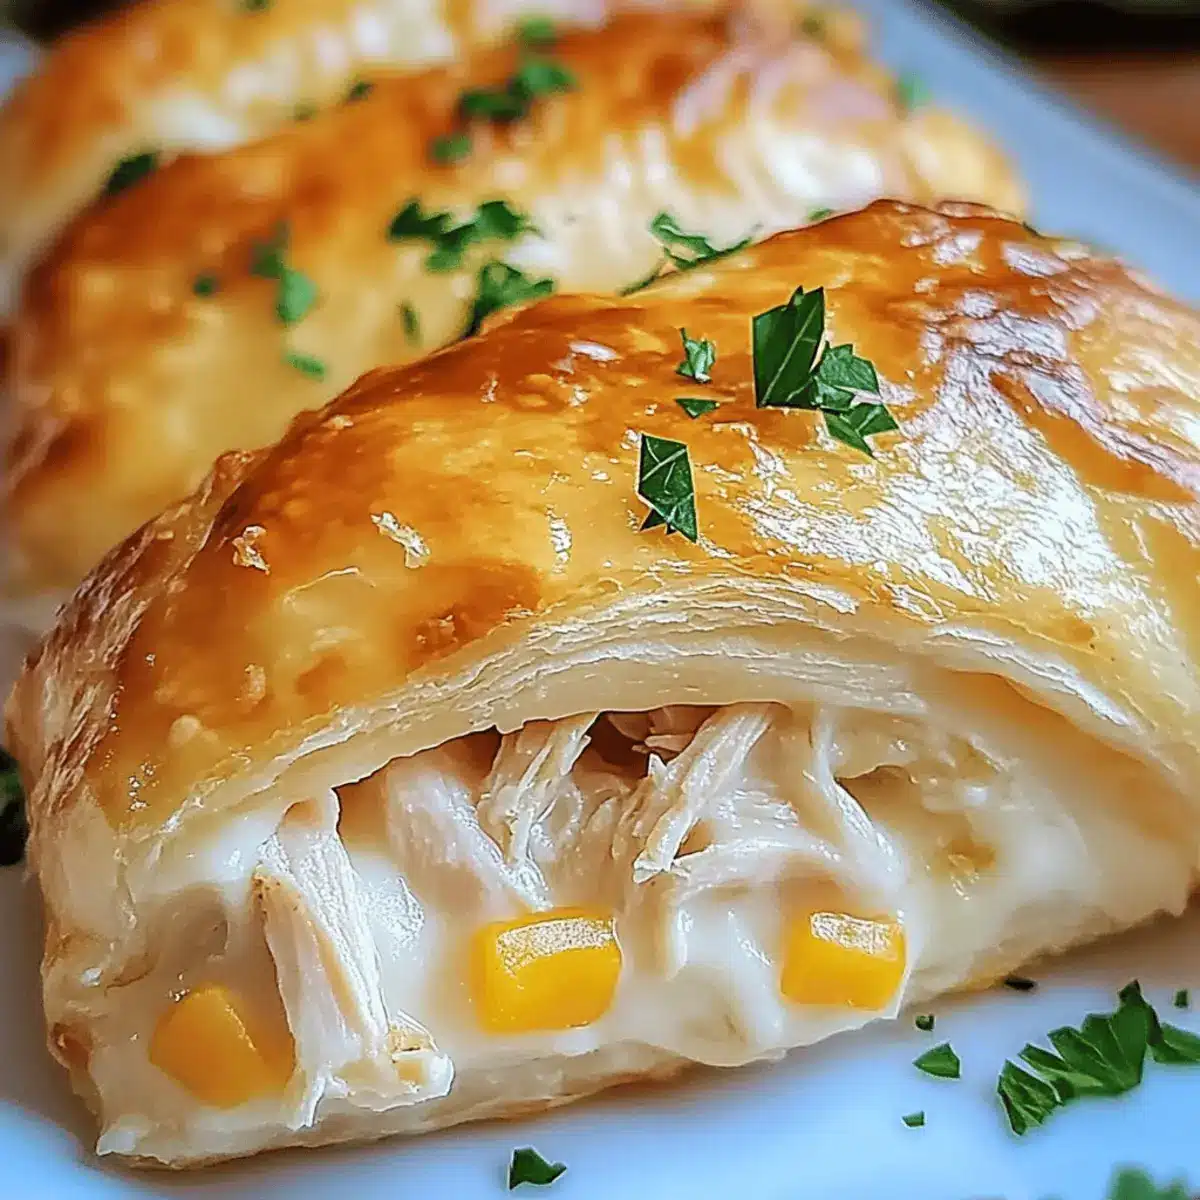
• Shredded Cooked Chicken – Adds protein and flavor. Rotisserie chicken is an excellent time-saving option.
• Cream Cheese – Contributes creaminess and helps bind the filling. Can substitute with Greek yogurt for a lighter option.
• Shredded Cheddar Cheese – Provides a rich, cheesy flavor. Mix mozzarella or pepper jack for a different taste profile.
• Garlic Powder – Enhances flavor and pairs well with chicken. Fresh minced garlic can be used for a stronger flavor.
• Chopped Parsley – Adds freshness and a hint of color. Omit or replace with other herbs like chives or dill as desired.
• Salt & Pepper – Seasonings for overall flavor enhancement. Adjust to taste.
These ingredients come together to create the perfect comforting treat!
Step‑by‑Step Instructions for Cheesy Chicken Crescent Rolls
Step 1: Preparation
Preheat your oven to 375°F (190°C) and grab a baking sheet. Lightly grease the baking sheet with olive oil or cooking spray to ensure easy cleanup after baking your Cheesy Chicken Crescent Rolls. The aroma of warm, flaky rolls will soon fill your kitchen, so it’s essential to set the stage for success right from the start!
Step 2: Filling
In a mixing bowl, combine shredded cooked chicken, softened cream cheese, and shredded cheddar cheese. Add in garlic powder, chopped parsley, salt, and pepper to taste. Stir this delicious filling until it’s smooth and well combined—this will create a creamy center that pairs perfectly with the flaky dough. Once you have your filling ready, it’s time to move on!
Step 3: Dough Setup
Carefully open the package of crescent roll dough and unroll it onto a clean, flat surface. You should see the triangles of dough neatly laid out, perfect for filling. If the dough isn’t coming apart easily, gently press along the perforated edges to separate the triangles without tearing. This part is crucial for your Cheesy Chicken Crescent Rolls to keep their shape!
Step 4: Assembly
Take a spoonful of the creamy filling and place it on the wider end of each triangle of dough. Gently roll the dough toward the pointed end, tucking in the sides as you go to create a nice pocket for the filling. Aim to secure the filling inside without overstuffing, as this will ensure even baking and prevent spills while your rolls cook.
Step 5: Baking
Now that your Cheesy Chicken Crescent Rolls are assembled, arrange them on the greased baking sheet with the point of the dough facing down. Bake in the preheated oven for 12-15 minutes, or until the rolls are gloriously golden brown and flaky. You’ll know they’re done when they emit a savory aroma that fills your home with comfort!
Step 6: Cooling
Once baked, remove the rolls from the oven and allow them to cool on a wire rack for a few minutes. This cooling step is essential to let the filling settle slightly. Your Cheesy Chicken Crescent Rolls will be warm and inviting, ready to serve at your next gathering or for a cozy night in.
Tips for the Best Cheesy Chicken Crescent Rolls
-
Don’t Overfill: Avoid excess filling in each roll to prevent them from leaking during baking. A tablespoon of filling is usually just right!
-
Serve Warm: For the best experience, serve the rolls warm. If left to cool, reheating them in the oven brings back their delightful crispy texture.
-
Airtight Storage: Keep any leftovers in an airtight container to maintain freshness and prevent sogginess. Enjoy them for up to 3-4 days!
-
Pre-Assembly Option: If you’re short on time, assemble the Cheesy Chicken Crescent Rolls ahead of time and refrigerate for up to 24 hours. Just add a few extra minutes to the baking time when ready to cook.
-
Herb Variations: Experiment with different herbs in your filling, such as chives or oregano, for an extra layer of flavor that will make your rolls truly special!
How to Store and Freeze Cheesy Chicken Crescent Rolls
Fridge: Store leftover Cheesy Chicken Crescent Rolls in an airtight container for up to 3-4 days to keep them fresh and avoid sogginess.
Freezer: For longer storage, freeze the rolls before baking. Wrap tightly and store for up to 2 months. When ready, just add an extra 2-3 minutes to the baking time.
Reheating: Reheat in the oven at 350°F (175°C) for about 10-15 minutes to restore their crispy texture. Avoid microwaving to prevent them from becoming soggy.
Make-Ahead: You can assemble the rolls and refrigerate them for up to 24 hours before baking. Just remember to extend the baking time slightly!
Make Ahead Options
These Cheesy Chicken Crescent Rolls are perfect for busy home cooks looking to save time during meal prep! You can assemble the rolls up to 24 hours in advance. Simply prepare them according to the instructions but stop before baking. Cover the assembled rolls tightly with plastic wrap and refrigerate them—this not only keeps them fresh but also allows the flavors to meld beautifully. When you’re ready to bake, remove them from the fridge, let them sit for about 10-15 minutes at room temperature, then pop them in the oven, adding a few extra minutes to the baking time if needed. Enjoy the convenience of homemade goodness with just a little advance planning!
What to Serve with Cheesy Chicken Crescent Rolls
There’s nothing like creating a full meal around these delightful bites that offers warmth and comfort with every bite.
-
Garden Salad: A light, fresh salad tossed with seasonal greens and a zesty vinaigrette complements the richness of the rolls beautifully. The crunch of vegetables adds a necessary contrast.
-
Roasted Vegetables: A medley of roasted carrots, bell peppers, and zucchini brings out earthy flavors, making it a perfect side with its caramelized sweetness that balances the rolls.
-
Ranch Dressing: Creamy ranch offers a cool dipping alternative that pairs well with the savory chicken and cheese filling, enhancing the overall flavor experience.
-
Buffalo Sauce: For those who love a spicy kick, serve some tangy buffalo sauce on the side. The heat perfectly contrasts the creamy filling, adding excitement to each bite.
-
Garlic Aioli: This rich and flavorful dip elevates your Cheesy Chicken Crescent Rolls with a creamy garlic kick, providing a gourmet touch that’s perfect for impressing guests.
-
Sweet Corn on the Cob: Fresh corn adds a touch of sweetness and crunch that perfectly marries the flavors of the rolls. Eating it with your fingers adds to the fun of the meal!
-
Beverage Pairing: Consider a chilled glass of sparkling lemonade or iced tea to cleanse your palate while balancing the savory flavors of the rolls.
-
Chocolate Chip Cookies: End on a sweet note with warm chocolate chip cookies for dessert, providing that classic comfort food vibe and a delightful contrast to the savory rolls.
Cheesy Chicken Crescent Rolls Variations
Feel free to mix and match ingredients for a unique twist on these delightful rolls!
-
Gluten-Free: Use gluten-free crescent roll dough or almond flour biscuit dough for a delicious alternative.
-
Spicy Kick: Add diced jalapeños or a splash of hot sauce to the filling for a fiery flavor that ignites your taste buds.
-
Veggie Delight: Incorporate cooked spinach for extra nutrition. Pair it with a blend of feta for a Mediterranean flair that elevates the dish.
-
Cheese Swap: Switch up the cheeses by using pepper jack for a melty, spicy twist, or try crumbled goat cheese for a gourmet touch.
-
Herb Infusion: Replace parsley with fresh dill or chives to bring a refreshing herbal note that brightens each bite.
-
Taco Twist: Add taco seasoning to the filling for a fun twist that transforms these rolls into a tasty Tex-Mex treat. Perfect for serving with salsa!
-
Savory Sweet: Incorporate a spoonful of cranberry sauce or figs with the chicken filling for a surprising sweet-and-savory bite that everyone will love.
-
Marinara Drizzle: Serve these rolls with a side of marinara sauce for dipping, making them a perfect companion to a cozy Italian meal or game night.
Remember, if you’re craving more comfort food inspiration, don’t miss my Crockpot Chicken Wild Rice Soup or those scrumptious Mediterranean Chicken Zucchini – they’re sure to warm your heart!

Cheesy Chicken Crescent Rolls Recipe FAQs
What type of chicken works best for the filling?
I recommend using shredded cooked chicken, as it adds delicious flavor and protein. Rotisserie chicken is an excellent time-saving option that delivers great taste without the fuss. If you have leftover grilled or baked chicken, feel free to shred that up and use it instead!
How should I store leftover Cheesy Chicken Crescent Rolls?
Store any leftovers in an airtight container in the refrigerator for up to 3-4 days. This helps to maintain their freshness and prevents sogginess. If you’re like me and love to savor your creations, this storage tip is a game changer!
Can I freeze Cheesy Chicken Crescent Rolls?
Absolutely! If you want to extend their life, you can freeze the rolls before baking. Wrap them tightly in plastic wrap or aluminum foil and store them in a freezer-safe bag for up to 2 months. When you’re ready to enjoy, just bake from frozen, adding an extra 2-3 minutes to the baking time for perfect results.
What do I do if my rolls are leaking filling during baking?
Don’t worry—this can happen sometimes! To prevent this, make sure you don’t overfill the rolls. A tablespoon of filling per roll is usually just right. If they still leak, simply enjoy the crispy bits that come out. They add a deliciously cheesy crunch!
Are these rolls suitable for gluten-free diets?
While traditional crescent roll dough contains gluten, you can easily make these Cheesy Chicken Crescent Rolls gluten-free by using a gluten-free dough alternative. Look for gluten-free crescent roll dough at your local grocery store or try making your own with gluten-free flour blends!
Can I prepare the rolls ahead of time?
Yes! You can assemble the Cheesy Chicken Crescent Rolls and refrigerate them for up to 24 hours before baking. This makes it easy to have them ready for any gathering or dinner plans—just remember to extend the baking time slightly for optimal puffiness and brownness!

Cheesy Chicken Crescent Rolls: Your New Favorite Comfort Snack
Ingredients
Equipment
Method
- Preheat your oven to 375°F (190°C) and grab a baking sheet. Lightly grease the baking sheet with olive oil or cooking spray.
- In a mixing bowl, combine shredded cooked chicken, softened cream cheese, and shredded cheddar cheese. Add in garlic powder, chopped parsley, salt, and pepper to taste. Stir until smooth and well combined.
- Carefully open the package of crescent roll dough and unroll it onto a clean surface. If the dough isn’t coming apart easily, gently press along the perforated edges to separate the triangles.
- Take a spoonful of the filling and place it on the wider end of each triangle of dough. Roll the dough toward the pointed end, tucking in the sides as you go.
- Arrange the rolls on the greased baking sheet with the point of the dough facing down. Bake for 12-15 minutes, until golden brown.
- Remove the rolls from the oven and allow them to cool on a wire rack for a few minutes before serving.
Leave a Reply