
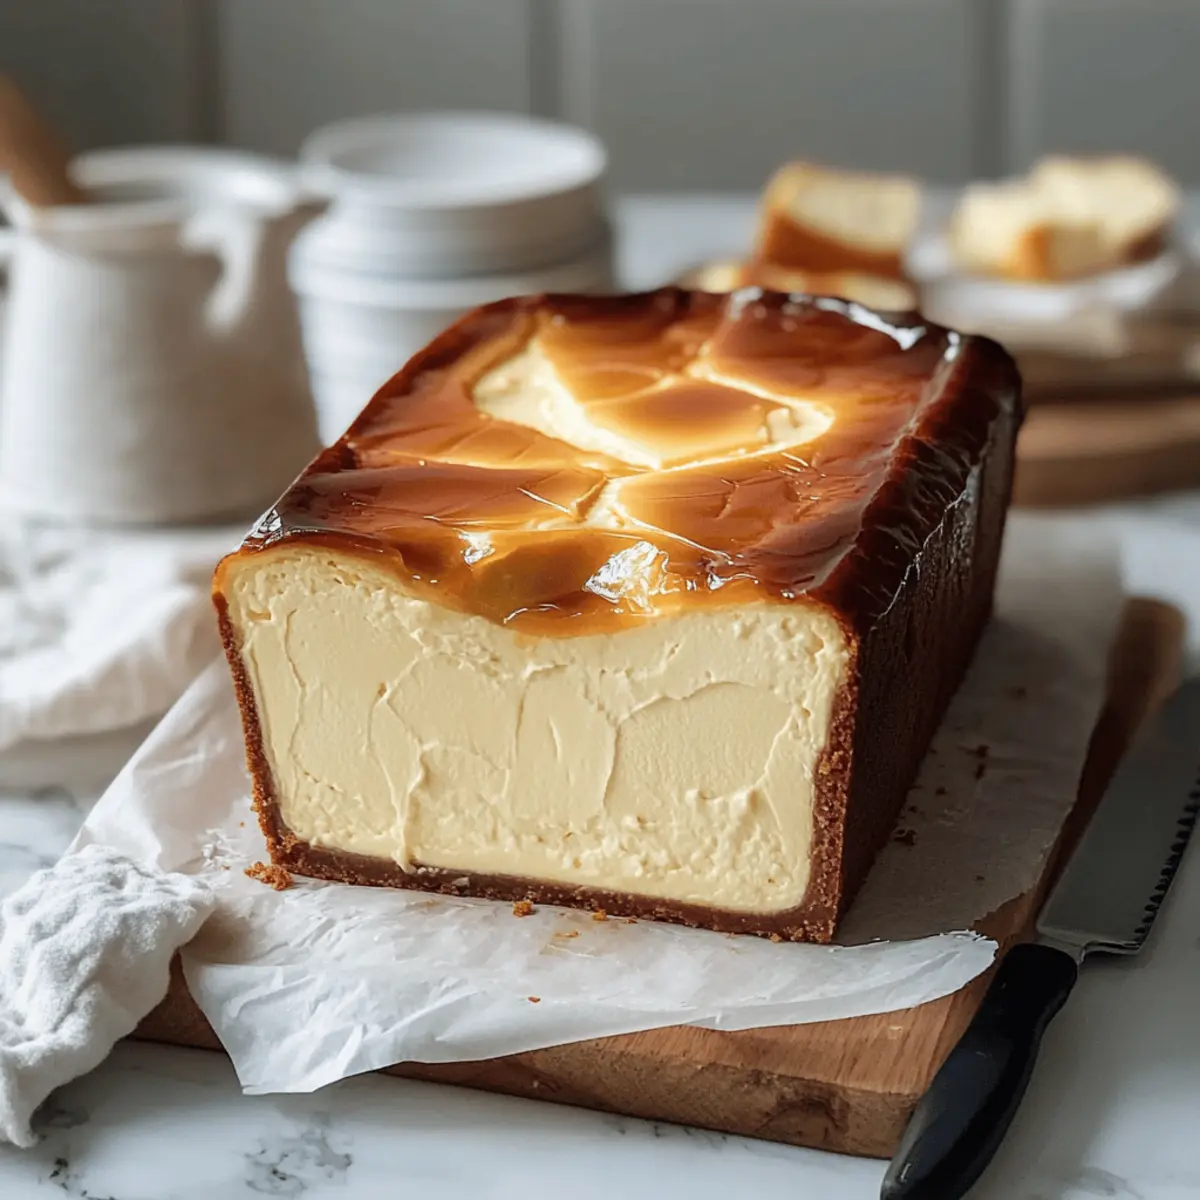
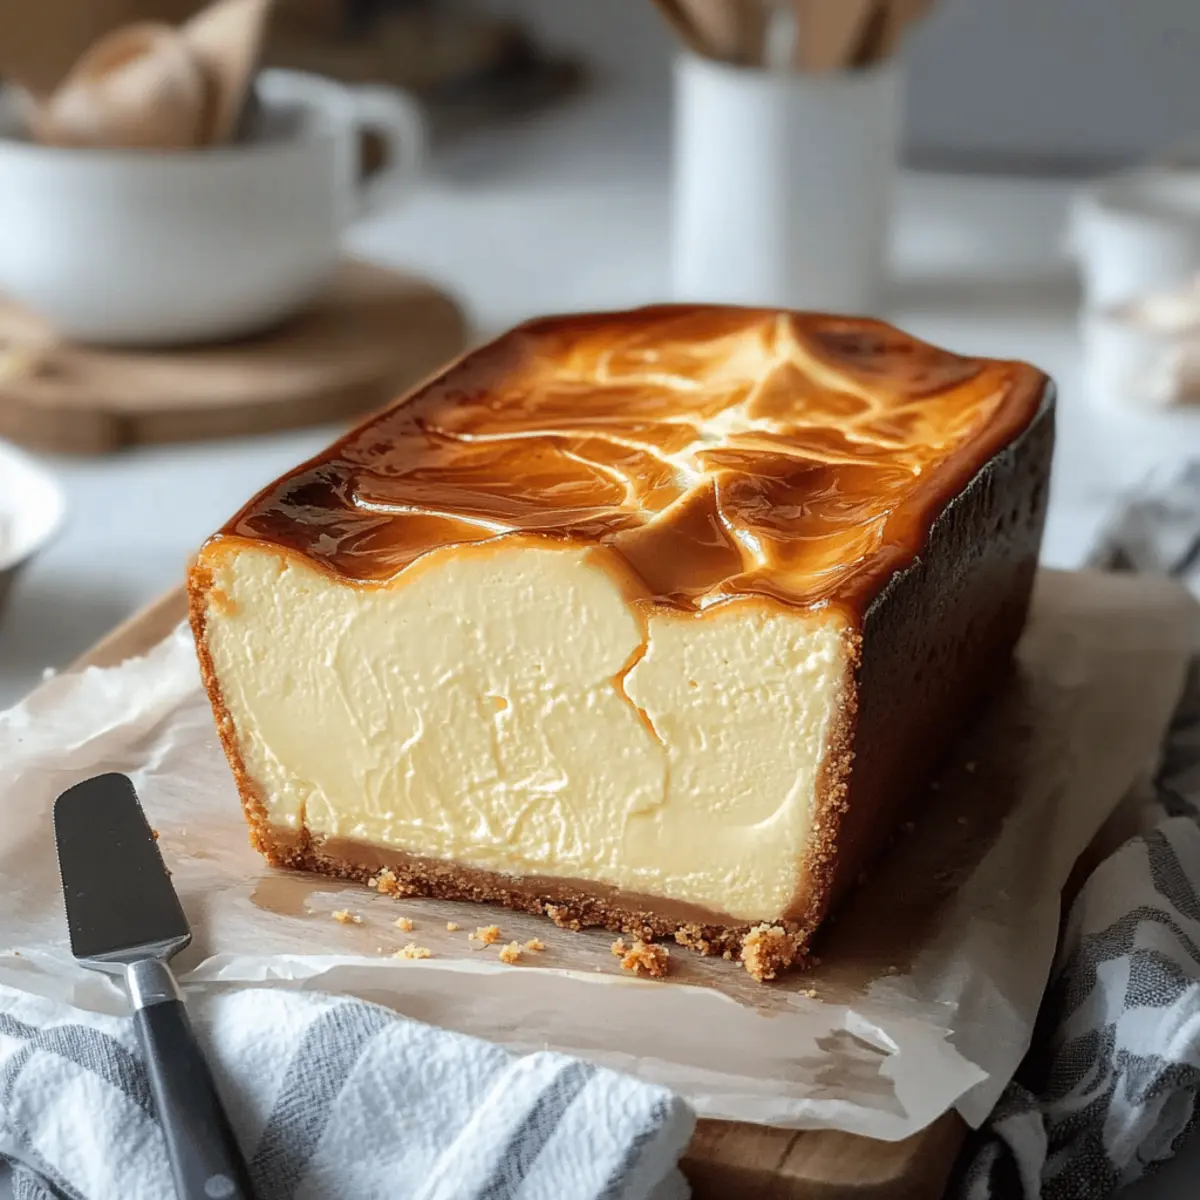
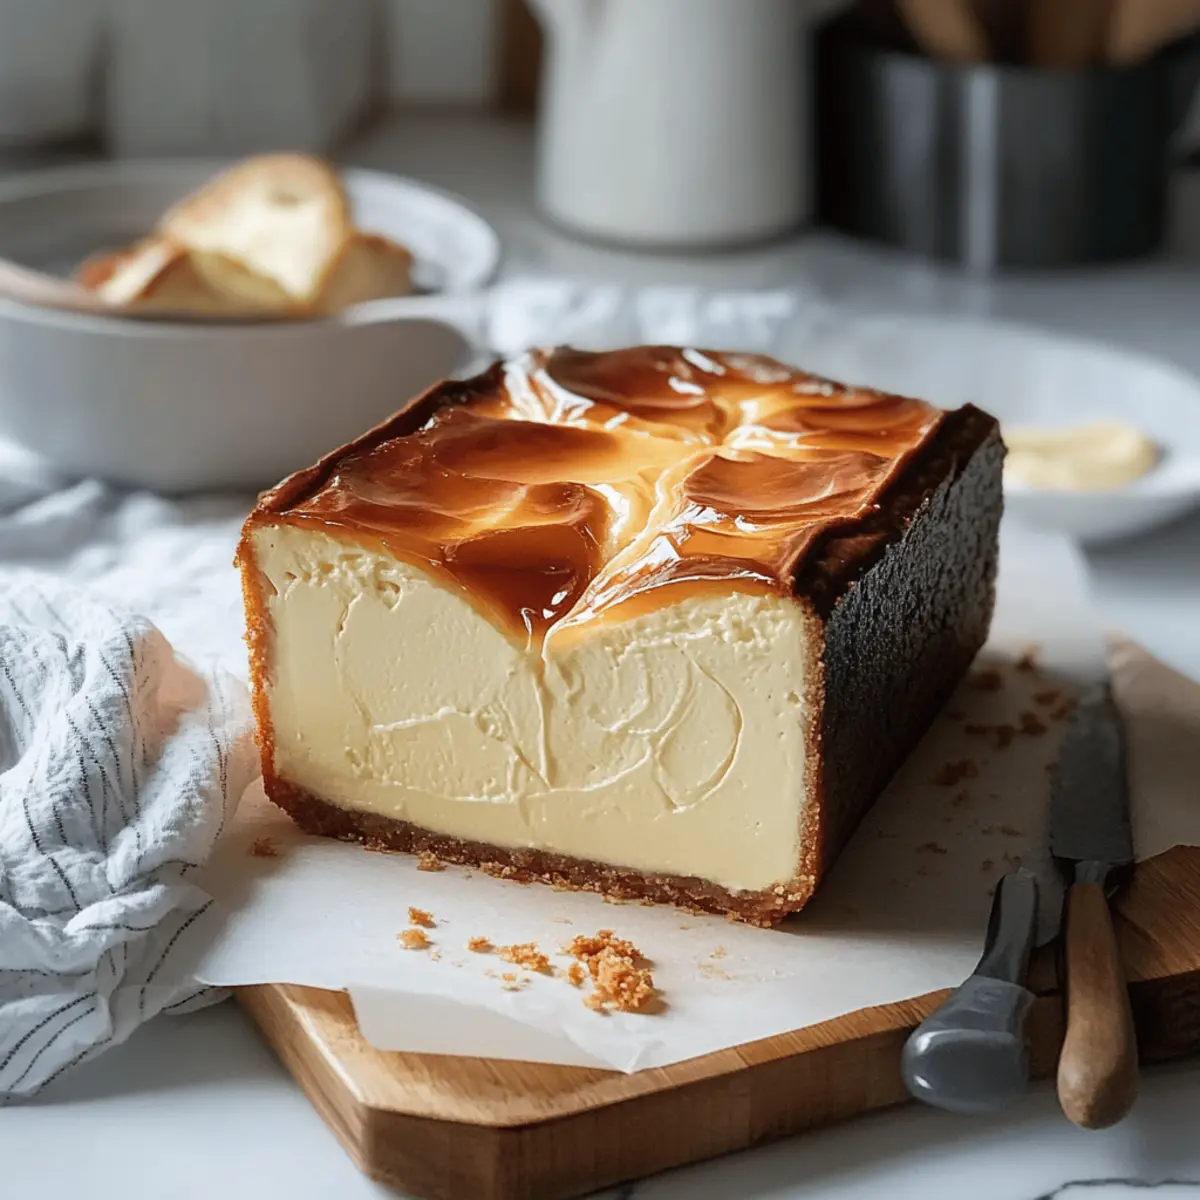
With a mouthwatering aroma wafting through the kitchen, I can’t help but get lost in the allure of a Burnt Basque Cheesecake—especially when it’s made in a handy loaf pan! This delightful crustless dessert is a perfect blend of ease and indulgence, combining a golden, caramelized exterior with a creamy custard center that melts in your mouth. It’s an effortless treat that lets you wow your guests or simply indulge your cravings without spending all day in the kitchen. Plus, when you make this Burnt Basque Cheesecake, you can easily adapt it with delicious twists, whether it’s a hint of citrus zest or a rich chocolate swirl. Are you ready to take a dive into this cheerful baking adventure?
Why is this cheesecake a must-try?
Indulgent Delight: This Burnt Basque Cheesecake is the epitome of creamy decadence, offering a unique flavor experience that is both rich and satisfying.
Effortlessly Simple: The loaf pan method makes this recipe incredibly easy, requiring minimal baking skills and just a few basic ingredients for a show-stopping dessert.
Versatile Variations: Feel free to adapt the recipe with citrus zest or chocolate swirls to match your taste—endless possibilities await!
Perfect for Sharing: Its impressive appearance and delightful taste make it a crowd-pleaser, guaranteed to win over friends and family alike.
Make Ahead Magic: Prepare it a day in advance for the best flavor. The chilling time allows the flavors to meld beautifully, ensuring every bite is pure bliss.
If you love creamy desserts, don’t miss checking out my recipes for Espresso Cheesecake Decadent or Vanilla Bean Cheesecake for even more delicious options!
Burnt Basque Cheesecake Ingredients
For the Cheesecake
• Full-fat Cream Cheese – Essential for achieving that rich and creamy texture; low-fat can result in a watery cheesecake.
• Granulated Sugar – Balances out the cheesecake’s tanginess and adds sweetness to this decadent dessert.
• Large Eggs – These bind everything together, ensuring a luscious and structured texture.
• Heavy Cream – The hero for a smooth, custardy finish; lighter alternatives may compromise the quality.
• Vanilla Extract (optional) – A splash of sweetness that elevates the flavors beautifully.
• Salt – A pinch enhances the overall flavor and balances the sweetness effectively.
• All-purpose Flour – Adds slight structure but can be omitted for a gluten-free version of the Burnt Basque Cheesecake.
For the Topping (Optional)
• Fresh Berries – A delightful contrast to the creamy cheesecake; add a splash of color and tang.
• Powdered Sugar – A light dusting enhances the presentation and adds subtle sweetness.
Step‑by‑Step Instructions for Burnt Basque Cheesecake
Step 1: Preheat Your Oven
Begin your baking adventure by preheating the oven to 400°F (200°C). While it heats, grab a 9×5 inch loaf pan and line it with parchment paper, allowing about 2 inches of overhang on the sides. This will help with easy removal later. The warm oven will set the perfect stage for your Burnt Basque Cheesecake!
Step 2: Blend the Cream Cheese and Sugar
In a large mixing bowl, combine the softened full-fat cream cheese and granulated sugar. Using an electric mixer on low-medium speed, beat the mixture for about 5 minutes until it reaches a luxurious, smooth consistency. Watch as the sugar incorporates and dissolves, creating a rich base for your cheesecake batter.
Step 3: Incorporate the Eggs
Next, add the large eggs to the cream cheese mixture one at a time. Mix well after each addition, ensuring that the batter remains smooth and homogeneous. Each egg binds the ingredients and adds to the silky texture of the Burnt Basque Cheesecake, so take your time with this important step.
Step 4: Stir in the Cream and Flavorings
Pour in the heavy cream, along with the optional vanilla extract and a pinch of salt. Gently stir using a spatula or wooden spoon until everything is well combined. The heavy cream will lend a decadent, custardy richness, while the salt balances the sweetness beautifully, creating a harmonious flavor in your cheesecake.
Step 5: Fold in the Flour
Sift the all-purpose flour into the batter, and with a gentle motion, fold it in using a spatula. Take care not to overmix, as you want to maintain the airy texture of the batter. This step adds a slight structure to the Burnt Basque Cheesecake without weighing it down, allowing it to rise beautifully.
Step 6: Pour and Prepare for Baking
Carefully pour the cheesecake batter into the prepared loaf pan, spreading it evenly. To catch any spills, place the loaf pan on a baking sheet. This extra precaution will keep your oven clean while also helping to bake the cheesecake evenly, so you achieve that perfect golden top.
Step 7: Bake to Perfection
Slide your baking sheet with the loaf pan into the preheated oven and bake for 40–45 minutes. Keep an eye on your Burnt Basque Cheesecake; it’s done when the edges are deeply browned, while the center remains jiggly. This contrast adds to its creamy allure, making every bite simply irresistible!
Step 8: Cool and Chill
Once baked, remove the cheesecake from the oven and allow it to cool completely at room temperature. Afterward, cover it and chill in the refrigerator for 2–4 hours, or ideally overnight. This waiting period enhances the flavors, resulting in a rich, mouthwatering slice every time you enjoy your Burnt Basque Cheesecake!

Expert Tips for Burnt Basque Cheesecake
Perfect Baking: Ensure your oven is correctly calibrated; an accurate temperature is crucial for achieving that burnt top without overcooking the center.
Avoid Sogginess: Use full-fat cream cheese and heavy cream to prevent a watery texture; don’t skimp on quality ingredients for the best results.
Chilling Time: The longer you chill your Burnt Basque Cheesecake, the better it becomes. Aim for at least four hours, but overnight is ideal!
Gentle Mixing: When folding in the flour, be gentle to maintain airiness. Overmixing can lead to a denser texture, which is less desirable.
Flavor Twists: Don’t hesitate to experiment! Add citrus zest or chocolate swirls to individualize your Burnt Basque Cheesecake—each twist adds a personal touch.
Make Ahead Options
These Burnt Basque Cheesecake delights are perfect for busy home cooks who want a delicious dessert ready to serve! You can prepare the entire cheesecake up to 24 hours in advance; simply bake, cool completely, and refrigerate until you’re ready to enjoy it. For optimal flavor, chill the cheesecake overnight, as this allows the flavors to meld beautifully. When it’s time to serve, simply unmold the cheesecake using the parchment overhang and slice it cold or let it sit at room temperature for about 15 minutes for a softer texture. This make-ahead approach ensures your dessert remains just as delicious, saving you precious time when entertaining guests or enjoying a post-dinner treat!
Burnt Basque Cheesecake Variations
Get ready to elevate your Burnt Basque Cheesecake with these delightful twists that will tickle your taste buds and make your dessert stand out!
-
Citrus Zest: Add lemon or orange zest for a burst of fresh flavor that brightens each bite.
-
Spiced Delight: Incorporate a pinch of cinnamon or nutmeg into the batter for a warm, cozy feel that’s perfect for chilly evenings.
-
Chocolate Swirl: Fold melted dark chocolate into the batter before baking for a rich, decadent surprise in every slice.
-
Savory Twist: Reduce the sugar and mix in some crumbled blue cheese with herbs for a sophisticated, savory version that’s sure to impress.
-
Nutty Crunch: Sprinkle chopped nuts like pecans or hazelnuts on top before baking for an added layer of texture and flavor that complements the creamy cheesecake.
-
Coffee Lover’s Dream: Swirl in some brewed espresso or add instant coffee granules to the batter for that delicious caffeine kick; it pairs beautifully with the rich creaminess.
-
Caramel Drizzle: After cooling, drizzle homemade or store-bought caramel sauce over the cheesecake for an irresistible touch of sweetness. It will make your guests swoon!
For even more delectable options, don’t forget to savor my rich Espresso Cheesecake Decadent or indulge in the enticing flavors of Vanilla Bean Cheesecake—each a treat worth savoring!
Storage Tips for Burnt Basque Cheesecake
Fridge: Keep your leftover Burnt Basque Cheesecake in an airtight container in the fridge for up to 4 days. The flavor continues to improve as it chills!
Freezer: To freeze, slice the cheesecake and wrap each piece tightly in plastic wrap, then place in a freezer-safe bag. Enjoy for up to 2 months.
Thawing: When ready to enjoy, transfer slices to the fridge for several hours or overnight to thaw gently. Serve chilled for the best taste and texture.
Reheating: This cheesecake is best enjoyed cold or at room temperature—avoid reheating to preserve its luscious creaminess!
What to Serve with Burnt Basque Cheesecake
With every creamy bite of the cheesecake, imagine a delightful meal crafted to complement its rich flavors and textures.
-
Fresh Berries: Juicy strawberries or tart raspberries provide a refreshing contrast to the cheesecake’s richness, adding vibrant color and flavor.
-
Creamy Whipped Cream: Lightly sweetened whipped cream adds a luscious touch, enhancing the dessert’s creamy profile without overpowering its flavor.
-
Citrus Zest: A sprinkle of lemon or orange zest brightens up the cheesecake, elevating its sweetness while offering a refreshing twist.
-
Chocolate Ganache: Drizzling silky-smooth chocolate ganache over the cheesecake mirrors its decadence, introducing luscious depth that chocolate lovers will crave.
-
Vanilla Ice Cream: A scoop of vanilla ice cream creates a delightful temperature contrast, melting into the warm, caramelized top while adding another layer of creaminess.
-
Espresso or Coffee: Serving your slice of cheesecake with a freshly brewed cup of espresso offers a rich and bold contrast, enhancing the dessert’s flavors while balancing its sweetness.
-
Powdered Sugar Dusting: A light dusting of powdered sugar adds an elegant touch, making your cheesecake visually appealing and subtly sweetening each bite.
Imagine savoring each element, crafting an unforgettable dessert experience that wraps your palate in flavors as enchanting as the Burnt Basque Cheesecake itself!
Burnt Basque Cheesecake Recipe FAQs
What type of cream cheese should I use for the Burnt Basque Cheesecake?
Absolutely! It’s best to use full-fat cream cheese to ensure a rich and creamy texture. Low-fat varieties can lead to a less-than-ideal, watery cheesecake. Look for high-quality brands for the best results, as they create the luxurious base that this dessert is known for.
How should I store leftover Burnt Basque Cheesecake, and for how long?
You can keep your leftover cheesecake in an airtight container in the fridge for up to 4 days. The flavor actually improves as it chills, so it’s a treat waiting to be savored! Make sure it’s well-covered; you want to protect that divine creaminess inside.
Can I freeze Burnt Basque Cheesecake? If so, how?
Yes, you can absolutely freeze this delicious cheesecake! I recommend slicing it first for easier serving later. Wrap each slice tightly in plastic wrap and place them in a freezer-safe bag or container. The cheesecake can be stored this way for up to 2 months. When you’re ready to indulge, simply transfer the slices to the fridge to thaw for several hours or overnight, and enjoy cold for the best taste!
What if my cheesecake cracks or doesn’t rise properly?
No worries, it happens! If your Burnt Basque Cheesecake cracks, don’t fret—its beauty is in its rustic charm. However, to prevent cracking in the future, make sure you don’t overmix the batter and monitor the baking time carefully. The edges should be brown, while the center remains slightly jiggly when you remove it from the oven. This texture is key to achieving that rich custard-like experience.
Is this cheesecake suitable for vegetarians?
Yes, it is! The Burnt Basque Cheesecake is a delightful vegetarian dessert, showcasing creamy goodness without any meat or fish products.
What can I use as alternatives for ingredients if I have allergies?
I recommend substituting heavy cream with coconut cream for a dairy-free option; it will maintain the lovely texture while being friendly to those avoiding dairy. If you need a gluten-free version, you can skip the all-purpose flour altogether, and the cheesecake will still be divine!
Decadent Burnt Basque Cheesecake You Can Make in a Loaf Pan
Ingredients
Equipment
Method
- Preheat your oven to 400°F (200°C) and line a 9x5 inch loaf pan with parchment paper.
- In a large mixing bowl, combine the softened full-fat cream cheese and granulated sugar. Beat until smooth.
- Incorporate the large eggs one at a time, mixing well after each addition.
- Stir in the heavy cream, optional vanilla extract, and salt until combined.
- Fold in the all-purpose flour gently to maintain airiness in the batter.
- Pour the cheesecake batter into the prepared loaf pan and place it on a baking sheet.
- Bake for 40–45 minutes until the edges are browned and the center remains jiggly.
- Cool completely at room temperature and then chill in the refrigerator for 2–4 hours or overnight.
Leave a Reply