
There’s something magical about the first bite of a cookie that just melts into your mouth, and these Mint Chocolate Chip Snowball Cookies deliver that blissful experience perfectly. As soon as the cool mint and rich chocolate mingle on your palate, you’ll understand why they’re a go-to choice for holiday gatherings and gift-giving. With their luscious texture and festive powdered sugar coat, they are not only effortless to whip up but also delightfully customizable—feel free to swap in your favorite chocolate for a personal twist! Whether you’re entertaining guests or simply indulging in a moment of self-care, these charming cookies are sure to bring a sprinkle of joy to your day. Intrigued to learn how to make your kitchen smell like a winter wonderland? Let’s dive into this delightful recipe!
What Makes These Cookies Irresistible?
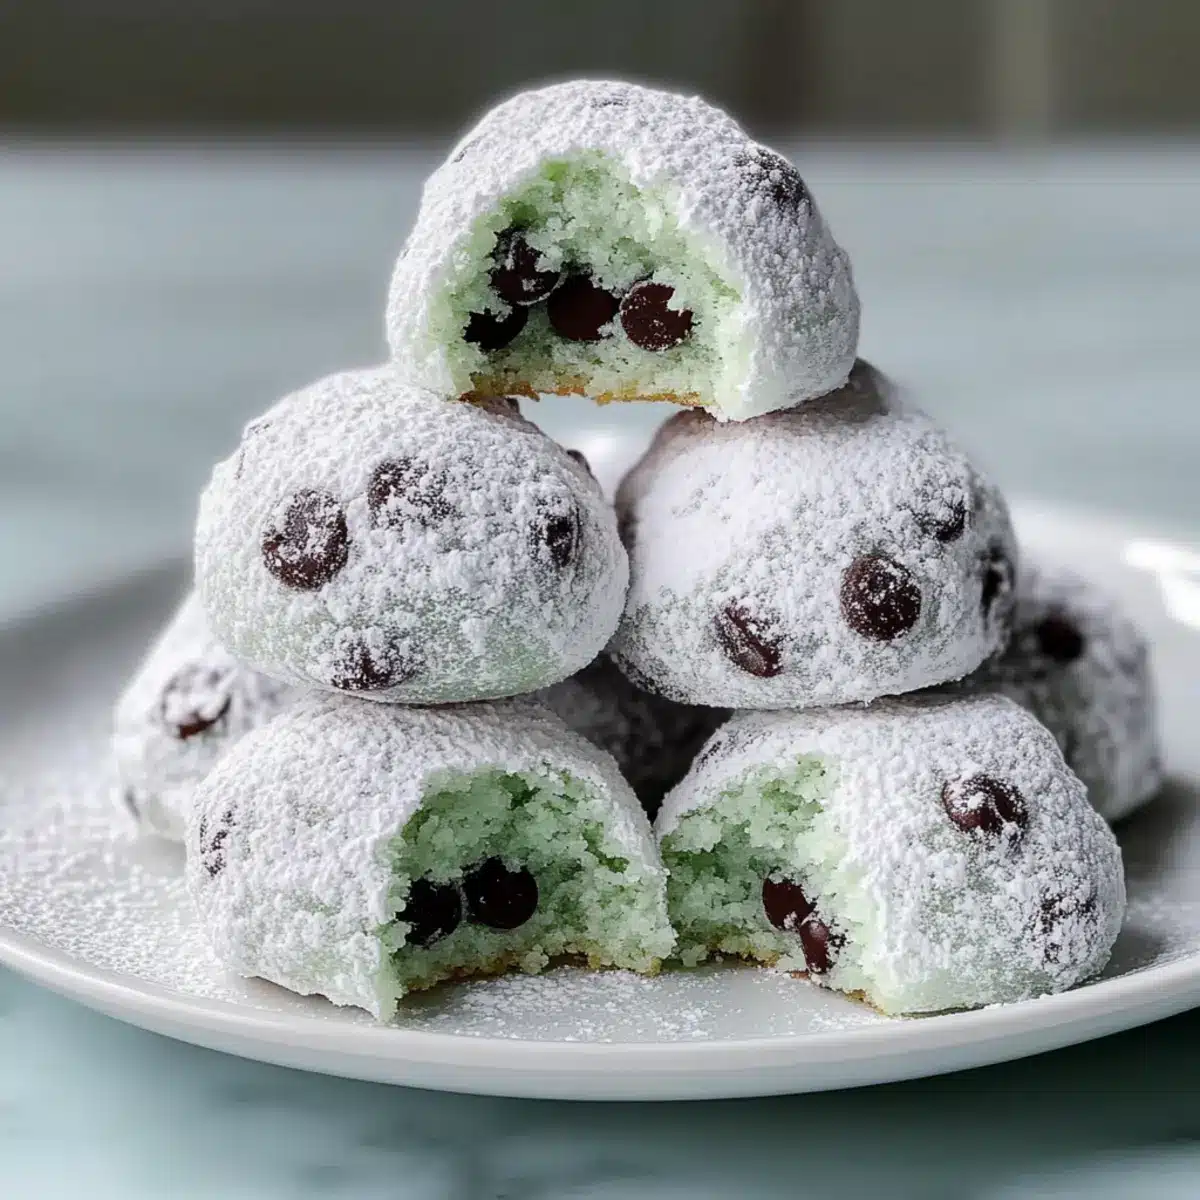
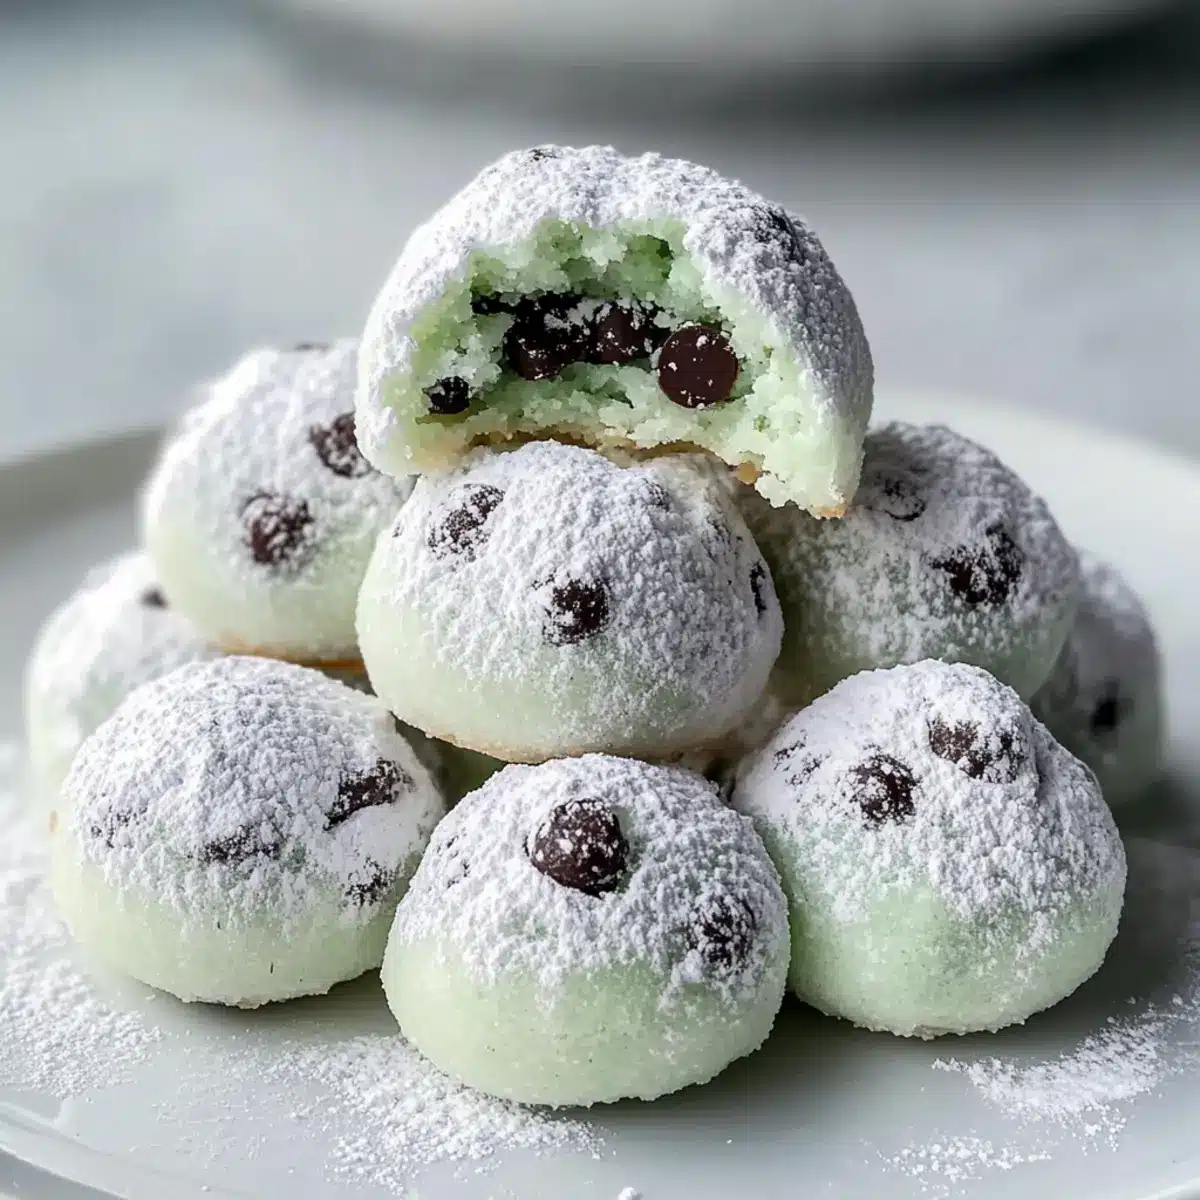
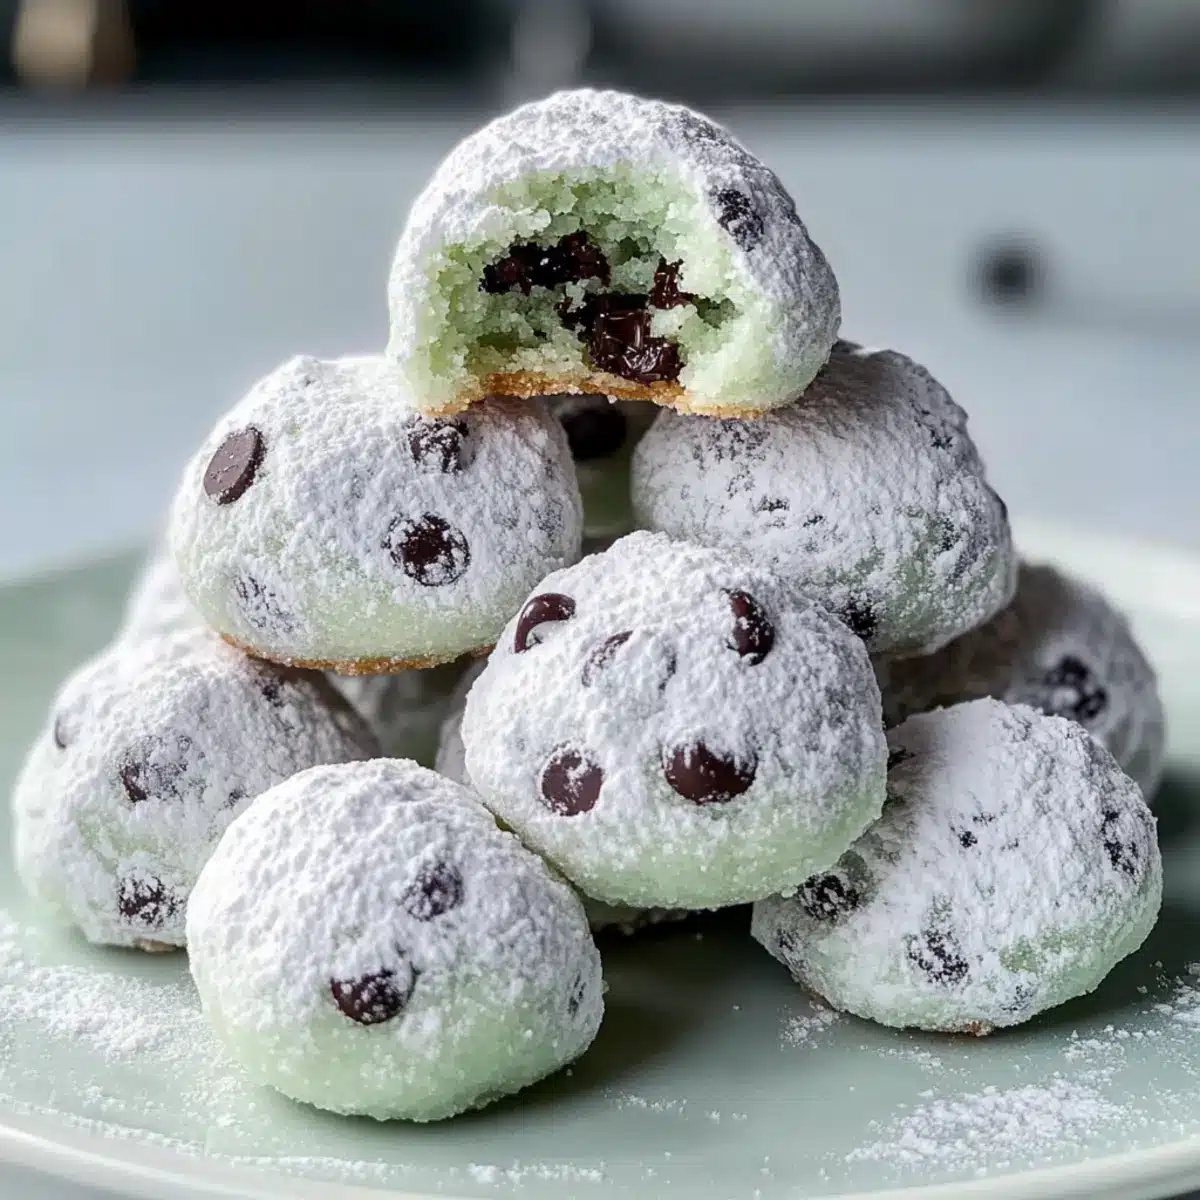
Melt-in-your-mouth bliss: These Mint Chocolate Chip Snowball Cookies are a symphony of soft textures, combining buttery richness with cool mint and rich chocolate bursts in every bite. Effortlessly simple to prepare, even novice bakers can impress with this forgiving recipe. Versatile variations allow you to customize with dark or white chocolate chips, or even add a festive touch with crushed candy canes. Perfect for gifting, their elegant appearance will delight family and friends alike. Serve them alongside a cup of hot cocoa or vanilla ice cream for the ultimate cozy dessert experience!
Mint Chocolate Chip Snowball Cookies Ingredients
-
For the Dough
-
Unsalted Butter – Ensures richness and moisture; soften beforehand for easy blending.
-
Granulated Sugar – Provides sweetness and texture; substitute with a sugar alternative if desired.
-
Pure Vanilla Extract – Enhances flavor; you can use imitation if needed.
-
Peppermint Extract – Infuses minty freshness; adjust based on your mint preference.
-
All-Purpose Flour – Gives structure; for a gluten-free version, use a 1:1 gluten-free flour mix.
-
Salt – Balances sweetness; a small amount goes a long way.
-
Mini Chocolate Chips – Adds delightful chocolate bursts; swap with dark or milk chocolate if you prefer.
-
For the Coating
-
Powdered Sugar – Rolls the cookies in snowy sweetness; essential for that festive finish!
-
Green Food Coloring (optional) – Adds a fun, festive hue to your dough if desired.
Embrace the delightful magic of Mint Chocolate Chip Snowball Cookies this season—these ingredients will pave the way for an enchanting baking experience!
Step‑by‑Step Instructions for Mint Chocolate Chip Snowball Cookies
Step 1: Preheat and Prepare
Begin by preheating your oven to 350°F (175°C). While it warms up, line your baking sheets with parchment paper to prevent the Mint Chocolate Chip Snowball Cookies from sticking. Having everything ready will make the baking process smoother and more enjoyable, ensuring that you’re set up for success!
Step 2: Whisk the Dry Ingredients
In a medium-sized mixing bowl, whisk together the all-purpose flour and salt until evenly combined. This crucial step helps distribute the salt throughout the flour, which enhances the overall flavor of your cookies. Once mixed, set the bowl aside—you’ll incorporate this mixture into the dough shortly.
Step 3: Cream the Butter and Sugar
In a large mixing bowl, beat the softened unsalted butter using a hand mixer or stand mixer until creamy, which should take about 1-2 minutes. Gradually add the granulated sugar, continuing to mix until the mixture becomes light and fluffy, usually about 3-5 minutes. This aeration stage is vital for achieving that melt-in-your-mouth texture!
Step 4: Add Flavorings and Color
Mix in the pure vanilla and peppermint extracts to the creamy butter and sugar mixture. If you want to add a festive touch, incorporate a few drops of green food coloring until you reach your desired shade. This brings the Mint Chocolate Chip Snowball Cookies to life with a cheerful hue that matches their delightful taste.
Step 5: Incorporate Dry Ingredients
With the mixer on low speed, gradually add the flour mixture into the wet ingredients. Mix until just combined to avoid overmixing, which can toughen the cookies. Stop when you see a few streaks of flour remaining; this ensures the cookies will be tender.
Step 6: Fold in the Chocolate Chips
Gently fold in the mini chocolate chips with a spatula, evenly distributing them throughout the dough. This step is about keeping the dough light while ensuring rich chocolatey bites in every Mint Chocolate Chip Snowball Cookie.
Step 7: Chill the Dough
Once your dough is ready, wrap it tightly in plastic wrap and refrigerate for 30-60 minutes. Chilling solidifies the fat in the dough, helping the cookies maintain their shape while baking. This step also allows the flavors to meld beautifully, enhancing the final taste!
Step 8: Shape the Cookies
After chilling, scoop out dough using a tablespoon or cookie scoop and roll it into 1-inch balls. Arrange them on the prepared baking sheets, leaving some space between each ball for the cookies to spread while baking.
Step 9: Bake the Cookies
Place the baking sheets in the preheated oven and bake for 10-12 minutes. You’re looking for lightly golden edges while the centers remain pale and soft. Avoid overbaking to maintain that delicious, melt-in-your-mouth texture characteristic of Mint Chocolate Chip Snowball Cookies.
Step 10: Cool and Sugar Coat
After baking, allow the cookies to cool on the sheets for 5-10 minutes. This rest period makes them easier to handle. Once cooled, roll them gently in powdered sugar for a beautiful snowy finish; this will enhance both sweetness and visual appeal.
Step 11: Second Coating
For an extra sweet touch, after the cookies have cooled completely, roll them again in a second bowl of powdered sugar. This final coating ensures each Mint Chocolate Chip Snowball Cookie is generously dusted, giving them that signature winter wonderland look before serving!

How to Store and Freeze Mint Chocolate Chip Snowball Cookies
-
Room Temperature: Store cookies in an airtight container at room temperature for up to 5 days to maintain freshness. Avoid placing them in direct sunlight to prevent drying out.
-
Fridge: For longer storage, keep the Mint Chocolate Chip Snowball Cookies in an airtight container in the fridge for up to a week. Allow them to come to room temperature before enjoying for the best texture.
-
Freezer: Freeze cookies by placing them in a single layer on a baking sheet until solid, then transfer to a freezer-safe bag or container. They can be frozen for up to 3 months. Roll in powdered sugar again after thawing for that snowy finish.
-
Reheating: When ready to enjoy, simply let the frozen cookies thaw at room temperature. For a warm treat, microwave for 10-15 seconds.
What to Serve with Melt-in-Your-Mouth Mint Chocolate Chip Snowball Cookies
Indulging in these minty delights creates a joyful experience, and pairing them with the right accompaniments can take your dessert game even further.
- Hot Chocolate: Sipping warm cocoa enhances the minty flavor while creating a cozy vibe, perfect for chilly evenings.
- Vanilla Ice Cream: The creamy vanilla contrasts beautifully with the cookies’ minty crunch, turning each bite into a delightful treat.
- Peppermint Tea: A soothing cup balances the sweetness and adds a refreshing herbal note, making for a calming dessert experience.
- Chocolate Covered Strawberries: The rich chocolate and juicy fruit offer a delightful textural contrast that complements the cookies perfectly.
- Christmas Fruitcake: The blend of spices and fruits in fruitcake echoes the holiday spirit, making it a festive pairing for gatherings.
Imagine sharing these joyful combinations with loved ones, turning your dessert table into a celebration of flavors and textures!
Make Ahead Options
These Mint Chocolate Chip Snowball Cookies are perfect for meal prep, allowing you to save time on busy days! You can prepare the cookie dough and refrigerate it up to 24 hours in advance, ensuring the flavors meld beautifully. Simply wrap the dough tightly in plastic wrap to prevent it from drying out. Alternatively, you can scoop and roll the dough into balls, then freeze them for up to 3 months. When you’re ready to bake, there’s no need to thaw; just pop the frozen cookie balls directly into the oven, adding a minute or two to the baking time. You’ll enjoy the same delightful texture and flavor without the hassle of last-minute preparation!
Mint Chocolate Chip Snowball Cookies Variations
Feel free to add your own unique twist to these delightful snowball cookies for an extra burst of flavor and fun!
-
Chocolate Type: Swap mini chocolate chips for dark or white chocolate for a different taste experience. Each variation brings its own charm to the cookies!
-
Mint Boost: Add an extra dash of peppermint extract for a more intense mint flavor. Just remember—a little goes a long way.
-
Candy Cane Crumble: After baking, sprinkle crushed candy canes on top for a festive crunch. The combination of mint and candy cane will transport you to a winter wonderland!
-
Nutty Delight: Fold in some chopped walnuts or pecans for a surprising texture twist. The nuttiness beautifully balances the sweetness of the chocolate and mint.
-
Cocoa Twist: For chocolate lovers, roll the cookies in a mix of powdered sugar and cocoa powder instead of just powdered sugar. This creates a decadent, chocolatey exterior that’s hard to resist!
-
Flavor Infusion: Experiment with adding a hint of orange zest to the dough for a cheerful citrus twist alongside the mint. It complements the flavors wonderfully and adds a nice pop of brightness.
-
Espresso Lift: For coffee enthusiasts, consider mixing in a teaspoon of instant espresso powder. It enhances the chocolate flavor and adds a delightful richness.
-
Vegan Version: Substitute butter with coconut oil or a plant-based butter spread and use your favorite non-dairy milk to create a vegan-friendly snowball cookie. They’ll still have that melt-in-your-mouth texture!
With these variations, you can make these cookies your own! If you’re looking for other delicious ideas, you might enjoy the rich flavors of Mint Chocolate Chip or the comforting taste of Chewy Pumpkin Chocolate cookies. Enjoy baking and creating!
Helpful Tricks for Mint Chocolate Chip Snowball Cookies
-
Butter Consistency: Make sure your butter is softened but not melted to achieve a creamy mixture. This is key for that melt-in-your-mouth texture.
-
Chill the Dough: Don’t skip chilling the dough for 30-60 minutes. This prevents the cookies from spreading too much during baking, ensuring they maintain their shape.
-
Mind the Baking Time: Bake until the edges are just lightly golden; the centers should remain pale. Overbaking can lead to tough cookies, losing that delightful melt-in-your-mouth quality.
-
Double Sugar Coating: For an extra touch of sweetness and a festive look, roll the cookies in powdered sugar after baking and again after cooling completely.
-
Customizable Flavors: Feel free to experiment with different chocolate chip varieties or add crushed candy canes for a unique twist on your Mint Chocolate Chip Snowball Cookies!
Mint Chocolate Chip Snowball Cookies Recipe FAQs
How do I choose ripe ingredients?
When selecting ingredients for Mint Chocolate Chip Snowball Cookies, ensure that your unsalted butter is softened at room temperature, which helps in mixing smoothly. The granulated sugar should be free of clumps and, if using alternatives, ensure they are compatible with baking. Fresh extracts (vanilla and peppermint) can elevate the flavor, so look for pure options whenever possible.
What’s the best way to store these cookies?
To maintain freshness, store your Mint Chocolate Chip Snowball Cookies in an airtight container at room temperature for up to 5 days. If you prefer to keep them longer, place them in the refrigerator, and they can last up to a week. Always allow them to come to room temperature before indulging for that melt-in-your-mouth experience!
Can I freeze these cookies?
Absolutely! To freeze Mint Chocolate Chip Snowball Cookies, lay them out in a single layer on a baking sheet until they are firm. Then, transfer them to a freezer-safe bag or container. They can stay frozen for up to 3 months. When ready to enjoy, simply thaw them at room temperature and roll them in powdered sugar again for a delightful snowy finish.
What should I do if my cookies spread too much while baking?
If your Mint Chocolate Chip Snowball Cookies tend to spread, it may be due to insufficient chilling time or overly warm dough. Make sure to chill the dough for at least 30-60 minutes before baking. Additionally, check that the butter is softened but not melted and also confirm the oven temperature with a thermometer; an incorrect temp can lead to unexpected spreading.
Are there any dietary considerations for these cookies?
When it comes to dietary restrictions, these Mint Chocolate Chip Snowball Cookies can be adapted! For gluten-free options, use a 1:1 gluten-free flour blend. If you are concerned about allergies, substitutes such as coconut sugar and dairy-free chocolate chips can be used. Always check individual ingredient labels to cater to any specific allergies or dietary preferences.
Melt-in-Your-Mouth Mint Chocolate Chip Snowball Cookies Recipe
Ingredients
Equipment
Method
- Preheat your oven to 350°F (175°C) and line your baking sheets with parchment paper.
- In a medium bowl, whisk together the all-purpose flour and salt.
- In a large bowl, beat the softened unsalted butter until creamy. Gradually add granulated sugar and mix until light and fluffy.
- Mix in pure vanilla and peppermint extracts. Optionally, add green food coloring.
- Gradually add the flour mixture and mix until just combined.
- Gently fold in mini chocolate chips.
- Wrap the dough in plastic wrap and refrigerate for 30-60 minutes.
- Scoop dough into 1-inch balls and arrange on the prepared baking sheets.
- Bake for 10-12 minutes or until edges are lightly golden.
- Cool on sheets for 5-10 minutes, then roll in powdered sugar.
- For extra sweetness, roll the cookies in powdered sugar again after they cool completely.
Leave a Reply