
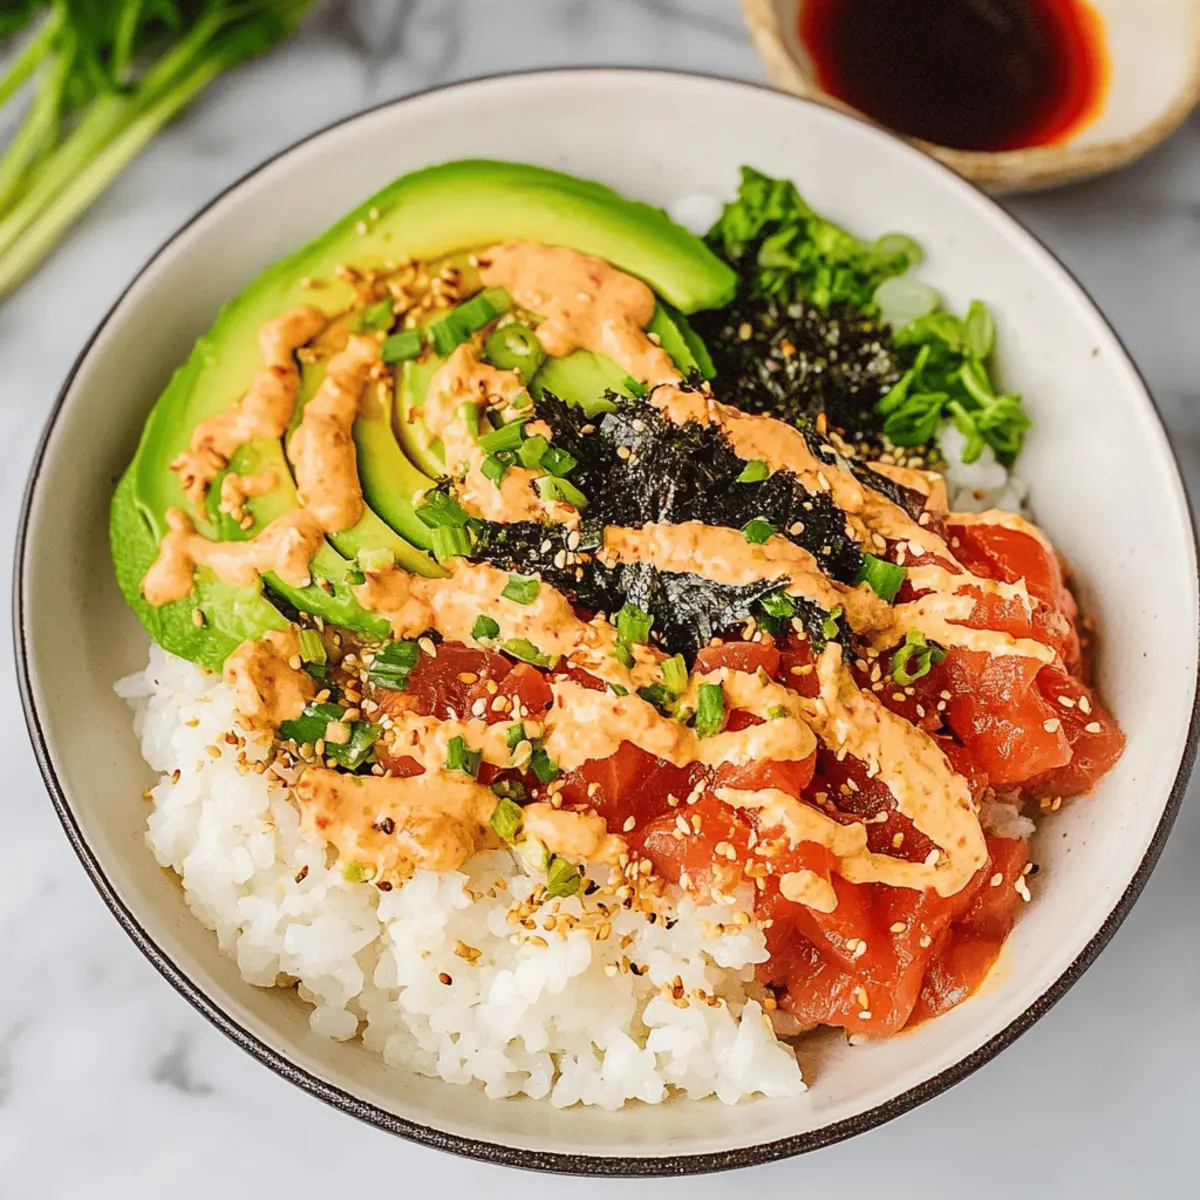
As I stood in my kitchen, the familiar sound of a can opener echoed, whispering of simple solutions too often overlooked. Enter the Canned Tuna Sushi Bowl, a vibrant twist on traditional sushi that brings the heart of Japanese cuisine right to our dinner table without the fuss. What I love most about this dish is not just its dazzling mix of colors and flavors, but also its quick prep time and protein-packed goodness. Trust me, on those busy weeknights, this easy recipe will become your go-to for a satisfying meal that the whole family will adore. Are you ready to discover how a little canned tuna can spark joy in your cooking?
Why is this recipe a must-try?
Simplicity at Its Finest: This Canned Tuna Sushi Bowl comes together in under 30 minutes, making it perfect for busy weeknights.
Protein-Packed Goodness: With protein-rich tuna and creamy avocado, this dish keeps you full without feeling heavy.
Customizable Delight: Feel free to swap in your favorite toppings—edamame, cucumbers, or even leftover veggies.
Kid-Approved Flavor: The zesty bang bang sauce gives a flavor boost that kids will love, making dinner a breeze.
Budget-Friendly: Utilizing canned tuna makes this recipe economical, allowing you to enjoy a gourmet experience without breaking the bank.
If you enjoy easy and customizable meals, you might also love exploring my Burger Bowls with Caramelized Onion Aioli or the delightful Coconut Chicken Rice Bowl for more family-friendly choices!
Canned Tuna Sushi Bowl Ingredients
For the Sushi Rice
• Cooked Sushi Rice – This seasoned base offers the perfect texture; feel free to swap with any white rice if sushi rice isn’t available.
• Olive Oil – Used for pan-frying; it gives the rice a crispy texture—neutral oil can be a great substitute.
• Salt and Black Pepper – Adjust to taste for the ultimate flavor.
For the Tuna Mixture
• Canned Tuna – The star protein of this dish, drained canned tuna in oil adds the best flavor; canned salmon is a tasty alternative.
• Bang Bang Sauce – This creamy, spicy element elevates the dish; homemade or store-bought spicy mayo works beautifully!
• Sriracha Sauce – For those who crave a bit of heat; any preferred hot sauce can also be used.
For the Toppings
• Avocado – Ensure it’s perfectly ripe for a creamy texture that blends beautifully.
• Scallions (Green Onions) – Chopped for a fresh pop of color and taste; shallots can provide a nice substitution.
• Furikake – A Japanese rice seasoning that brightens flavors; nori or other seaweed types can make for an excellent alternative.
Remember, this Canned Tuna Sushi Bowl is as versatile as your imagination allows! Customize by adding any favorite ingredients you have on hand.
Step‑by‑Step Instructions for Canned Tuna Sushi Bowl
Step 1: Cook Sushi Rice
If you haven’t prepared sushi rice yet, rinse 1 cup of sushi rice under cold water until the water runs clear, then cook according to package instructions. Once it’s cooked, while it’s still warm, season the rice with a mixture of rice wine vinegar, sesame oil, and a pinch of sugar. Stir gently to combine and then set aside to cool slightly.
Step 2: Prepare Toppings
In a mixing bowl, add one drained can of tuna and mix it with a dollop of bang bang sauce, adjusting the amount according to your spice preference. While the tuna marinates, slice half an avocado into thin pieces and chop a handful of scallions (green onions) for a fresh touch. This step builds the delightful components for your Canned Tuna Sushi Bowl.
Step 3: Pan-Fry the Rice (Optional)
Heat a non-stick skillet over medium heat and add 1 tablespoon of olive oil. Once the oil is shimmering, carefully press the prepared sushi rice into an even layer in the skillet. Allow it to cook for 3-5 minutes, or until the bottom is golden brown and crispy. Flip the rice using a spatula, cooking for an additional minute and then remove it from heat.
Step 4: Assemble the Bowl
In a serving bowl, layer the crispy rice at the bottom, creating a solid base. Top the rice with the tuna mixture, ensuring an even distribution. Next, arrange the creamy slices of avocado and sprinkle chopped scallions over the top. To finish, add a generous sprinkle of furikake and drizzle with Sriracha or extra bang bang sauce for that perfect finishing touch. Serve immediately and enjoy your delicious Canned Tuna Sushi Bowl!
Expert Tips for Canned Tuna Sushi Bowl
-
Perfectly Cooked Rice: Ensure sushi rice is cooked al dente to avoid mushiness. Rinse it well before cooking for the right texture.
-
Balance Flavors: Taste as you go! Adjust bang bang sauce and Sriracha levels to suit your family’s spice preferences in the Canned Tuna Sushi Bowl.
-
Crispy Delight: For extra crunch, avoid stirring the rice too much in the skillet—let it sit to form a crispy bottom.
-
Fresh Ingredients: Always use ripe avocado and fresh scallions for enhanced flavor and texture—these details make your dish shine!
-
Keep It Economical: Use canned tuna as the main ingredient but feel free to customize with leftover veggies, making this dish both economical and adaptable.
Canned Tuna Sushi Bowl Variations
Feel free to explore these delightful twists that will take your Canned Tuna Sushi Bowl to the next level!
-
Protein Swap: Replace canned tuna with canned salmon or even cooked shrimp for a unique protein experience. Each option brings a different flavor burst to your bowl.
-
Quick Rice Hack: Use leftover rice to save time; it retains seasoning well and allows for a fast meal on busy nights.
-
Texture Change: Swap avocado for edamame or diced cucumber to add a refreshing crunch to your bowl. These swaps make for a fun crunch against the creamy elements.
-
Flavor Kick: Enhance your dish by adding pickled ginger or wasabi on the side. These traditional sushi accompaniments offer an extra zing that pairs beautifully with the rich flavors.
-
Vegetarian Twist: For a meat-free option, use tofu marinated in soy sauce instead of tuna. It absorbs flavors well and contributes a hearty texture.
-
Spice Level: Adjust the heat by mixing in sriracha or using a spicier version of the bang bang sauce. This gives you the freedom to tailor the heat level just as you like it.
-
Seaweed Boost: Incorporate nori strips or wakame for an umami kick, adding depth without overpowering the bowl’s primary flavors.
-
Grain Variation: Substitute sushi rice with quinoa or brown rice for a nutty flavor and a nutritional boost. Both grains bring a delightful earthiness to the dish.
Customizing your Canned Tuna Sushi Bowl is a joy. With these ideas, you’ll create a deliciously unique meal every time! And while you’re at it, why not check out my fresh take on Mediterranean Chicken Tzatziki Bowls for another customizable delight?
How to Store and Freeze Canned Tuna Sushi Bowl
Fridge: Store leftover Canned Tuna Sushi Bowl in an airtight container for up to 2 days. Keep the tuna and toppings separate from the rice to maintain freshness.
Freezer: This dish can be frozen for up to 1 month, but it’s best to freeze only the rice. After cooling, wrap it tightly in plastic wrap, then place in a freezer-safe bag.
Reheating: Reheat the rice directly from frozen; microwave for 1-2 minutes or pan-fry until heated through. Add fresh toppings after reheating for the best texture.
Assembly Reminder: For optimal taste, assemble the bowl just before serving, mixing the rice with the fresh tuna and toppings for a delightful meal any night of the week.
Make Ahead Options
These Canned Tuna Sushi Bowls are perfect for meal prep enthusiasts! You can prepare the sushi rice up to 24 hours in advance; just cool it completely before refrigerating in an airtight container to maintain its texture. The tuna mixture can also be prepared ahead and stored in the fridge for up to 3 days; just mix it with bang bang sauce right before serving to keep it fresh. When you’re ready to enjoy your bowl, simply pan-fry the rice in a skillet for that delightful crispiness, assemble with the tuna and toppings, and you’ll have a delicious, quick meal that feels like a treat with minimal effort.
What to Serve with Canned Tuna Sushi Bowl
The perfect meal isn’t just about the centerpiece; it’s about crafting a delightful experience with complementary flavors and textures.
-
Seaweed Salad: Light and refreshing, this salad adds a savory umami flavor that pairs beautifully with the sushi bowl’s rich toppings.
-
Asian Cucumber Salad: Crisp cucumbers tossed in a tangy sesame dressing bring a cool crunch, balancing the warmth of the pan-fried rice.
-
Miso Soup: A warm bowl of miso soup offers a comforting embrace, with its earthy flavors enhancing the entire dining experience.
-
Edamame: These steamed green soybeans provide a satisfying pop of protein and a fresh contrast to the bowl’s creaminess.
-
Pickled Ginger: A small side of pickled ginger cleanses the palate, adding a zesty kick that complements the rich bang bang sauce.
-
Green Tea: This fragrant tea offers a light, refreshing drink choice, perfectly cleansing the palate and enhancing your meal.
-
Mochi Ice Cream: For dessert, this sweet and chewy treat comes in various flavors, providing a delightful finish to your meal.
Let your dining table be a canvas that showcases not only the Canned Tuna Sushi Bowl but also flavors that dance together in harmony!
Canned Tuna Sushi Bowl Recipe FAQs
How do I choose the best canned tuna for this recipe?
Absolutely! When selecting canned tuna, look for options packed in oil for richer flavor. It’s best to choose tuna that specifies “skipjack” or “albacore” to ensure quality. Make sure to check the expiration date on the can and avoid any that show signs of denting or damage.
How should I store leftovers of the Canned Tuna Sushi Bowl?
Very! Store leftovers in an airtight container in the fridge for up to 2 days. To keep the components fresh, I recommend keeping the tuna and toppings separate from the rice until ready to eat. Reheat the rice before adding fresh toppings to enjoy optimal textures and flavors.
Can I freeze any part of the Canned Tuna Sushi Bowl?
Yes, you can freeze! For the best results, only freeze the sushi rice. Once it has cooled, wrap it tightly in plastic wrap and then place it in a freezer-safe bag, where it can stay fresh for up to 1 month. When you’re ready to enjoy it again, simply reheat it directly from frozen—microwaving for 1-2 minutes should do the trick!
What if my sushi rice turns out mushy?
Oh no! If your rice does turn out mushy, there are a few steps you can take. First, ensure you’ve rinsed your rice well before cooking to remove excess starch. If it’s mushy after cooking, you can try spreading it on a baking sheet and letting it cool for a bit; this can help to dry it out a little. Also, cooking it with a bit less water next time can really help maintain the ideal texture.
Is this recipe suitable for someone with seafood allergies?
It’s important to consider! If you or someone you’re cooking for has seafood allergies, I suggest swapping out the canned tuna for a protein like shredded chicken or even a plant-based option, such as marinated tofu. You can still enjoy the same zesty flavors with the bang bang sauce and enjoy a delicious meal safely!

Savory Canned Tuna Sushi Bowl That's Quick and Easy
Ingredients
Equipment
Method
- Rinse 1 cup of sushi rice under cold water until the water runs clear, then cook according to package instructions. Season the rice with a mixture of rice wine vinegar, sesame oil, and a pinch of sugar.
- In a mixing bowl, add one drained can of tuna and mix it with a dollop of bang bang sauce. While the tuna marinates, slice half an avocado and chop scallions.
- Heat a non-stick skillet over medium heat and add 1 tablespoon of olive oil. Press the sushi rice into an even layer, cooking until golden brown and crispy.
- In a serving bowl, layer the crispy rice at the bottom, top with the tuna mixture, avocado slices, and chopped scallions. Sprinkle with furikake and drizzle with Sriracha or extra bang bang sauce.
Leave a Reply