
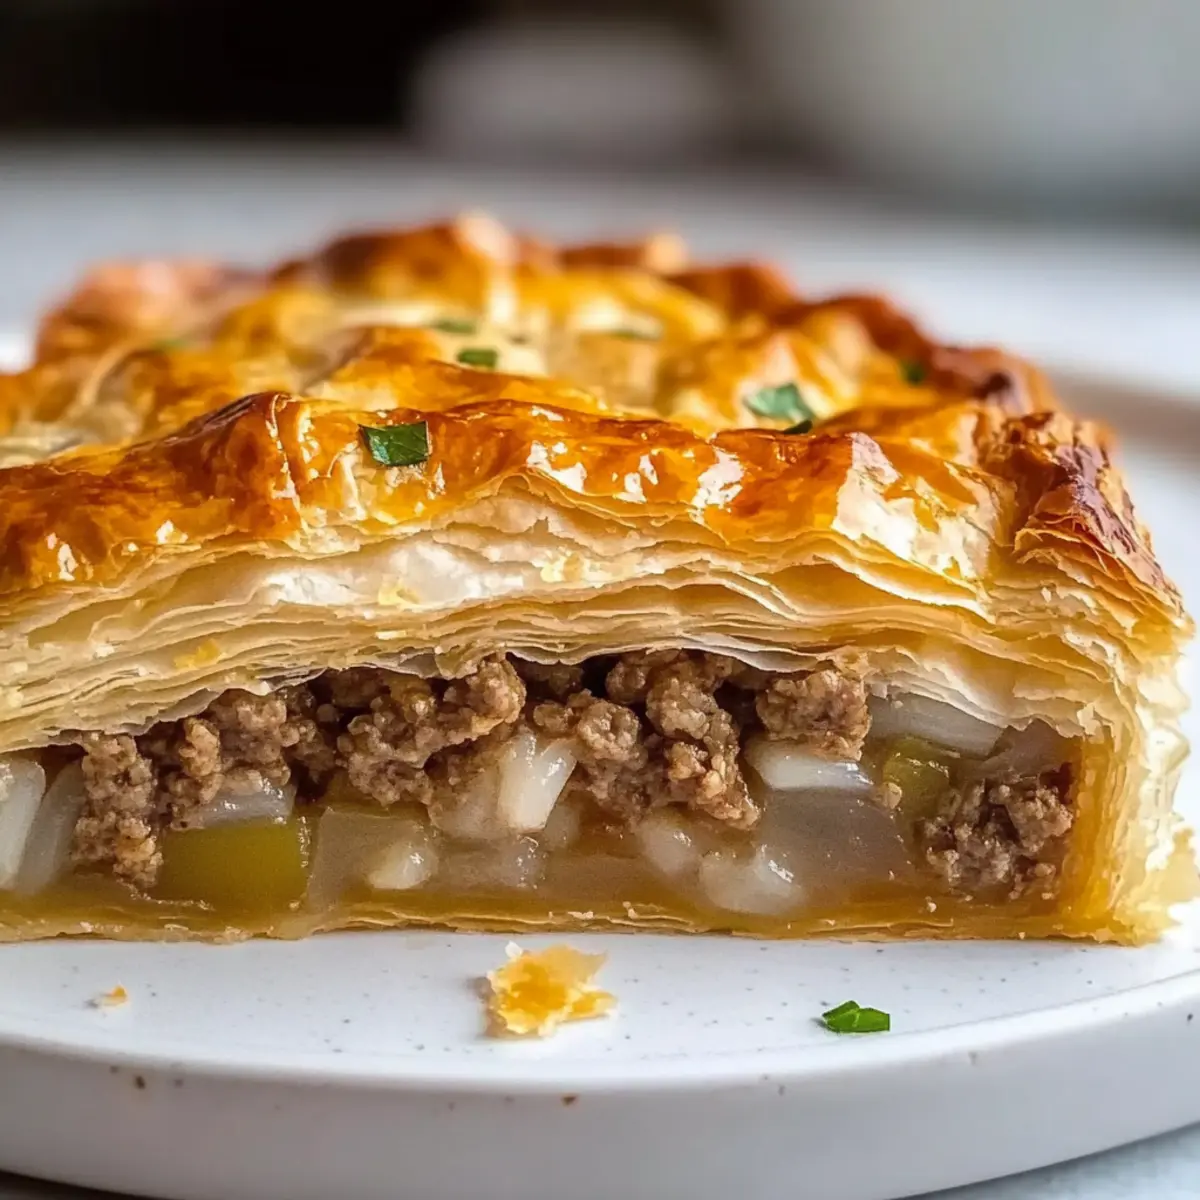
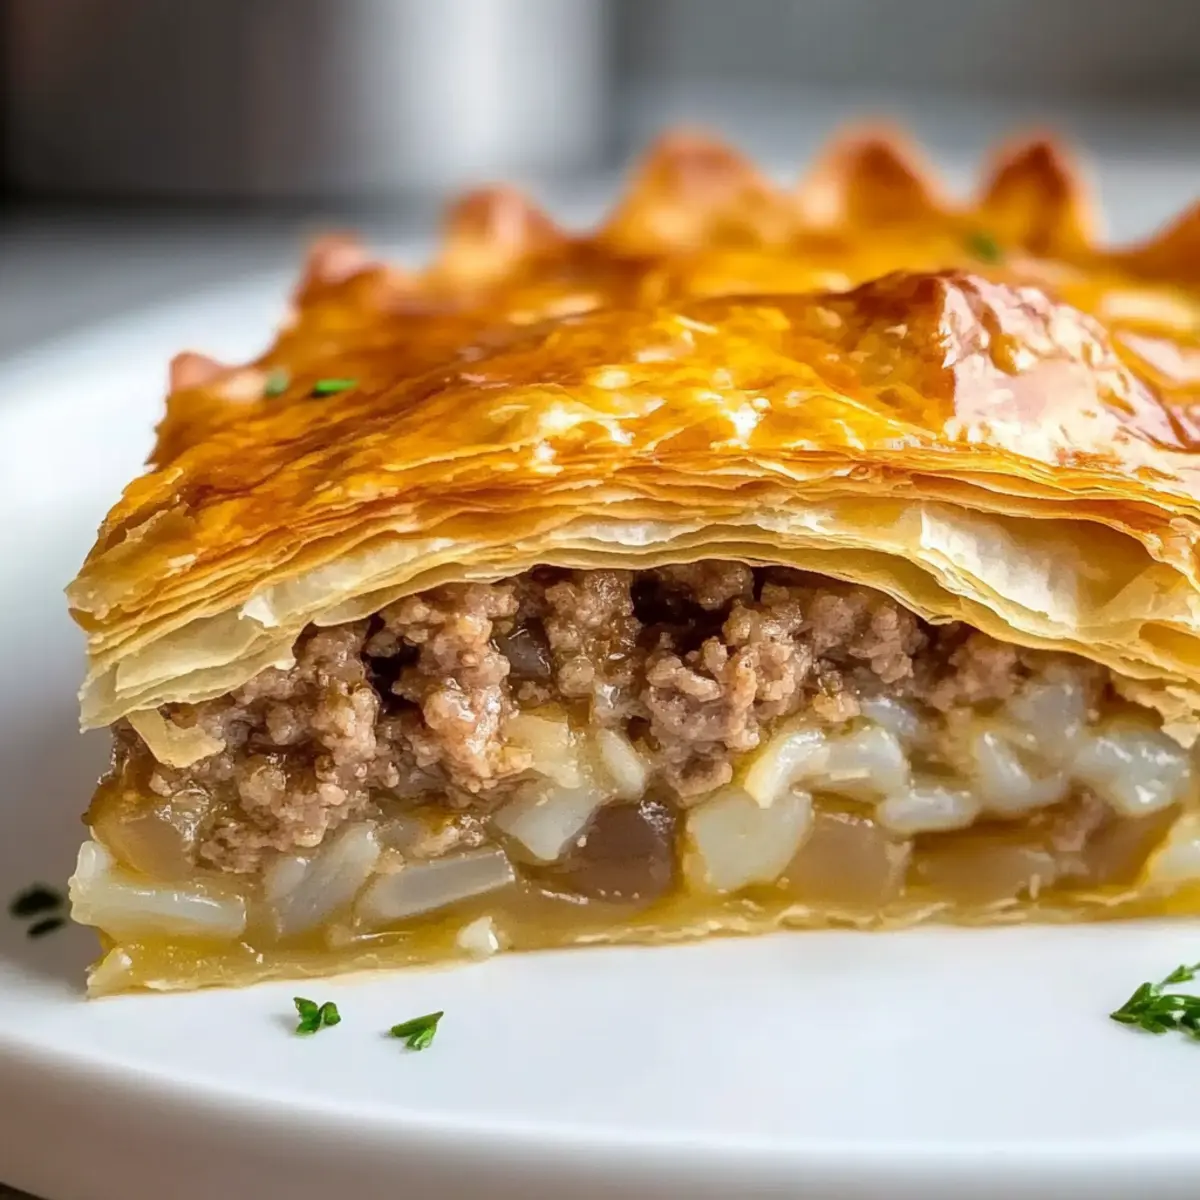
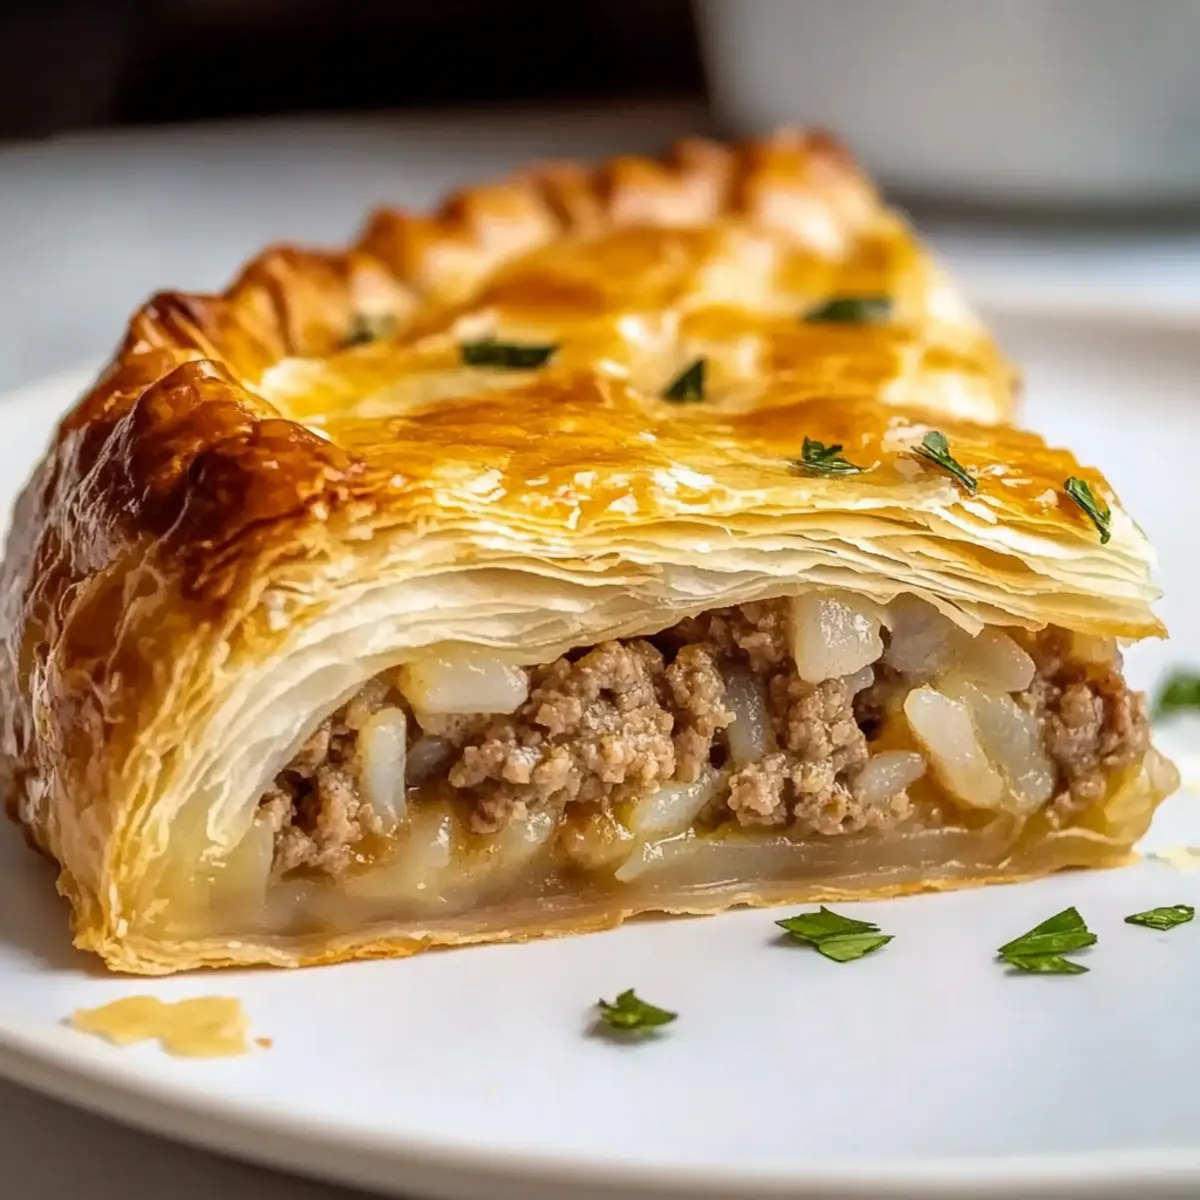
As I rolled out the delicate layers of phyllo dough, I could feel the excitement bubbling just beneath the surface—today, I’m making Kreatopita, the beloved Greek meat pie that has been a family favorite for generations. This scrumptious dish not only boasts a flaky texture but also an irresistible filling of tender beef and aromatic spices, making it perfect for cozy weeknight dinners or special gatherings. What I adore most about this recipe is how uncomplicated it is to prepare, making it an ideal choice for both novice cooks and seasoned kitchen warriors alike. Plus, it’s a guaranteed crowd-pleaser that will inspire even the most devoted fast-food lovers to rethink their takeout habits. Are you ready to embark on this culinary adventure and bring a taste of Greece into your home?

Why is Kreatopita a Must-Try?
Simplicity at Its Core: This Kreatopita is unbelievably easy to make, with straightforward steps that even beginner cooks can confidently follow.
Comforting Flavors: The rich blend of spices and herbs in the filling enhances the hearty flavor, ensuring each bite is a heavenly experience.
Crispy Perfection: The phyllo pastry delivers a delightful crunch that complements the savory filling beautifully, making it a treat for the senses.
Versatile Dish: You can easily customize this pie—swap ground beef for lamb, or even experiment with quinoa for a healthier option!
Impressive Presentation: Whether for a family dinner or a festive gathering, this dish is sure to impress your guests and become a cherished favorite in no time.
For more comforting recipes, don’t forget to check out my post on Savory Spanakopita for another delightful Greek experience!
Kreatopita Ingredients
• Let’s gather everything you need for this hearty Greek classic!
For the Filling
- Ground Beef – Provides a rich flavor base and is perfect for this Kreatopita. Substitute with ground lamb for an authentic twist.
- Onion – Adds sweetness and depth; finely chop for an even texture in your filling.
- Tomato Sauce – Brings moisture and tang; feel free to use diced tomatoes for a chunkier filling.
- Rice – Acts as a binder, providing a satisfying texture; white rice is best, but consider par-cooking brown rice if that’s what you have.
- Oregano – Imparts an herby essence; if unavailable, Italian seasoning is a suitable alternative.
- Salt and Pepper – Essential for enhancing the flavors; adjust according to your taste preferences.
For the Crust
- Phyllo Dough – Creates that coveted crispy, flaky crust; you could use puff pastry, but the texture will differ.
- Butter or Oil – Used for brushing the phyllo, adding flavor and aiding in browning; olive oil provides a lovely Mediterranean flair.
Get ready to savor each delightful bite of this Kreatopita, bringing the warmth of Greek comfort food right to your kitchen!
Step‑by‑Step Instructions for Kreatopita
Step 1: Sauté the Onion
Heat a drizzle of oil in a large skillet over medium heat. Add the finely chopped onion and sauté for about 5-7 minutes, or until the onion is soft and translucent, releasing a sweet aroma. This step is crucial as it forms the flavorful base for your Kreatopita filling.
Step 2: Brown the Beef
Add the ground beef to the skillet, breaking it apart with a wooden spoon. Cook for 8-10 minutes, stirring until the meat is browned and no longer pink. Ensure that any excess fat is drained away, as you want a wholesome filling for your pie.
Step 3: Combine Ingredients
Stir in uncooked rice, tomato sauce, oregano, salt, and pepper. Pour in about a cup of water, then bring the mixture to a gentle simmer over low heat. Cover and cook for 10-12 minutes, or until the rice is tender and has absorbed the flavors, creating a cohesive filling for your Kreatopita.
Step 4: Prepare the Oven and Dish
Preheat your oven to 180°C (350°F) while the filling simmers. Meanwhile, brush a 9×13-inch baking dish with melted butter or oil to prevent sticking. This preparation ensures your Kreatopita will bake evenly and develop a beautiful crust.
Step 5: Layer the Phyllo Dough
Take five sheets of phyllo dough and layer them in the prepared baking dish, brushing each layer generously with melted butter. Allow the edges to hang over the sides, creating a strong base for your Kreatopita. This layering technique will contribute to the crispiness of the final product.
Step 6: Add the Filling
Spoon the beef and rice filling evenly over the layered phyllo in the baking dish. Spread it out gently with a spatula, ensuring that every bite of your Kreatopita will be packed with flavor. This is the heart of your pie, and it’s time to bring it to life!
Step 7: Top with Phyllo Layers
Layer another five sheets of phyllo dough on top of the filling, brushing each with melted butter as you go. Tuck in any overhanging edges from the bottom layers to secure the filling, creating a lovely, rustic appearance for your Kreatopita that will delight your guests.
Step 8: Bake the Kreatopita
Place your assembled Kreatopita in the preheated oven and bake for 40-45 minutes. Keep an eye on it; the top should turn a lovely golden brown and become crisp to the touch. This tantalizing appearance will signal that your savory meat pie is ready to be enjoyed.
Step 9: Cool and Serve
Once out of the oven, let the Kreatopita cool for about 10 minutes before slicing. This resting period allows the filling to set, making for cleaner slices. Serve warm, and prepare to savor the delightful combination of flaky pastry and savory filling!
Expert Tips for Perfect Kreatopita
Keep It Moist: Use quality ground meat and drain excess fat to prevent a greasy filling; a touch of broth can also enhance moisture.
Phyllo Care: Always keep phyllo options covered with a damp towel while assembling, as it dries out quickly, making it difficult to handle.
Layering Technique: Brush each phyllo sheet generously with butter or oil for a crispy, golden crust. Don’t skimp on it; it’s key for a delightful texture!
Custom Fillings: Feel free to experiment with herbs or spices in your filling. Just remember, the focus on flavor is essential for a delicious Kreatopita.
Baking Watch: Keep an eye on your pie towards the end of the baking time. If it’s browning too quickly, cover it lightly with foil to avoid burning.
Make Ahead Options
These Kreatopita are perfect for busy weeknights and meal prep enthusiasts! You can prepare the filling up to 3 days in advance; just cool it completely and store it in an airtight container in the fridge. Additionally, you can layer the phyllo and filling and assemble the pie up to 24 hours ahead—just cover it tightly with plastic wrap to prevent the phyllo from drying out. When ready to bake, simply preheat the oven and place the assembled Kreatopita directly into the oven. Bake as per the original instructions for golden, flaky perfection! This efficient prep not only saves time but guarantees a delicious homemade meal when you need it most.
How to Store and Freeze Kreatopita
Fridge: Store leftover Kreatopita tightly covered in the fridge for up to 3 days. This keeps the flavors intact while preventing the phyllo from becoming soggy.
Freezer: For longer storage, wrap individual slices of the pie tightly in plastic wrap and aluminum foil before freezing. They can last up to 2 months, preserving their deliciousness.
Reheating: To enjoy frozen slices, thaw in the fridge overnight; then reheat in the oven at 180°C (350°F) for 10-15 minutes, allowing the crust to regain its crispiness.
Serving Fresh: Always aim to enjoy freshly baked Kreatopita when possible, as this pie is best served warm and crunchy for maximum enjoyment!
What to Serve with Kreatopita
A warm slice of Kreatopita pairs beautifully with a variety of delightful sides that enhance its flavors and complement the meal perfectly.
-
Greek Salad: A refreshing mix of tomatoes, cucumbers, and feta cheese that lightens the meal while adding vibrant color and nutrition.
-
Tzatziki Sauce: This creamy yogurt and cucumber dip brings coolness and a hint of tang, making each bite of the meat pie even more enjoyable.
-
Roasted Vegetables: A medley of caramelized seasonal veggies adds a hearty, comforting touch, balancing the richness of the pie with their natural sweetness.
-
Lemon Wedges: Squeezing a bit of fresh lemon juice over your slice brightens the flavors of the Kreatopita, adding zesty contrast to its savory filling.
-
Pita Bread: Soft, warm pita serves as a great vehicle for enjoying any leftover tzatziki; it adds texture and keeps the meal feeling light and airy.
-
Ouzo or Retsina Wine: Sip these traditional Greek beverages alongside your Kreatopita for a truly authentic experience; their anise and herbal notes pair beautifully with the dish.
Each of these pairings brings a unique flair while harmonizing with the comforting flavors of your Kreatopita. Enjoy crafting a full meal that transports you straight to Greece!
Kreatopita: Delicious Variations to Try
Feel free to get creative with this recipe and explore exciting twists that will tantalize your taste buds!
-
Ground Lamb: Swap ground beef for ground lamb to embrace a more traditional Greek flavor, adding a rich, herbal nuance.
-
Quinoa Filling: Replace rice with cooked quinoa for a protein-packed alternative that adds a delightful nutty texture.
-
Cheesy Surprise: Stir in some feta or kasseri cheese into your filling for an extra layer of creaminess and flavor that elevates the dish.
-
Vegetarian Delight: Use a medley of sautéed mushrooms, spinach, and lentils instead of meat for a hearty vegetarian twist that’s equally satisfying.
-
Spicy Kick: Add a pinch of red pepper flakes or sauté fresh chili with the onions for those who crave a little heat in their Kreatopita.
-
Mini Versions: Pour your filling into muffin tins lined with phyllo for adorable mini Kreatopitas, perfect for appetizers or lunchboxes.
-
Diced Tomatoes: For a chunkier texture, substitute tomato sauce with diced tomatoes; the added juiciness will make every bite delightful.
-
Herb Medley: Mix fresh herbs like parsley and dill into your filling for a vibrant flavor boost that brightens the dish—perfect for springtime meals!
By experimenting with these variations, you’ll infuse your Kreatopita with new flavors while keeping the heart and soul of this beloved Greek classic. Consider pairing it with a fresh Greek salad for a complete meal that sings with flavor!
Kreatopita Recipe FAQs
What type of ground meat is best for Kreatopita?
For the most traditional taste, I recommend using ground beef as it provides a robust flavor that complements the spices perfectly. However, for a more authentic Greek twist, consider substituting ground lamb. Just be sure to drain any excess fat for a balanced filling!
How can I store leftover Kreatopita?
Absolutely! Store any leftover Kreatopita tightly covered in the refrigerator for up to 3 days. To keep that delicious texture intact, make sure it’s well-wrapped to prevent the phyllo from getting soggy. I’ve found that using an airtight container works wonders for maintaining freshness!
Can I freeze Kreatopita?
Yes, you can! For freezing, wrap individual slices of your Kreatopita tightly in plastic wrap followed by aluminum foil. This prevents freezer burn and keeps them delicious. They will stay good for up to 2 months. When you’re ready to enjoy some, just thaw them overnight in the fridge before reheating!
What should I do if my phyllo dough is tearing while assembling?
Very common! If your phyllo tears, don’t worry too much—this is a part of its charm! I suggest layering the torn pieces in a crisscross pattern to create additional texture. Also, ensure you’re keeping the phyllo covered with a damp towel while you work; this helps prevent drying and tearing.
Is Kreatopita suitable for people with gluten allergies?
Unfortunately, traditional Kreatopita made with phyllo dough isn’t gluten-free. However, if you’re looking for a gluten-free version, consider using gluten-free pastry alternatives that mimic phyllo. Just be sure to check the packaging for any potential allergens!
Kreatopita: Savory Greek Meat Pie for Cozy Nights
Ingredients
Equipment
Method
- Heat a drizzle of oil in a large skillet over medium heat. Add the finely chopped onion and sauté for about 5-7 minutes, or until the onion is soft and translucent.
- Add the ground beef to the skillet and cook for 8-10 minutes until browned and no longer pink.
- Stir in uncooked rice, tomato sauce, oregano, salt, and pepper. Add about a cup of water and bring to a gentle simmer over low heat for 10-12 minutes.
- Preheat your oven to 180°C (350°F). Brush a 9x13-inch baking dish with melted butter or oil.
- Layer five sheets of phyllo dough in the baking dish, brushing each layer with melted butter.
- Spoon the beef and rice filling evenly over the phyllo layers.
- Layer another five sheets of phyllo dough on top, brushing each with butter and tucking edges in.
- Bake the assembled Kreatopita in the preheated oven for 40-45 minutes, or until golden brown.
- Let the Kreatopita cool for about 10 minutes before slicing and serving warm.
Leave a Reply