
As I stood in my kitchen, the tropical scent of lime and coconut wafted through the air, instantly transporting me to a sun-kissed beach. Today, I’m excited to share my recipe for Refreshing No-Bake Chia Pudding Bars with Zesty Coconut Lime Flavor—a delightful treat that not only satisfies your sweet tooth but makes healthy eating a breeze. With just 15 minutes of prep time, these vegan bars are perfect for busy days when you crave a nutritious snack without the fuss. Imagine indulging in a creamy, fiber-packed bar, bursting with tropical flavors, that leaves you feeling energized rather than weighed down. Who wouldn’t want that? Trust me, once you try these, they’ll become your go-to for satisfying cravings in a guilt-free way! Ready to whisk your taste buds away? Let’s dive into this refreshing recipe!
Why Are These Chia Pudding Bars Amazing?
Simplicity: With only 15 minutes of prep time, these bars are incredibly easy to whip up, making them perfect for even the busiest of schedules.
Tropical Flavor: The zesty combo of coconut and lime brings a refreshing taste that will transport your senses to a sunny beach paradise!
Nutritious: Packed with fiber and healthy fats, these vegan bars are a guilt-free indulgence that satisfy cravings without weighing you down.
Versatility: Feel free to customize with different citrus fruits or mix in berries to create your unique twist. Pair them with a Coconut Rum Coquito for an extra tropical treat!
Crowd-Pleaser: Serve these bars at gatherings or as an afternoon snack; they’re sure to impress friends and family alike!
Make-Ahead: Prepare in advance and store in the fridge for quick, healthy snacks throughout the week. Enjoy the convenience without compromising on flavor or freshness!
No-Bake Chia Pudding Bars with Zesty Coconut Ingredients
For the Pudding
• Chia Seeds – These tiny powerhouses are essential for a creamy texture and a thickening agent.
• Full-Fat Coconut Milk – Adds a rich, velvety base; for a lighter version, try almond or soy milk.
• Maple Syrup or Agave – Natural sweeteners that balance flavors; honey or date syrup can be used for non-vegan options.
• Lime Zest – Brightens the bars with a burst of citrus aroma; lemon zest serves as a great alternative.
• Lime Juice – Provides a zesty tang and freshness; freshly squeezed juice enhances the flavor.
• Vanilla Extract – Elevates sweetness and enriches the overall flavor profile.
• Salt – Just a pinch balances all the sweetness nicely.
For the Optional Crust
• Almonds/Cashews – Bring delightful crunch and nuttiness; feel free to swap with walnuts or pecans.
• Shredded Coconut – Adds a tropical texture; choose unsweetened for a healthier option.
• Medjool Dates – Natural sweetener and binder for your crust; can be replaced with dried figs or prunes.
• Melted Coconut Oil – Helps bind the crust together; any neutral oil works as a substitute.
Dive into these No-Bake Chia Pudding Bars with Zesty Coconut, and experience a tropical sensation that’s easy, healthy, and utterly delicious!
Step‑by‑Step Instructions for No-Bake Chia Pudding Bars with Zesty Coconut
Step 1: Make the Optional Crust
In a food processor, combine 1 cup of almonds or cashews, ½ cup of shredded coconut, 5 Medjool dates, 2 tablespoons of melted coconut oil, and a pinch of salt. Pulse the mixture until it resembles a clumpy texture, ensuring the dates are well integrated. Press this mixture firmly into the bottom of an 8×8 inch pan lined with parchment paper, creating an even layer. Chill in the refrigerator for 10 minutes while you prepare the pudding filling.
Step 2: Prepare the Chia Pudding Filling
In a large mixing bowl, whisk together 1 cup of full-fat coconut milk, ½ cup of chia seeds, ¼ cup of maple syrup or agave, the zest and juice of 1 lime, 1 teaspoon of vanilla extract, and a pinch of salt. Stir vigorously until the seeds are evenly mixed into the liquid, ensuring there are no clumps remaining. The mixture should appear creamy and slightly thickened.
Step 3: Rest the Mixture
Let the chia pudding filling sit at room temperature for about 5-10 minutes. This allows the chia seeds to absorb the liquid fully and thicken the mixture. Stir occasionally to prevent clumping. Once the pudding has a syrupy consistency, it will be ready for the next step, transforming into your No-Bake Chia Pudding Bars with Zesty Coconut.
Step 4: Pour and Set
Remove the crust from the refrigerator and carefully pour the chia pudding filling over it. Use a spatula to smooth out the top for an even surface, ensuring the filling is evenly spread. If you did not make a crust, simply pour the mixture directly into the lined pan. Cover the pan with plastic wrap or a lid, and prepare to chill.
Step 5: Chill to Set
Refrigerate the chia pudding bars for at least 4 hours, but if possible, let them chill overnight. This extended chilling ensures the pudding sets beautifully, providing a firm yet creamy texture. Check for doneness by gently shaking the pan; it should feel stable and not wobbly when ready.
Step 6: Add Toppings
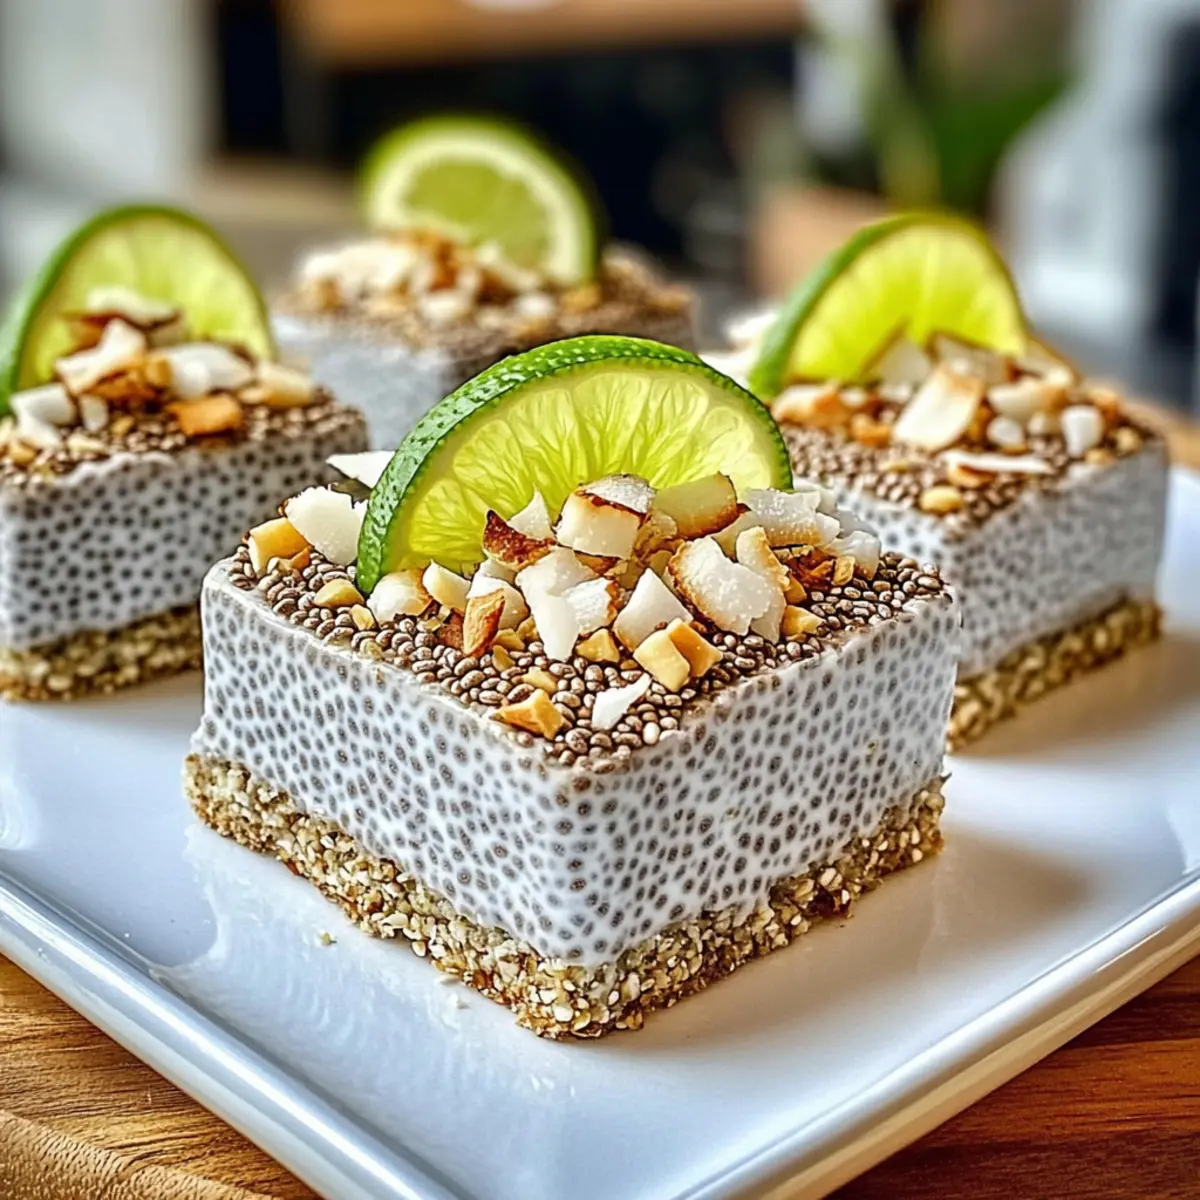
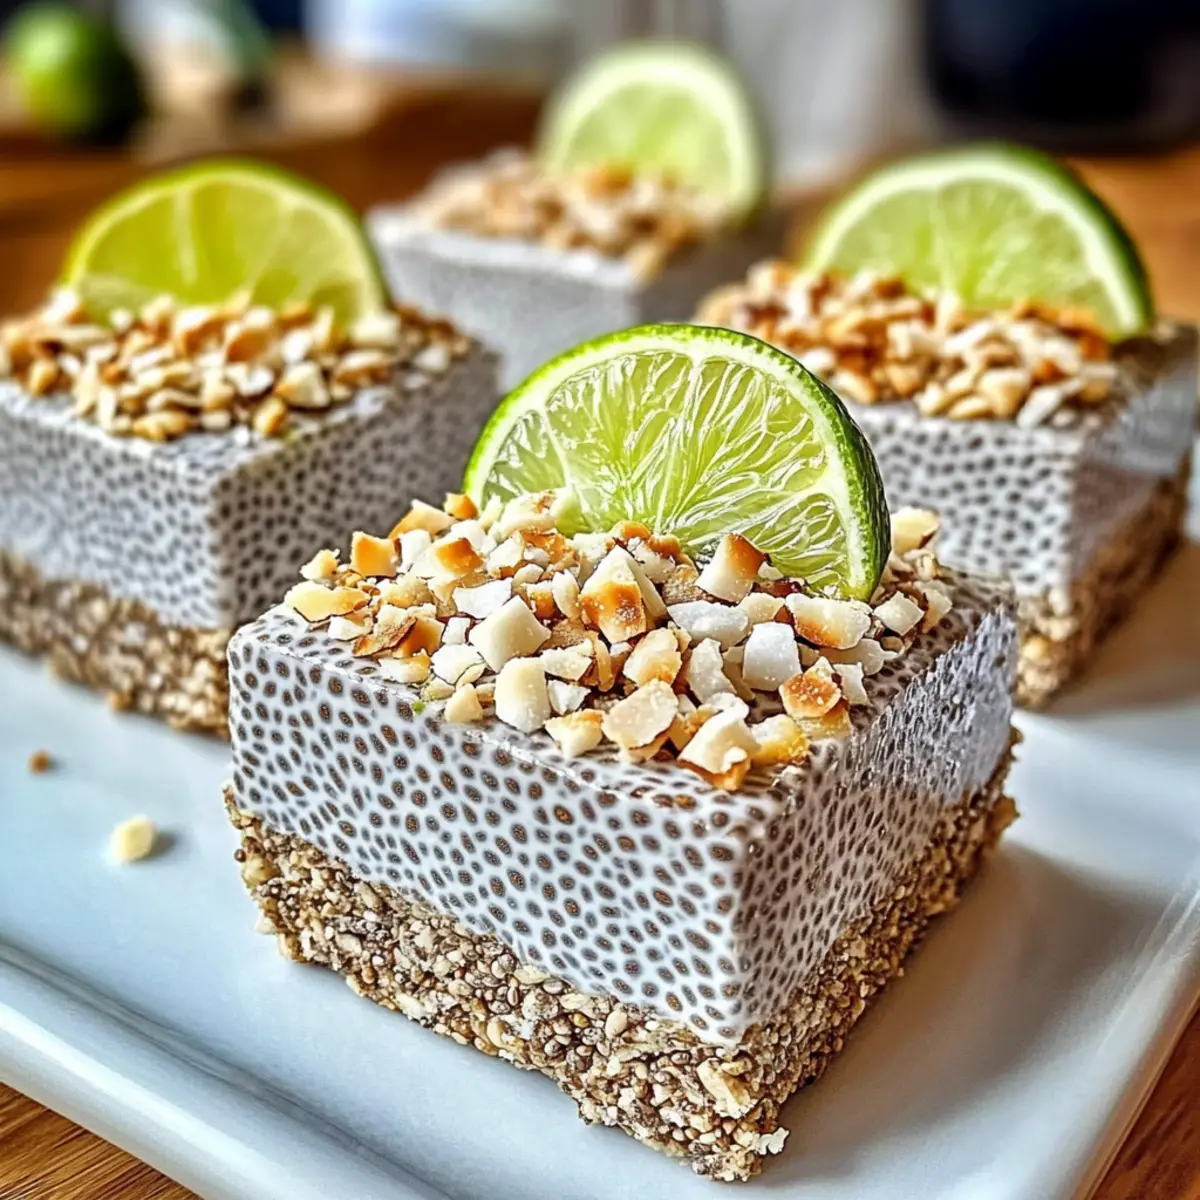
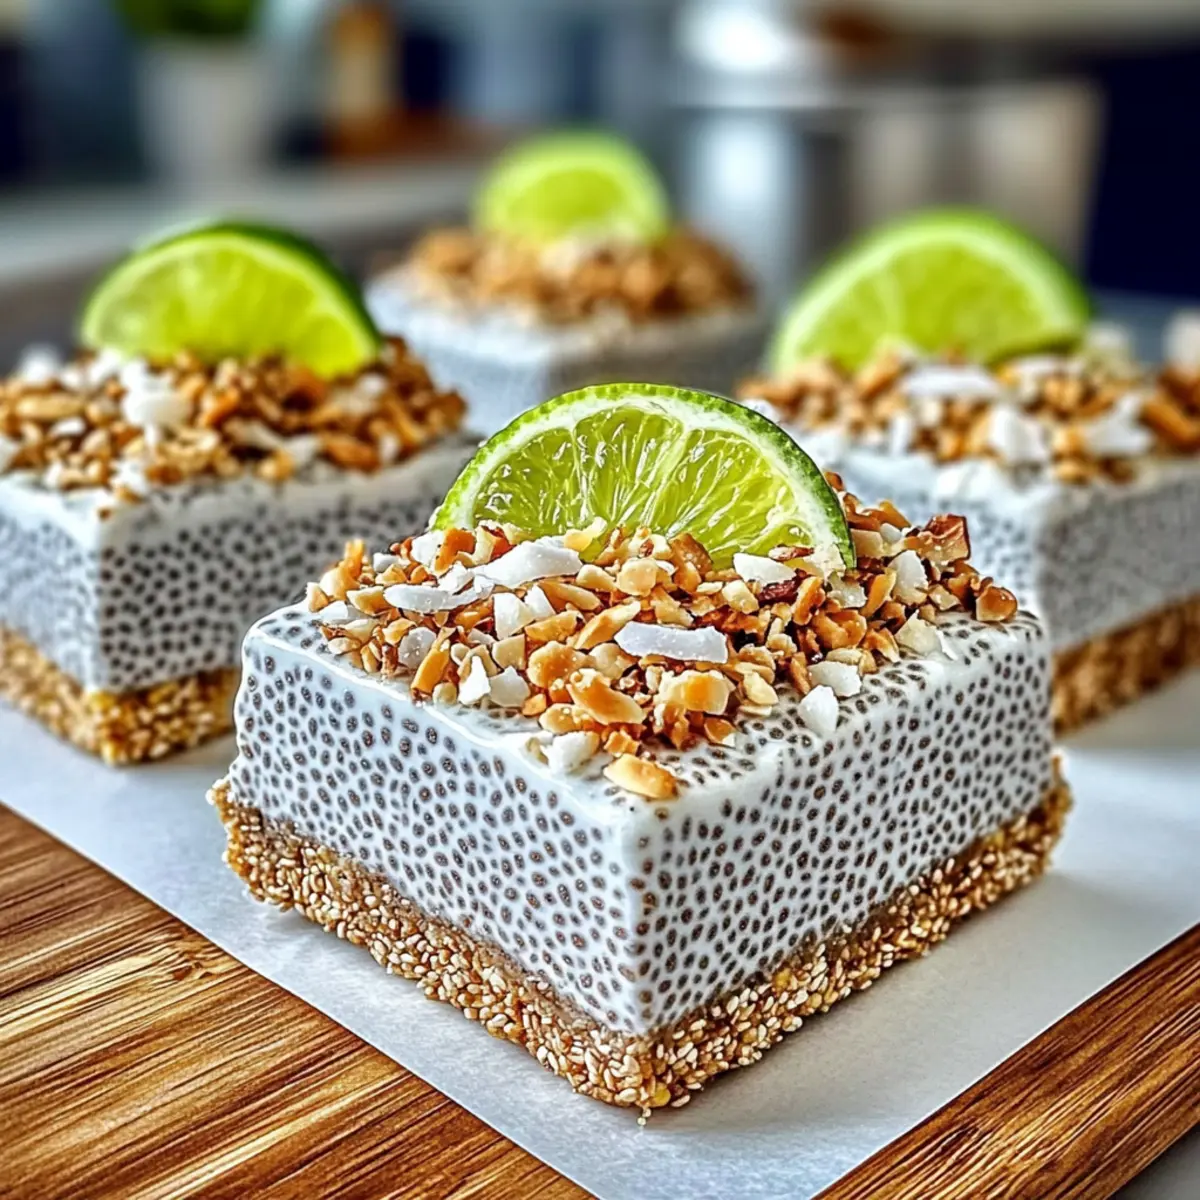
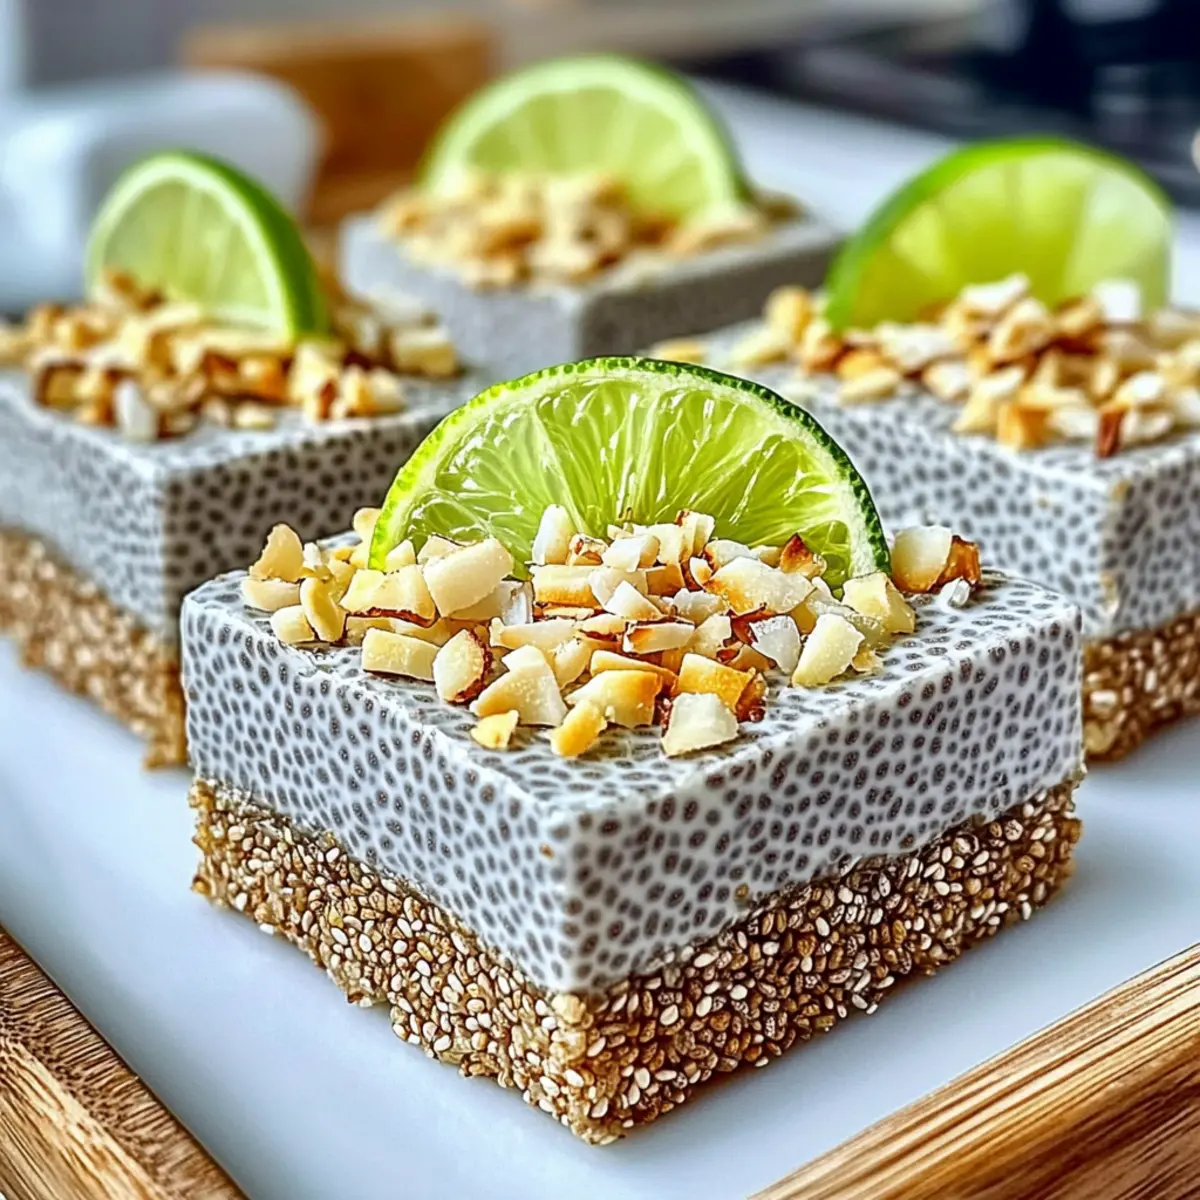
Once the bars are set, remove them from the refrigerator. Lift the entire block out of the pan using the parchment paper. Place the bars on a cutting board, and sprinkle the top with additional toasted shredded coconut and a sprinkle of lime zest for an extra burst of flavor.
Step 7: Slice and Serve
Use a sharp knife to cut the chilled bars into squares or rectangles, based on your preference. Serve immediately for a delightful tropical snack or dessert. Store any leftovers in an airtight container in the fridge for up to 4-5 days, ensuring you continue to enjoy these No-Bake Chia Pudding Bars with Zesty Coconut.
No-Bake Chia Pudding Bars Variations
Feel free to get creative and personalize these delicious bars to suit your taste!
-
Citrus Swap: Replace lime with lemon or orange for a delightful change in flavor. Each citrus brings its own unique brightness.
-
Berry Boost: Fold in your favorite berries, such as blueberries or strawberries, for a refreshing burst of sweetness and extra nutrients. The vibrant colors will make the bars even more inviting!
-
Nut-Free: Replace the nuts in the crust with oat flour or sunflower seeds to create a nut-free version that still tastes delightful.
-
Creamy Coconut Bliss: For an even richer flavor, mix in some coconut cream into the pudding filling. It adds an irresistible creaminess that enhances the tropical experience.
-
Chocolate Delight: Drizzle melted dark chocolate on top or mix in cocoa powder for a chocolaty twist. The pairing of chocolate with coconut is simply divine!
-
Extra Crunch: Top your bars with crunchy granola or chopped toasted nuts for added texture. This little kick makes each bite even more satisfying!
-
Chili Lime Zing: For those who love heat, sprinkle just a pinch of chili powder or paprika into the pudding for a spicy kick. Imagine the surprise with each sweet, tangy bite!
Don’t forget to enjoy these bars alongside a refreshing beverage! A tropical drink such as Coconut Rum Coquito or a chilled glass of coconut water makes the perfect pairing for your No-Bake Chia Pudding Bars with Zesty Coconut!
What to Serve with Refreshing No-Bake Chia Pudding Bars?
Elevate your tropical experience with these delightful pairings that will complement the zesty flavors beautifully!
-
Coconut Yogurt: Creamy and tart, it enhances the tropical theme while adding a protein boost to your snack.
-
Fresh Mango Slices: The juicy sweetness of ripe mango perfectly balances the tartness of lime, creating a refreshing taste contrast.
-
Mint-Infused Iced Tea: A cool, herbal drink adds an invigorating touch, making every bite feel even more refreshing and light.
-
Tropical Fruit Salad: A colorful mix of pineapple, kiwi, and berries brings vibrancy and natural sweetness, amplifying the tropical vibes beautifully.
-
Almond Butter Drizzle: A sprinkle of nutty goodness adds rich flavors and healthy fats, enhancing the creamy texture of the pudding bars.
-
Chilled Coconut Water: This hydrating drink maintains the tropical theme and offers a light and refreshing option to accompany your dessert.
-
Chocolate-Covered Almonds: The richness of dark chocolate pairs wonderfully with the zesty lime, giving an indulgent crunch alongside your bars.
-
Coconut Lime Sorbet: For a cool and creamy dessert option, this sorbet echoes the flavors of the bars, creating a delightful sweet finish to your meal.
-
Homemade Granola: Served on the side, the crunchy granola adds texture and nuttiness, enhancing the overall snacking experience.
These pairings will not only round out your meal but also create a delightful tropical escape with every bite of the No-Bake Chia Pudding Bars!
Tips for the Best No-Bake Chia Pudding Bars
Mix Well: Ensure the coconut milk is blended thoroughly to avoid clumps, which can affect the texture of your No-Bake Chia Pudding Bars.
Chilling is Key: For an optimal texture, refrigerate the bars overnight. This helps them set properly, ensuring they’re firm yet creamy when you slice them.
Adjust for Thickness: If you prefer a thicker pudding, you can increase the chia seeds or reduce the liquid slightly to achieve your desired consistency.
Taste Test: Don’t hesitate to adjust sweetness by adding more maple syrup or agave based on your preference before chilling.
Go Toppings Crazy: Experiment with different toppings like fresh fruit or nuts to personalize your No-Bake Chia Pudding Bars and add a little extra crunch!
Storage Tips for No-Bake Chia Pudding Bars
Fridge: Store your No-Bake Chia Pudding Bars in an airtight container in the refrigerator for up to 4-5 days, keeping them fresh and delicious.
Freezer: For longer storage, freeze the bars for up to 2 months. Individually wrap them in plastic wrap before placing them in a sealed freezer bag.
Thawing: When ready to enjoy, simply remove the bars from the freezer and let them thaw in the fridge for a few hours. Enjoy them chilled for the best taste!
Reheating: These bars are best eaten cold and do not require reheating, ensuring the delightful tropical flavors shine through every bite.
Make Ahead Options
These No-Bake Chia Pudding Bars with Zesty Coconut are a fantastic option for meal prep enthusiasts! You can prepare the crust (if using) and the chia pudding filling up to 24 hours in advance. Simply store the crust in the fridge after pressing it into the pan, and the chia mixture can be refrigerated in a separate bowl. To maintain the quality, cover both tightly to avoid any absorption of flavors. When you’re ready to finish, just pour the pudding over the chilled crust, let it set for at least 4 hours (or overnight for best results), and enjoy a refreshing, healthy treat that’s just as delicious as if you made it fresh!
No-Bake Chia Pudding Bars with Zesty Coconut Recipe FAQs
How do I know if my chia seeds are fresh enough to use?
Absolutely! To ensure your chia seeds are fresh, check for a nutty aroma. If they seem stale or have lost their scent, opt for a new batch. Also, inspect for any clumping or moisture; they should be dry and loose. Store them in a cool, dark place to maintain freshness.
What’s the best way to store leftovers of the chia pudding bars?
Very! Store your No-Bake Chia Pudding Bars in an airtight container in the refrigerator for up to 4-5 days. This keeps them fresh and ready for a quick snack or dessert. Ensure they’re fully chilled before sealing to maintain their perfect texture.
Can I freeze these chia pudding bars, and if so, how?
Of course! To freeze your No-Bake Chia Pudding Bars, individually wrap them in plastic wrap, then place them in a sealed freezer bag. They can be stored for up to 2 months. When you’re ready to enjoy, simply thaw them in the fridge for a few hours before serving.
What should I do if my chia pudding isn’t thickening properly?
Don’t worry; it happens. If your chia pudding isn’t thickening, it may be due to insufficient time or not enough chia seeds. Allow it to sit for an additional 10 minutes, stirring occasionally. For a thicker consistency, add more chia seeds gradually while stirring until you reach your desired thickness.
Are these bars safe for people with nut allergies?
Great question! If someone has nut allergies, you can still enjoy these bars by using seeds instead of nuts in the crust. Sunflower seeds or pumpkin seeds are excellent alternatives that provide a delightful crunch. Always ensure to avoid any cross-contamination with nuts during preparation.
Can I substitute any ingredients in this recipe?
Absolutely! If you’re looking to adjust your No-Bake Chia Pudding Bars, feel free to substitute the full-fat coconut milk with almond, soy, or oat milk for a different flavor profile. For the sweetener, you can use honey or agave based on your dietary preferences. Experimenting can lead to delightful new variations!
No-Bake Chia Pudding Bars with Zesty Coconut Bliss
Ingredients
Equipment
Method
- In a food processor, combine 1 cup of almonds or cashews, ½ cup of shredded coconut, 5 Medjool dates, 2 tablespoons of melted coconut oil, and a pinch of salt. Pulse until clumpy and press into an 8x8 inch pan. Chill for 10 minutes.
- In a large bowl, whisk together 1 cup of full-fat coconut milk, ½ cup of chia seeds, ¼ cup of maple syrup, lime zest, lime juice, 1 teaspoon of vanilla extract, and a pinch of salt. Stir until creamy and no clumps remain.
- Let the chia pudding sit at room temperature for about 5-10 minutes to thicken. Stir occasionally to prevent clumping.
- Remove crust from the fridge and pour the chia pudding over it. Smooth the top with a spatula. Cover and chill.
- Refrigerate for at least 4 hours, or overnight for best results. Ensure the pudding sets and feels stable.
- Once set, remove bars from the pan and top with toasted shredded coconut and lime zest.
- Cut the bars into squares or rectangles and serve chilled. Store leftovers in an airtight container in the fridge for up to 4-5 days.
Leave a Reply