
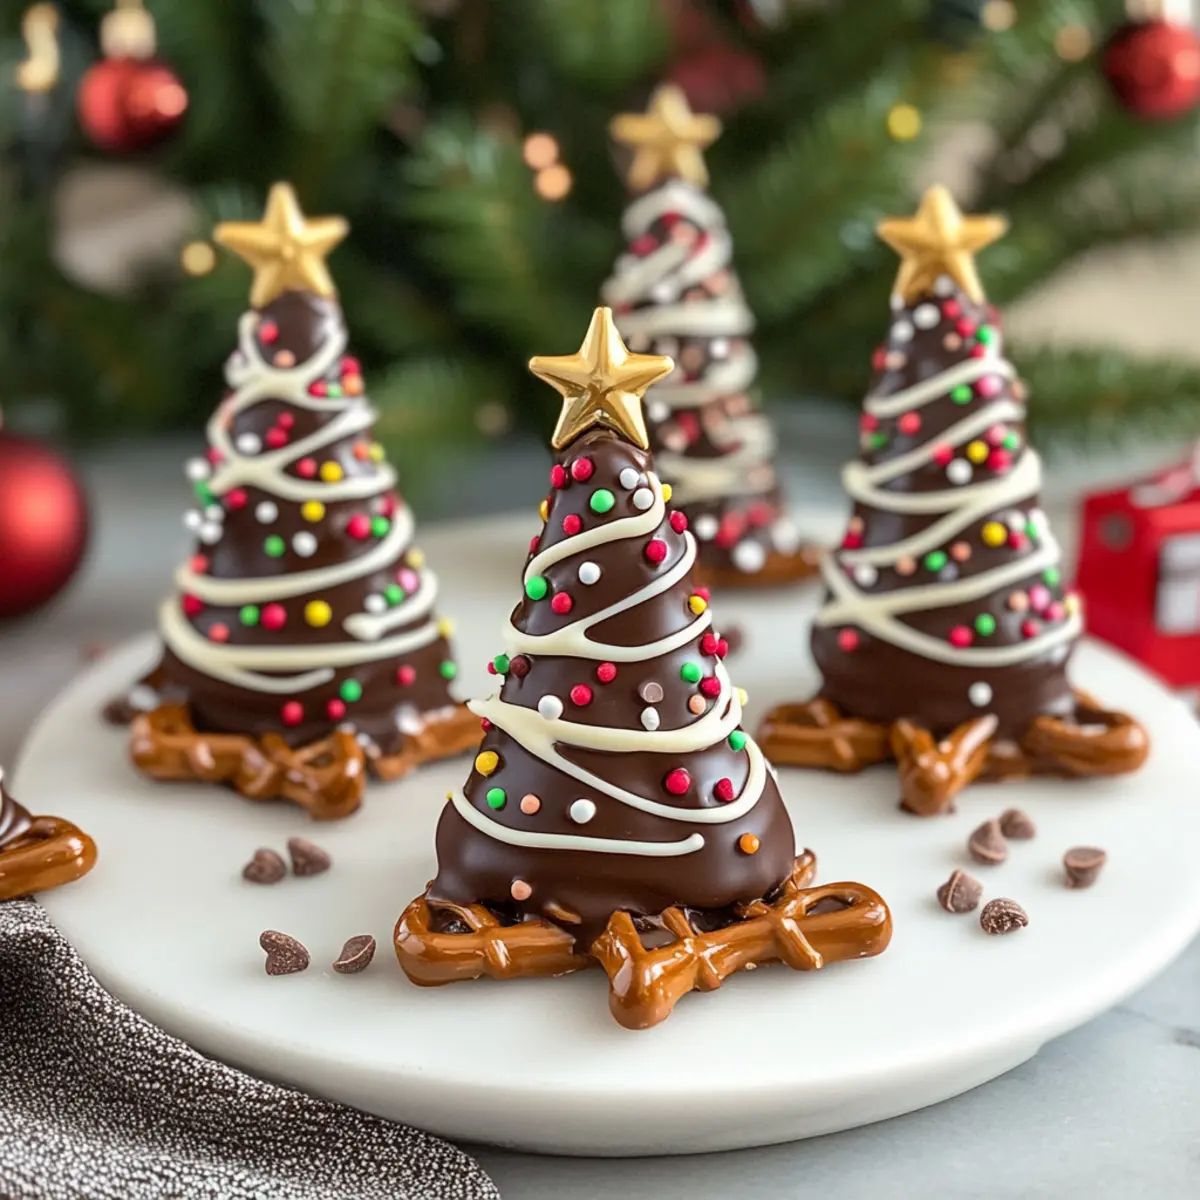
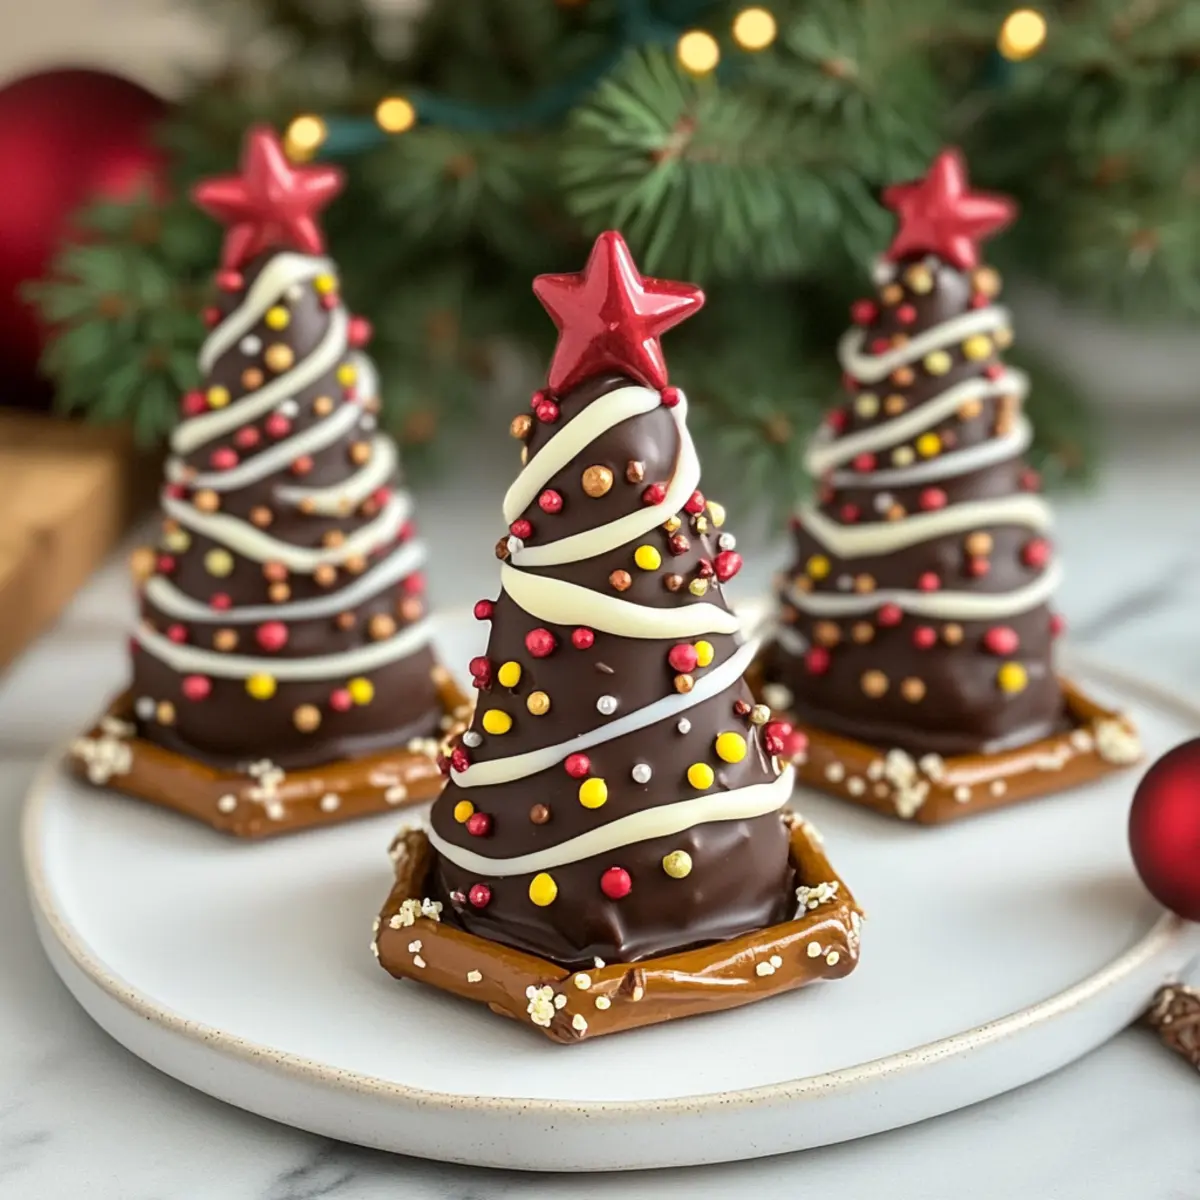
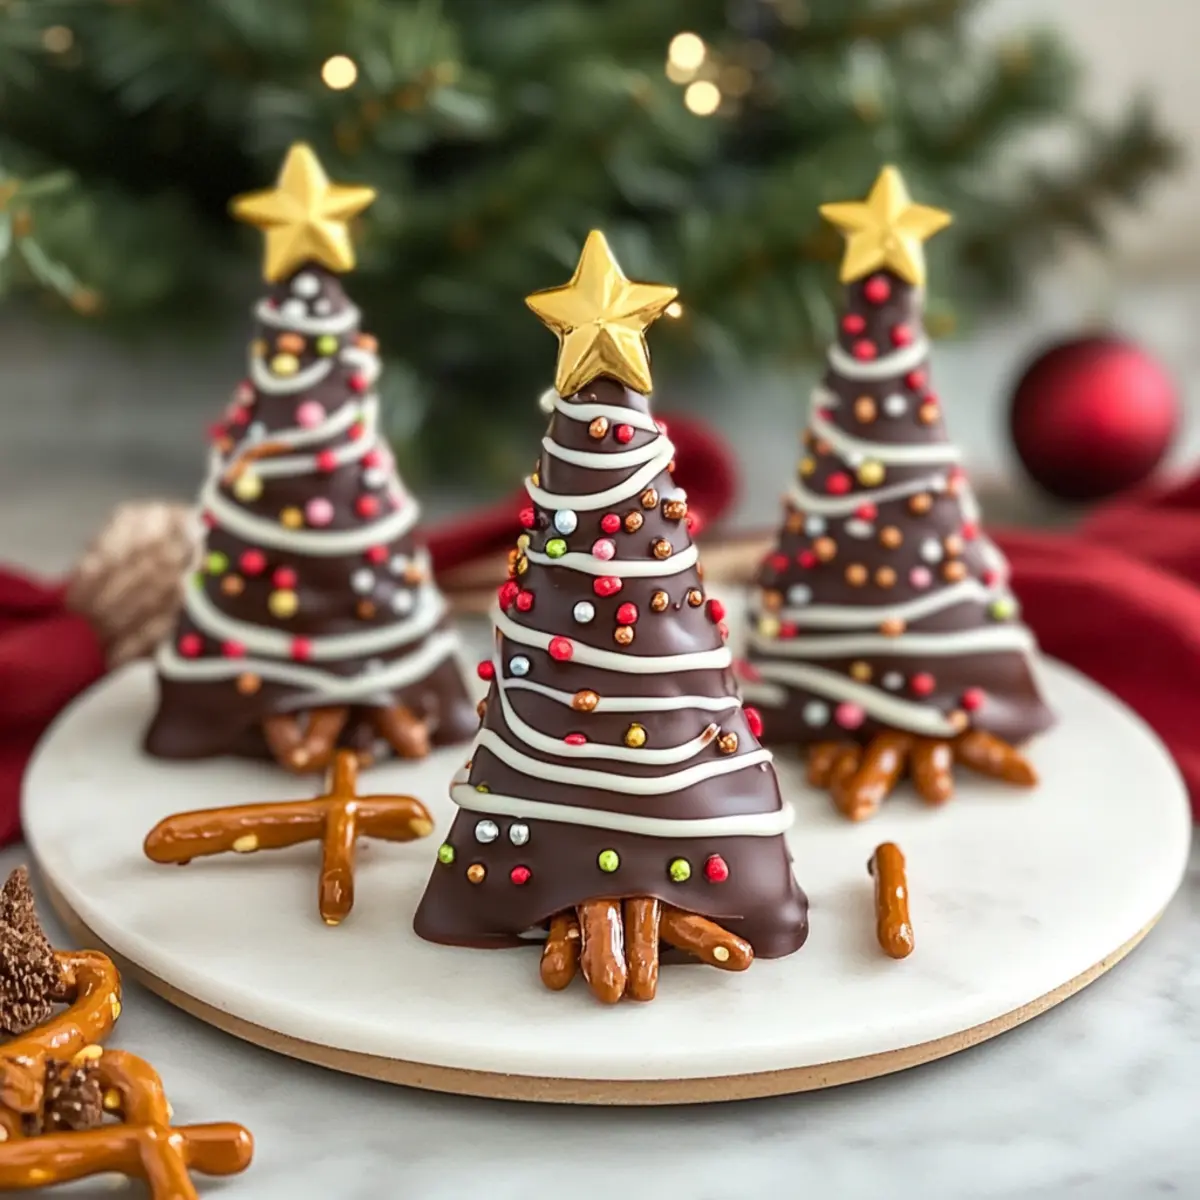
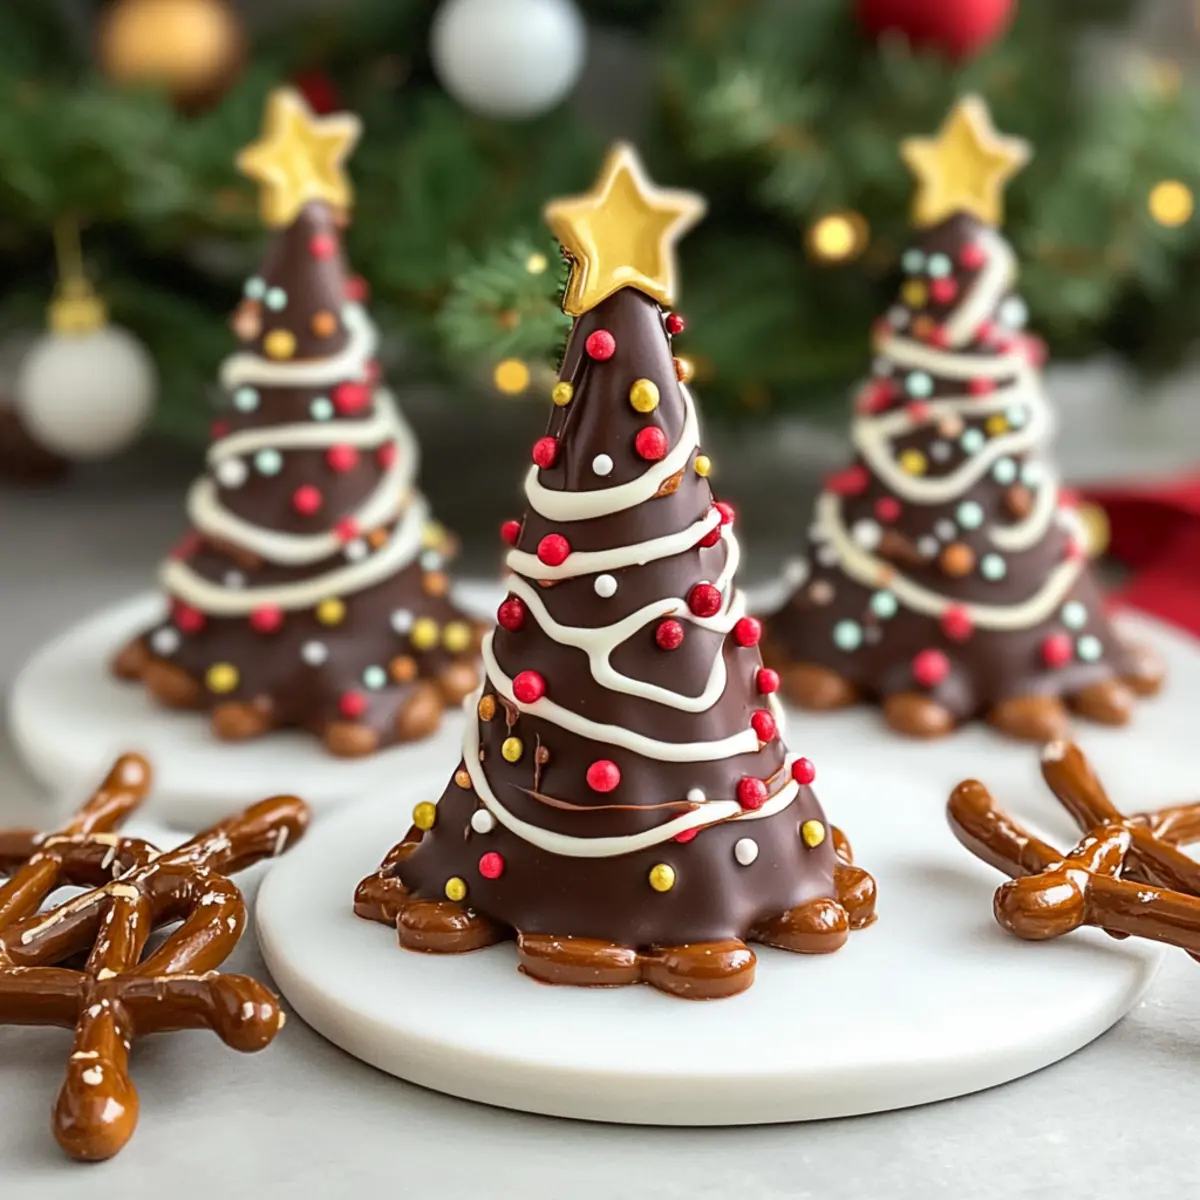
In just 30 minutes, you can transform your kitchen into a festive wonderland with these enchanting Christmas Chocolate Trees! Made from simple pantry staples like dark chocolate and pretzel sticks, these delightful edible decorations are perfect for both busy hosts and excited little helpers. You won’t need any baking skills to craft these charming treats, making them a hassle-free way to spread holiday cheer. With a satisfying crunch from the pretzel trunks and a splash of colorful sprinkles, they’re not only fun to make but also a hit at holiday gatherings. Plus, for those needing a gluten-free option, it’s easy to substitute with gluten-free pretzels! Curious about how to create these whimsical delights? Let’s dive into the festive magic of making your own Christmas Chocolate Trees!
Why Are These Chocolate Trees a Hit?
Simplicity at its finest: With only 30 minutes needed and zero baking required, these trees are perfect for anyone, from busy parents to novice chefs.
Kid-Friendly Fun: Kids will love helping out by decorating and creating their own unique trees, making this a wonderful holiday activity.
Versatile Treats: Feel free to experiment by using different types of chocolate or toppings, like coconut flakes, to add your personal touch.
Stunning Presentation: These dazzling trees are an eye-catching addition to any dessert table, sure to impress family and friends alike.
Delicious & Satisfying: Enjoy the perfect combo of rich chocolate flavor and crunchy pretzel texture—an instant crowd-pleaser! If you love easy festive treats, check out these Chewy Pumpkin Chocolate or Chocolate Pumpkin Cupcakes for more delicious ideas!
Christmas Chocolate Trees Ingredients
• Get ready to whip up magical treats!
For the Chocolate
- Dark Chocolate – This rich base adds depth of flavor; feel free to swap it with milk or white chocolate if preferred.
- White Chocolate – Provides a lovely snowy drizzle effect on top of the trees.
For the Decorations
- Mini Colorful Sprinkles – These fun toppings boost the festive look; choose colors that match your holiday theme.
- Pretzel Sticks – Acting as the trunks of your trees, they add a delightful crunch; substitute with gluten-free pretzels if needed for a gluten-free option.
Step‑by‑Step Instructions for Christmas Chocolate Trees
Step 1: Prepare Baking Tray
Begin by lining a baking tray with parchment paper, ensuring it’s flat and secure. This will prevent the chocolate from sticking and make for easy removal once your delightful Christmas Chocolate Trees are ready. Take a moment to ensure the paper is smooth and wrinkle-free, as this helps in creating neat designs later on.
Step 2: Melt Dark Chocolate
In a microwave-safe bowl, break apart the dark chocolate into smaller pieces. Microwave in 20-second intervals, stirring each time until the chocolate is completely melted and smooth. Alternatively, use a double boiler for more control. Once melted, remove from heat and let it cool slightly until it’s still pourable yet not too hot, about 3–5 minutes.
Step 3: Pipe Tree Shapes
Transfer the melted dark chocolate into a piping bag or a zip-top bag with a corner snipped off. Pipe tree shapes onto the prepared parchment paper, making them about 3 inches tall and 2 inches wide. Ensure that the base of each tree overlaps with a pretzel stick, which will serve as the trunk and add a lovely crunch to your Christmas Chocolate Trees.
Step 4: Add White Chocolate Drizzle
Next, melt the white chocolate using the same method you used for the dark chocolate. Once smooth and melted, drizzle it over the piped dark chocolate trees in a fun, artistic pattern. This step adds a festive snowy effect and enhances the visual appeal of your delightful creations, making them even more inviting for holiday gatherings.
Step 5: Decorate
While the chocolate is still wet, sprinkle mini colorful sprinkles generously on top of each tree. This not only enhances the festive charm of the Christmas Chocolate Trees but also allows for creativity; you can mix and match colors to fit your holiday theme. Act quickly, as the chocolate will set as it cools, and you want those sprinkles to stick well.
Step 6: Set
Allow the decorated trees to cool at room temperature until firm, which may take about 10 minutes. Alternatively, you can place the baking tray in the refrigerator for 15-20 minutes to speed up the setting process. Watch for the chocolate to become opaque and solid, revealing the delightful shapes of your trees.
Step 7: Serve/Store
Once set, gently peel the Christmas Chocolate Trees off the parchment paper. Arrange them on a festive platter for serving, creating a charming display that will wow your family and friends. Store any leftovers in an airtight container at room temperature for up to 5 days, or refrigerate for up to 2 weeks, making sure to protect their delightful appearance.
Make Ahead Options
These delightful Christmas Chocolate Trees are perfect for meal prep, especially during the hectic holiday season! You can prepare the chocolate tree shapes and store them in an airtight container for up to 3 days. To maintain their quality, make sure they are completely cool before storing, preventing any condensation. If you’re pressed for time, pipe the trees and refrigerate them overnight; finish by adding the white chocolate drizzle and sprinkles just before serving to keep them looking fresh and vibrant. This way, you can enjoy a fun and festive treat with minimal last-minute effort, ensuring you have more time to celebrate the holidays with loved ones!
What to Serve with Christmas Chocolate Trees?
Transform your holiday gathering into a delightful feast with these enchanting treats as a centerpiece.
-
Festive Sugar Cookies: These classic cookies provide a sweet complement to the rich chocolate and crunchy pretzels, making for a cozy dessert platter. They embody the holiday spirit and are easy to decorate alongside the kids.
-
Creamy Hot Chocolate: A warm cup of rich hot chocolate pairs wonderfully with the crisp chocolate trees, offering a delightful contrast. Top it with whipped cream for an added touch of indulgence that enhances the festive atmosphere.
-
Gingerbread Men: These spiced cookies add depth and a nostalgic flavor to your dessert table. Their chewy texture beautifully contrasts with the crispy chocolate trees, creating a well-rounded treat experience.
-
Peppermint Bark: Keep the holiday flavors strong with this treat featuring layers of chocolate and peppermint. The coolness of peppermint balances the richness of the chocolate trees, making for a refreshing end to your meal.
-
Fruit Platter: Fresh seasonal fruits, like crisp apples or bright pomegranate seeds, provide a refreshing note against the sweetness of the chocolate. They add a burst of color and a light texture that cleanses the palate.
-
Sparkling Cider: This non-alcoholic option is festive and fruity, perfect for toasting and celebrating with family. It enhances the overall festive vibe without overpowering the delicious chocolate flavors.
-
Mini Cheesecake Bites: Creamy cheesecake bites add a rich, velvety texture that complements the crunch of the chocolate trees. You can even top them with seasonal fruits to keep things colorful and fresh.
-
Chocolate Dipped Pretzels: Embrace the crunch again by serving chocolate-dipped pretzels, which mirror the pretzel trunks of your trees. Their salty-sweet combination offers a tantalizing treat for guests.
-
Eggnog: This classic holiday drink adds a creamy, spiced flavor to the table, perfectly balancing out the sweetness of the chocolate trees. Serve it cold for a refreshing twist or warm for those cozy evenings.
Christmas Chocolate Trees Variations
Feel free to let your creativity shine with these delightful tweaks to make your Christmas Chocolate Trees uniquely yours!
- Dairy-Free: Use a dairy-free chocolate option for a vegan twist to accommodate all guests.
- Festive Flavors: Try orange or peppermint-infused chocolate to add a seasonal flair with every bite. The aroma alone will invigorate your holiday spirit!
- Nutty Crunch: Add crushed nuts, like almonds or pecans, to your decorations for an added textural element that will surprise your guests. A little crunch goes a long way in enhancing flavor!
- Tropical Treat: Sprinkle toasted coconut flakes on top for a sunny island vibe, providing a delightful contrast to the rich chocolate. These trees will transport you to a tropical holiday party!
- Spicy Kick: Dust with a sprinkle of chili powder or cayenne before the chocolate sets if you’re after a bold twist. The heat against the sweet chocolate will create a unique and memorable flavor sensation.
- Colorful Layers: Use colored melting chocolates instead of traditional dark chocolate to create layered trees. Imagine a rainbow of chocolate trees that will mesmerize the kids at your holiday gathering!
- Graham Cracker Trunks: For a fun break from pretzels, substitute with graham cracker sticks for a sweeter spin, reminiscent of s’mores. Who can resist a s’mores-inspired tree during the holidays?
- Other Toppings: Consider using dried fruit or mini candy pieces to take your trees to new heights of delight! These add unexpected bursts of flavor that will intrigue and excite your taste buds.
No matter which twist you choose, these Christmas Chocolate Trees will surely become a family favorite. If you’re looking for more creative holiday treats, check out these Chewy Chocolate Chip or Brown Butter Dubai for additional festive inspiration!
Expert Tips for Christmas Chocolate Trees
-
Work Quickly: Chocolate can set fast, especially in cooler environments. Pipe and decorate your Christmas Chocolate Trees swiftly to avoid any frustrating delays.
-
Choose Quality Chocolate: High-quality chocolate enhances flavor. Opt for chocolates with minimal added ingredients for the best experience, keeping dietary preferences in mind.
-
Mix Your Toppings: Get creative! Use a variety of sprinkles, or even crushed nuts or shredded coconut, to elevate your Christmas Chocolate Trees and give them individual flair.
-
Ensure a Firm Base: When piping, make sure each tree base overlaps securely with the pretzel stick to prevent them from toppling over once set.
-
Store Properly: To keep your delightful trees looking their best, store them in an airtight container. Refrigerate or freeze them as needed, but bring to room temperature before serving for optimal taste!
Storage Tips for Christmas Chocolate Trees
Room Temperature: Store your Christmas Chocolate Trees in an airtight container at room temperature for up to 5 days to maintain their delightful crunch and flavor.
Fridge: For longer storage, keep them in the fridge for up to 2 weeks, ensuring they’re sealed well to avoid moisture and maintain freshness.
Freezer: These festive treats can also be frozen for up to 2 months. Place them in an airtight container or wrap tightly in plastic wrap; thaw in the refrigerator before bringing them back to room temperature to enjoy.
Reheating: There’s no need to reheat these chocolate trees; they are best enjoyed fresh or at room temperature.
Christmas Chocolate Trees Recipe FAQs
What type of chocolate should I use?
Absolutely! I recommend using high-quality dark chocolate for its rich flavor. However, if you prefer something sweeter, you can easily substitute it with milk or white chocolate. Just ensure that any chocolate you choose meets your dietary needs.
How do I store my Christmas Chocolate Trees?
To keep your Christmas Chocolate Trees fresh, store them in an airtight container at room temperature for up to 5 days. If you want to extend their shelf life, place them in the refrigerator for up to 2 weeks, making sure they are well-sealed to prevent any moisture from ruining that delightful crunch.
Can I freeze these chocolate trees?
Very! You can freeze your Christmas Chocolate Trees for up to 2 months. Just place them in an airtight container or wrap them tightly in plastic wrap. When you’re ready to enjoy, thaw them overnight in the refrigerator and let them come to room temperature before serving for the best texture and flavor.
What if my chocolate doesn’t set properly?
If you find that the chocolate is not setting properly, it might be due to insufficient cooling time or excess moisture. Make sure to let the decorated trees cool in a dry area, and if any branches feel loose, re-melt a small amount of chocolate and use it to reattach those pieces gently.
Are these Christmas Chocolate Trees safe for pets?
Not at all! It’s best to keep these Christmas Chocolate Trees away from pets, as chocolate can be toxic to dogs and cats. Always ensure that your festive treats are kept in a place where curious pets can’t reach them for their safety.
Can I customize the decorations?
Absolutely! Feel free to mix things up by using different types of sprinkles, or even adding crushed nuts or coconut flakes for added texture. The more, the merrier! This is a wonderful way to make your Christmas Chocolate Trees uniquely yours, perfect for any holiday gathering.
Delightful Christmas Chocolate Trees: No-Bake Holiday Treats
Ingredients
Equipment
Method
- Prepare Baking Tray: Line a baking tray with parchment paper, ensuring it's flat and secure.
- Melt Dark Chocolate: Break dark chocolate into small pieces and microwave in intervals, stirring until melted and smooth.
- Pipe Tree Shapes: Transfer melted dark chocolate into a piping bag and pipe tree shapes onto parchment paper, ensuring the base overlaps with a pretzel stick.
- Add White Chocolate Drizzle: Melt white chocolate and drizzle over the piped dark chocolate trees.
- Decorate: While chocolate is wet, sprinkle mini colorful sprinkles generously on top of each tree.
- Set: Allow the decorated trees to cool until firm, about 10 minutes at room temperature or 15-20 minutes in the refrigerator.
- Serve/Store: Peel the trees off the parchment paper and arrange on a platter. Store leftovers in an airtight container.
Leave a Reply