
The aroma of freshly baked cookies wafting through the house usually brings a smile, but when those cookies are Cannoli Cookies, the joy is amplified tenfold. These little treasures combine the crisp texture of traditional cookies with a rich, creamy ricotta filling that pulls you right into a comforting embrace of Italian flavor. Not only are these Cannoli Cookies quick to whip up, but they also bring a nostalgic touch to family gatherings or cozy afternoons. As a delightful canvas for creativity, you can easily switch things up with fun variations like adding cinnamon or swapping in strawberries. So, how might you enjoy these scrumptious bites today?
Why Will You Love Cannoli Cookies?
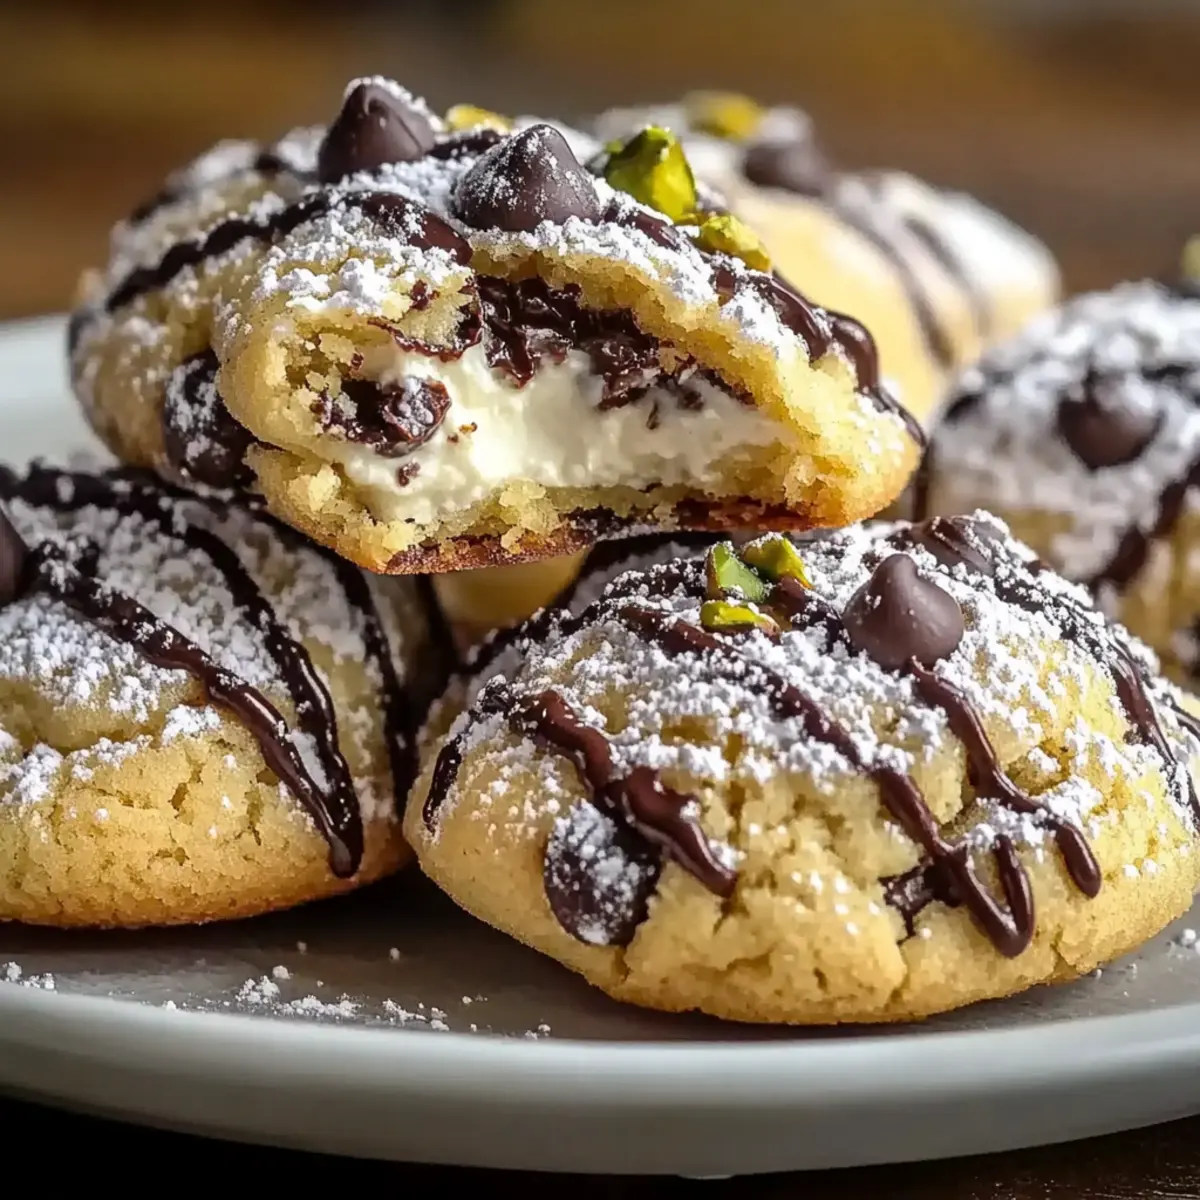
Irresistible flavor profile: These Cannoli Cookies balance the crispness of baked dough with a creamy ricotta filling that exudes Italian charm.
Easy to customize: Feel free to get creative! Try adding spices like cinnamon or even replacing chocolate chips with dried fruit for a fresh twist.
Quick preparation: The simple steps let you whip up a batch in under an hour, perfect for when you have unexpected guests or need a sweet treat.
Crowd-pleaser: They’re sure to impress family and friends, making them a go-to dessert for gatherings. If you’re a fan of cookies, Thick Chewy Cookies and Chewy Chocolate Chip Cookies are also a must-try!
Stunning presentation: Dust them with powdered sugar for that classic touch, ensuring your dessert table looks as amazing as it tastes.
Enjoy these cookies anytime – they’re perfect for both cozy afternoons and festive occasions!
Cannoli Cookies Ingredients
For the Cookie Dough
• All-Purpose Flour – Provides structure to the cookies; try a gluten-free blend for a different option.
• Granulated Sugar – Sweetens the dough without affecting texture; using brown sugar adds a hint of molasses flavor.
• Large Egg – Binds the ingredients together; for a vegan version, substitute with a flax egg.
• Vanilla Extract – Enhances the overall flavor; opt for pure vanilla extract for the best aromatic results.
• Lemon Zest – Adds brightness and freshness; you can switch it for orange zest for a citrus twist.
For the Filling
• Ricotta Cheese – This gives moisture and creaminess; make sure it’s at room temperature to blend easily.
• Mini Chocolate Chips – Infuses a delicious chocolatey bite; swap them out for dried fruit if preferred.
• Chopped Pistachios – Introduces a nutty crunch; you can use almonds or walnuts as substitutes.
For Dusting
• Powdered Sugar – Adds a sweet finish and a beautiful presentation to your Cannoli Cookies.
Step‑by‑Step Instructions for Cannoli Cookies
Step 1: Preheat the Oven
Begin by preheating your oven to 350°F (175°C). This crucial step ensures your Cannoli Cookies bake evenly and achieve that perfect golden-brown color. While the oven heats up, gather all your ingredients and equipment, such as mixing bowls and a rolling pin, to streamline your baking process.
Step 2: Prepare the Dry Ingredients
In a mixing bowl, whisk together your all-purpose flour and granulated sugar until well combined. This step creates the base of your Cannoli Cookies. Ensure there are no lumps, and the mixture is light and airy, ready to blend seamlessly with the wet ingredients in the next step.
Step 3: Mix the Wet Ingredients
In another bowl, mix the ricotta cheese, large egg, vanilla extract, and lemon zest until the mixture is smooth and creamy. This will create a deliciously rich filling for your Cannoli Cookies. Make sure the ricotta is at room temperature to help it combine easily, resulting in a velvety texture.
Step 4: Combine Wet and Dry Mixtures
Gradually add the flour mixture to the ricotta mixture, stirring gently until a soft dough forms. Avoid overmixing to prevent tough cookies; aim for a smooth consistency where the ingredients are just combined. This tender dough is the key to your Cannoli Cookies’ delightful texture.
Step 5: Rest the Dough
Cover the dough with a clean kitchen towel or plastic wrap and let it rest for 30 minutes. This resting period allows the gluten to relax, making it easier to roll out later and yields a tender cookie. Use this time to clean up your workspace and prepare your baking sheets.
Step 6: Roll Out the Dough
Once the dough has rested, sprinkle a light dusting of flour on your countertop and roll the dough out to about ¼ inch thick. Use a sharp knife or pizza cutter to cut the dough into 2×3 inch rectangles. These will be the perfect size to wrap around the creamy filling.
Step 7: Prepare the Filling
In a separate bowl, mix the remaining ricotta cheese, mini chocolate chips, and chopped pistachios until well combined. This sweet filling gives your Cannoli Cookies their signature flavor. Ensure that the mixture is evenly distributed for a delightful burst of taste with every bite.
Step 8: Assemble the Cookies
Place a small spoonful of the filling onto each dough rectangle, then fold the dough over and pinch the edges to seal. Ensure that the filling is securely contained within the dough. This step is crucial for achieving that classic Cannoli Cookies shape and preventing the filling from leaking during baking.
Step 9: Bake the Cookies
Arrange the filled cookies on a parchment-lined baking sheet and bake in the preheated oven for 15-18 minutes, or until they are golden brown and fragrant. Keep an eye on them towards the end of the baking time to avoid overbaking, ensuring they remain perfectly crisp.
Step 10: Cool and Dust
Once baked, allow the Cannoli Cookies to cool on the baking sheet for a few minutes before transferring them to a wire rack. Let them cool completely, then dust generously with powdered sugar for a sweet finish. This final touch enhances not only the flavor but also the visual appeal of your Cannoli Cookies.
Variations & Substitutions for Cannoli Cookies
Customize your Cannoli Cookies to suit your taste and delight your senses with these fun twists.
-
Dairy-Free: Replace ricotta cheese with a blend of silken tofu and dairy-free cream cheese for a creamy vegan filling.
-
Gluten-Free: Use a gluten-free flour blend in place of all-purpose flour to accommodate gluten sensitivities while keeping the taste intact.
-
Cinnamon Kick: Add 1 teaspoon of cinnamon to the dough for a warm spice that elevates the traditional flavors reminiscent of holiday treats.
-
Zesty Orange: Swap lemon zest with orange zest to infuse a different citrus flavor that brightens the sweetness.
-
Nut-Free: Omit chopped pistachios and use pumpkin seeds or sunflower seeds to maintain a delightful crunch while being nut-free.
-
Fruity Fusion: Incorporate dried fruits like cranberries or apricots into the filling for a sweet and chewy surprise in each bite.
-
Chocolate Lovers: Use a mix of dark and white chocolate chips for a double chocolate explosion that will please any sweet tooth.
-
Decadent Layering: Consider layering your creamy filling with a spoonful of Nutella for a chocolate-hazelnut upgrade that is irresistibly decadent.
Feel free to explore and experiment with these ideas, and if you’re in the mood for more cookie delights, check out my recipes for Thick Chewy Cookies or Pumpkin Oatmeal Cookies! Enjoy the journey of baking!
Expert Tips for Cannoli Cookies
-
Ricotta Consistency: Ensure your ricotta cheese is well-blended and at room temperature to avoid graininess in the creamy filling.
-
Mixing Matters: Be careful not to overmix the dough! Mixing just until combined will help maintain their tender, cookie-like texture that you desire in Cannoli Cookies.
-
Baking Time: Keep an eye on your cookies as they bake. Checking them a minute or two before time’s up will help prevent overbaking and maintain that perfect golden-brown exterior.
-
Cooling Technique: Allow the cookies to cool completely before dusting them with powdered sugar. This helps the sugar adhere better and presents beautifully for serving.
-
Creative Variations: Don’t hesitate to explore different nuts or fruits in the filling. A unique ingredient can take your Cannoli Cookies to the next level!
Make Ahead Options
These Cannoli Cookies are a fantastic choice for busy home cooks looking to save time during the week! You can prepare the dough up to 24 hours in advance by mixing all the ingredients and wrapping the dough tightly in plastic wrap. Simply refrigerate it until you’re ready to bake. Additionally, the filling can be made ahead of time and stored separately in an airtight container for up to 3 days in the refrigerator. When you’re ready to enjoy these delightful treats, roll out the chilled dough, assemble the cookies with the filling, and bake them as directed. This way, you’ll have fresh, delicious Cannoli Cookies with minimal effort, just when you need them!
Storage Tips for Cannoli Cookies
Room Temperature: Store the Cannoli Cookies in an airtight container at room temperature for up to 3 days to maintain their crispiness and flavor.
Fridge: If you live in a warmer climate, consider refrigerating the cookies. Just make sure to keep them in an airtight container to prevent them from drying out.
Freezer: For longer storage, wrap the cookies individually and place them in a freezer-safe bag. Enjoy within one month for the best taste and texture.
Reheating: To enjoy chilled or frozen Cannoli Cookies, reheat them in a preheated oven at 350°F (175°C) for about 5-7 minutes until warmed through.
What to Serve with Crispy Cannoli Cookies with Creamy Ricotta Filling
Imagine the delight of pairing the sweet crunch of Cannoli Cookies with complementary sides that elevate your dessert experience.
-
Rich Coffee: The robust flavor of coffee enhances the creamy filling, bringing out the sweetness perfectly while adding warmth to your afternoon.
-
Dessert Wine: A glass of sweet dessert wine, like Vin Santo, complements the cookies beautifully, making each bite feel indulgent and elegant.
-
Fresh Berries: Juicy berries like strawberries or raspberries offer a tart contrast that balances the sweetness of the cookies and adds a refreshing touch.
-
Vanilla Ice Cream: Creamy vanilla ice cream provides a luscious counterpoint to the crisp texture of the cookies, creating a delightful textural combination that is sure to please.
-
Chocolate Sauce Drizzle: Drizzling warm chocolate sauce adds a luscious layer of richness, harmonizing with the mini chocolate chips inside the cookies for double the chocolate delight.
-
Chopped Nuts Garnish: A sprinkle of crushed pistachios or almonds on top adds a crunchy element, enhancing the nutty flavor and visual appeal of your plate.
Enjoy these Cannoli Cookies on their own or with a selection of these pairings for a memorable dessert experience that your family will cherish!
Cannoli Cookies Recipe FAQs
How do I choose the right ricotta cheese for the filling?
Absolutely! When selecting ricotta cheese, look for a brand that is creamy and has no graininess. I recommend using whole milk ricotta as it offers a better texture and flavor. Also, make sure it’s at room temperature before mixing, as this ensures a smooth and well-combined filling.
What is the best way to store leftover Cannoli Cookies?
To keep your Cannoli Cookies at their best, store them in an airtight container at room temperature for up to 3 days. If you live in a humid climate, it might be wise to store them in the fridge, again in an airtight container, but expect them to soften slightly. For longer storage, wrap them individually and place them in a freezer-safe bag, consuming them within a month for the best quality.
Can I freeze Cannoli Cookies, and if so, how?
Yes, you can freeze Cannoli Cookies! I often wrap each cookie in plastic wrap, then place them in a zip-top freezer bag. Be sure to remove excess air to prevent freezer burn. When ready to enjoy, simply thaw them at room temperature or reheat in a preheated oven at 350°F (175°C) for about 5-7 minutes to restore that delightful texture.
What should I do if my dough is too sticky?
If your Cannoli Cookies dough feels sticky, don’t worry! Simply sprinkle in a little more flour, one tablespoon at a time, and gently mix until it reaches a consistency that’s manageable for rolling out. Be cautious not to add too much flour, though, as it can alter the texture. The dough should be soft but not overly sticky.
Are Cannoli Cookies safe for people with nut allergies?
Good question! If you or someone you are serving has nut allergies, simply omit the chopped pistachios from your recipe. You can replace them with seeds like sunflower seeds for a similar crunchy texture or skip nuts altogether. Always double-check ingredient labels to ensure they’re allergy-friendly.
Can I make Cannoli Cookies vegan?
Very much so! To make Cannoli Cookies vegan, use a flax egg (1 tablespoon ground flaxseed mixed with 3 tablespoons water) in place of the large egg. For the filling, substitute ricotta with a vegan alternative like tofu blended with a bit of lemon juice and coconut cream. These tweaks will still yield delightful cookies that everyone can enjoy!
Irresistible Cannoli Cookies: Crispy, Creamy Italian Delights
Ingredients
Equipment
Method
- Preheat your oven to 350°F (175°C). Gather all your ingredients and equipment.
- Whisk together the all-purpose flour and granulated sugar until well combined.
- In another bowl, mix the ricotta cheese, egg, vanilla extract, and lemon zest until smooth.
- Gradually add the flour mixture to the ricotta mixture, stirring gently until a soft dough forms.
- Cover the dough with a towel or plastic wrap and let it rest for 30 minutes.
- Roll the dough out to about ¼ inch thick and cut into 2x3 inch rectangles.
- Mix the remaining ricotta cheese, chocolate chips, and pistachios until well combined for the filling.
- Place a small spoonful of the filling on each rectangle, fold over, and pinch to seal.
- Arrange the filled cookies on a baking sheet and bake for 15-18 minutes until golden brown.
- Allow to cool briefly, then dust with powdered sugar before serving.
Leave a Reply