
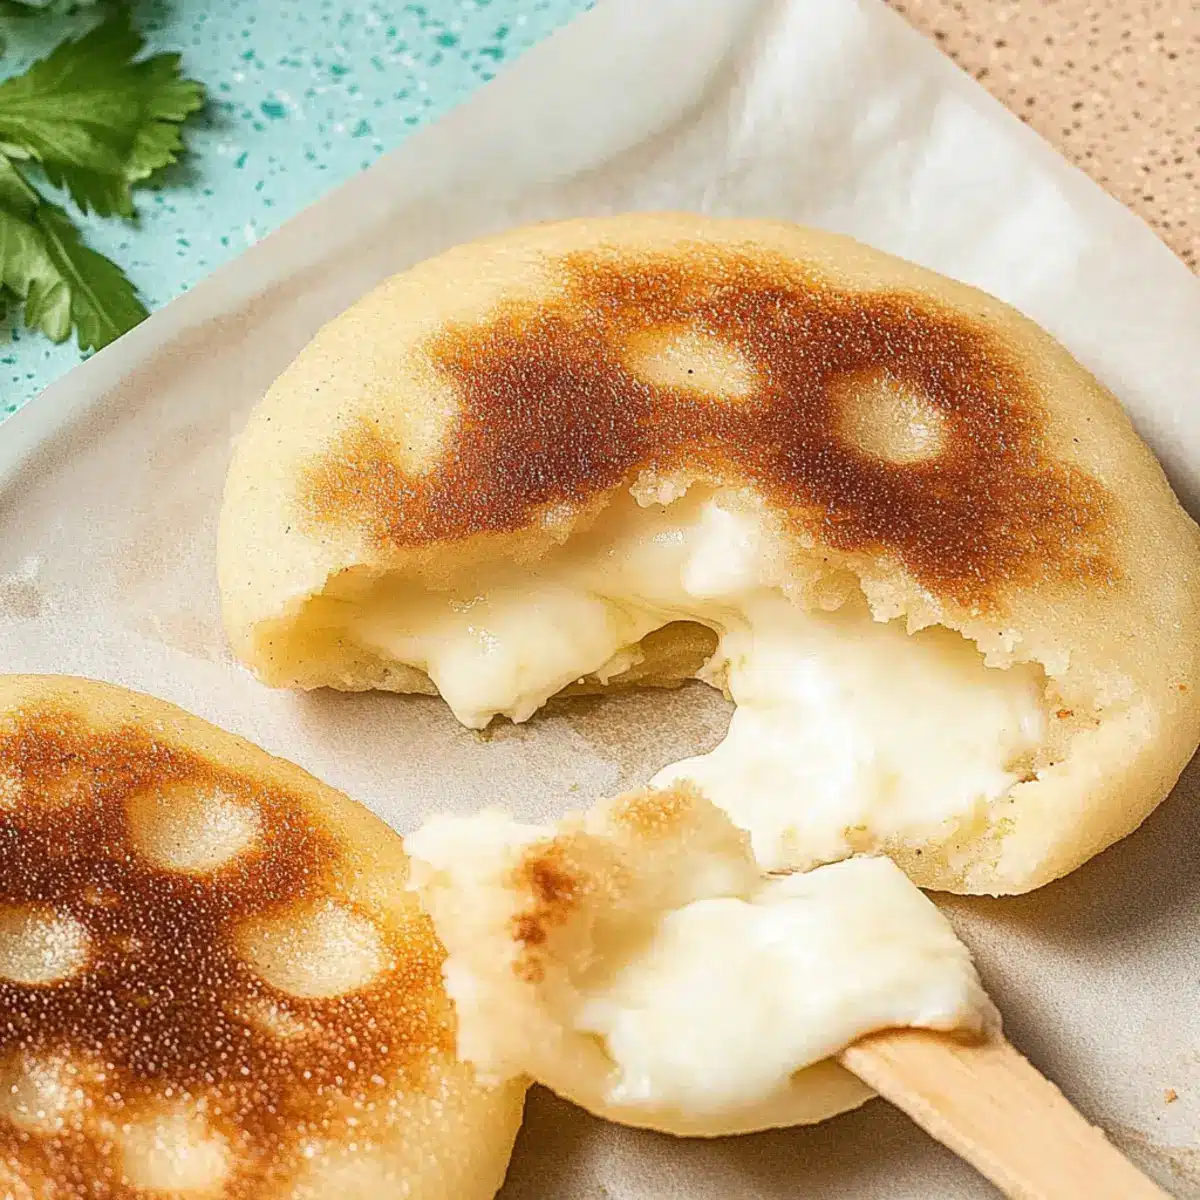
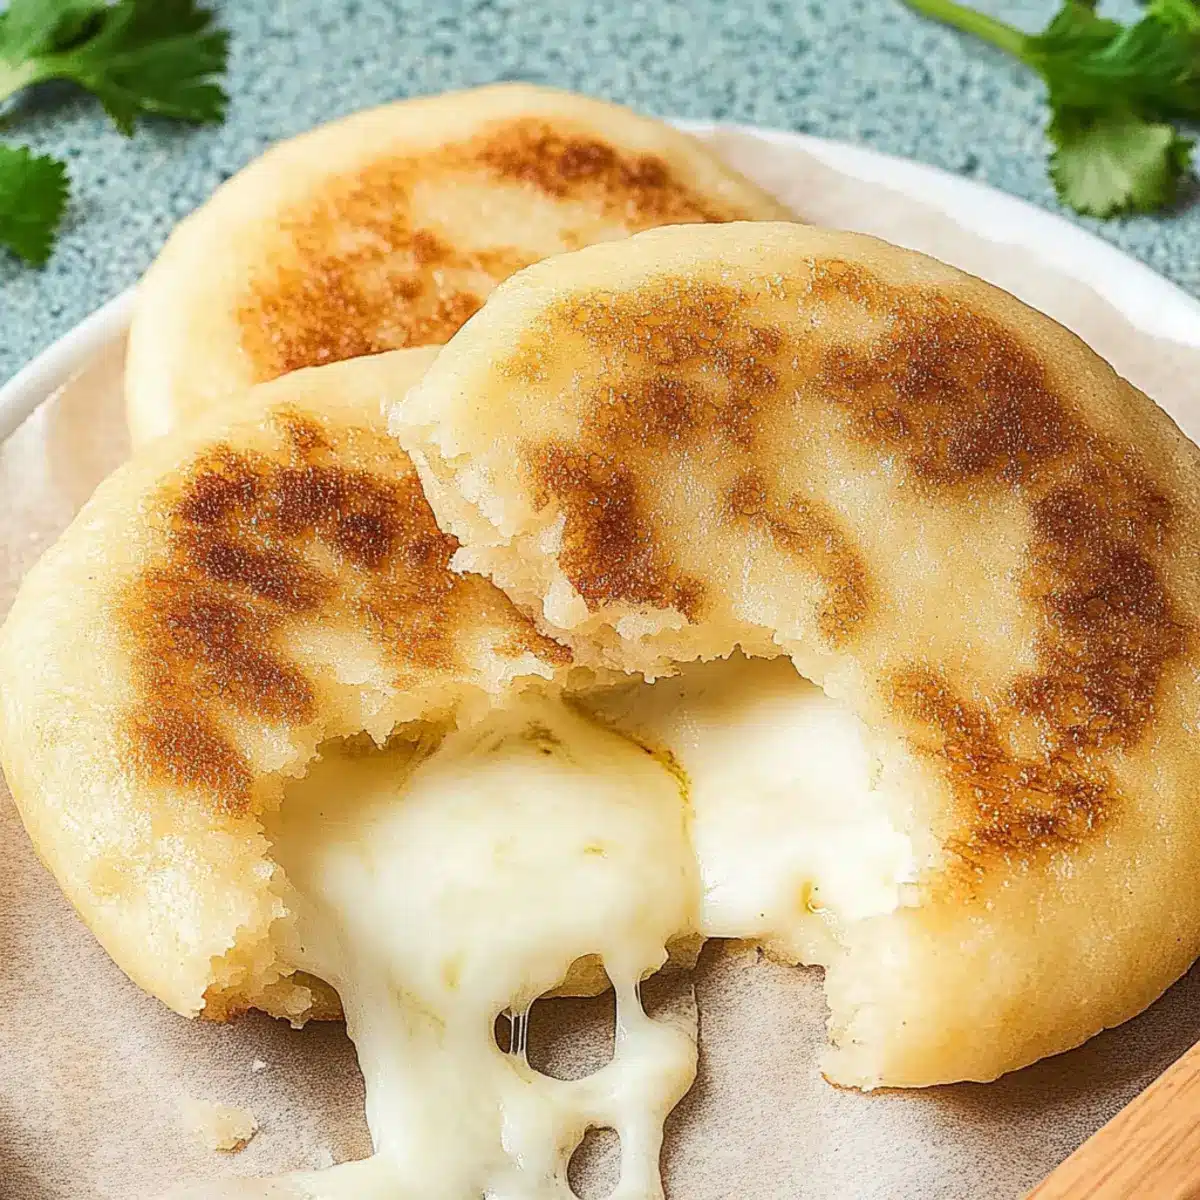
The sizzling sound of arepas hitting a hot griddle instantly transports me to sunny Colombian kitchens, where the air is filled with the mouthwatering aroma of comfort food. Today, I’m excited to share my twist on this beloved dish: Arepas con Queso, delightful cheese-filled corn cakes that are simply irresistible. Quick to prepare, they are perfect for any time—whether you’re hosting friends for a weekend brunch or seeking a cozy fun snack for movie night. With masarepa as their star ingredient, these gluten-free gems not only bring a light and fluffy texture to your plate but also showcase a beautiful balance of crispy exteriors and melty cheese centers that will charm anyone. Ready to bring a little Latin flair into your kitchen? Let’s dive in!

Why are Arepas con Queso a Must-Try?
Comforting Experience: These cheesy delights combine a soft, tender interior with a crispy outer layer, ensuring every bite is a blissful experience.
Quick Prep Time: You can enjoy homemade Arepas con Queso in less than 30 minutes, making them an excellent option for busy weeknights.
Crowd-Pleasing Flavor: The rich, savory Cotija cheese perfectly complements the mild flavor of masarepa, appealing to both kids and adults alike.
Versatile Fillings: Feel free to experiment with different cheeses or add proteins like shredded chicken or vegetables for a delicious twist.
Gluten-Free Goodness: Being gluten-free allows everyone to enjoy these flavorful treats without worry. Pair them with a side of guacamole or fresh salsa for a full experience!
Dive deeper into flavor with other recipes like Coconut Chicken Rice or serve them alongside Bacon Jalapeno Popper for a fantastic festive spread.
Arepas con Queso Ingredients
• Perfect for making your cheesy Colombian delight!
For the Dough
- Masarepa – This pre-cooked white cornmeal is essential for a fluffy, gluten-free base; yellow masarepa can be used as a substitute.
- Sea Salt – Enhances the overall flavor; kosher salt works great too.
- Cotija Cheese – This adds a rich, savory richness to the dough; feel free to swap it with feta for a different taste.
- Butter – Softened for easy mixing, it brings moisture and a lovely richness to the arepas.
- Warm Water – Helps bring the masarepa together to form a smooth dough; add as needed for the right consistency.
For the Filling
- Shredded Mozzarella Cheese – Gives that gooey, melty center; cheddar is a tasty alternative if you fancy some variety.
For Cooking
- Oil or Butter for Cooking – Crucial for even cooking and achieving that crispy outer layer on the arepas.
These Arepas con Queso are sure to become a favorite in your home, promising warmth and flavor in every crispy bite!
Step‑by‑Step Instructions for Arepas con Queso
Step 1: Combine Dry Ingredients
In a medium bowl, thoroughly mix 2 cups of masarepa and 1 teaspoon of sea salt until evenly combined. This forms the base for your Arepas con Queso, ensuring a balanced flavor. Set the bowl aside as you prepare for the next step, which will introduce richness to your dough.
Step 2: Incorporate Cheese and Butter
Add 1 cup of crumbled Cotija cheese and 2 tablespoons of softened butter to the dry ingredients. Use your hands or a spatula to blend these components well, ensuring that the cheese and butter are distributed throughout the mixture, creating a rich texture. You’re building the flavor that will make the arepas irresistible!
Step 3: Add Water and Knead
Gradually pour in about 1 cup of warm water into the mixture while kneading it with your hands. Continue adding water as needed until the dough is smooth and non-sticky, reminiscent of play dough. Once achieved, cover the bowl with a damp cloth and let it rest for 10 minutes to allow the flavors to meld.
Step 4: Shape Dough
After resting, divide the dough into eight equal pieces. Roll each piece into a ball, then flatten it gently into discs about 5 inches in diameter. This step is crucial for achieving the perfect shape for your Arepas con Queso and sets the stage for the delicious cheesy filling.
Step 5: Fill and Seal
Take each flattened dough disc and place a generous portion of shredded mozzarella in the center. Gently cover it with another flattened dough piece, pinching the edges to seal the filling inside securely. This step encapsulates the beauty of your Arepas, ensuring that each bite bursts with gooey warmth.
Step 6: Cook Arepas
Heat a skillet over medium-low heat and add 1-2 tablespoons of oil or butter. Once hot, carefully place the arepas in the skillet, cooking each for 4-5 minutes on one side until golden brown and crispy. Flip them over and repeat, creating that delightful contrast between the crispy exterior and the soft, cheesy interior.
Step 7: Serve Warm
Remove the Arepas con Queso from the skillet and serve them hot. Optionally, add a pat of butter on top for extra flavor. Each bite should reveal a melty, cheesy center surrounded by a fluffy, tender corn cake, perfect for breakfast, lunch, dinner, or a cozy snack!

Storage Tips for Arepas con Queso
-
Room Temperature: Arepas con Queso are best enjoyed fresh but can be kept at room temperature for up to 2 hours if you’re serving them at a gathering.
-
Fridge: Store leftover arepas in an airtight container in the fridge for up to 3 days. This keeps them moist while preventing them from drying out.
-
Freezer: For longer storage, freeze cooked arepas in a single layer on a baking sheet, then transfer to a freezer-safe container for up to 3 months. This way, you can enjoy the deliciousness of arepas con queso anytime!
-
Reheating: To reheat, place frozen arepas in a toaster oven or skillet over medium heat for about 5-7 minutes until warmed through and crispy. This helps to restore their delightful texture.
Expert Tips for Arepas con Queso
-
Choose the Right Masarepa: Ensure you use pre-cooked masarepa, not regular cornmeal, to achieve the perfect texture and flavor essential for arepas con queso.
-
Check Dough Consistency: If the dough feels too dry or crumbly, gradually add warm water until it’s smooth and pliable, similar to play dough.
-
Seal Properly: Make sure to pinch the edges tightly when covering the cheese; this prevents any delicious filling from leaking out during cooking.
-
Even Cooking Temperature: Keep the skillet on medium-low heat to avoid burning your arepas while ensuring they cook through and remain crispy.
-
Experiment with Fillings: Don’t hesitate to try various cheeses or additional flavorful ingredients in your filling, enhancing the comforting experience of your arepas con queso.
Make Ahead Options
These Arepas con Queso are perfect for busy home cooks looking to save time during the week! You can prepare the dough up to 24 hours in advance and store it wrapped in plastic wrap in the refrigerator to keep it fresh. Additionally, you can shape the arepas, fill them with mozzarella, and refrigerate them for up to 3 days. Just ensure you keep them in an airtight container to maintain their quality. When you’re ready to enjoy, simply heat oil in a skillet and cook the arepas as directed, allowing for quick and delicious meals at a moment’s notice.
What to Serve with Arepas con Queso?
Creating a warm, inviting meal around Arepas con Queso means blending flavors and textures that harmonize beautifully.
-
Guacamole: The creamy, rich texture of guacamole perfectly balances the crispy exterior of the arepas, adding a fresh, zesty kick. It’s a crowd-pleaser that enhances every bite.
-
Fresh Salsa: A vibrant, chunky salsa with tomatoes, onions, and cilantro brings a refreshing contrast to the cheesy arepas, cutting through the richness with its bright flavors. This delightful dip will elevate your Arepas to new heights.
-
Colombian Aji Sauce: This tangy, spicy sauce made with vinegar, cilantro, and chili adds an exciting layer of flavor that pairs beautifully with the cheesy goodness of the arepas, making each bite tantalizing.
-
Black Beans: These hearty legumes lend a creamy element and are packed with protein, complementing the flavors of the cheese-stuffed arepas while adding a healthy component to your meal.
-
Fried Eggs: A sunny-side-up egg atop an arepa creates a luxurious breakfast experience, marrying the flavors of the cheesy corn cake with the delicious richness of the yolk.
-
Mango Juice: A glass of refreshing mango juice not only boosts your meal with a tropical flair but also adds a sweet cooling contrast to the savory arepas, making every mouthful delightful.
-
Plantain Chips: These crispy, salty snacks are perfect for crunch; their sweetness complements the savory notes of the arepas, creating a delightful mix of textures with every bite.
-
Coconut Rice: The subtly sweet and creamy elements of coconut rice make for a cozy side that pairs wonderfully with the savory cheese-filled arepas, enhancing the dish’s comforting appeal.
Arepas con Queso Variations & Substitutions
Feel free to let your creativity shine as you customize these delightful arepas to match your taste!
-
Dairy-Free: Use vegan cheese alternatives to achieve that creamy filling without animal products.
For those avoiding dairy, non-dairy alternatives can be just as flavorful. Look for varieties designed for melting for the best results! -
Spicy Twist: Add diced jalapeños or crushed red pepper flakes to the cheese filling for a nice kick.
Infusing heat is a great way to elevate the arepas. The spicy notes blend beautifully with the savory cheese, creating a vibrant flavor explosion! -
Herbed Versions: Incorporate fresh herbs like cilantro or chives into the dough for a fragrant aroma and taste.
Adding herbs not only enhances the flavor but also adds a pop of color to the arepas. It’s a simple way to make them extra special! -
Sweet Surprise: Try a sweet filling with cream cheese and a hint of cinnamon, then serve with honey or maple syrup.
This unexpected twist transforms arepas into a delightful dessert. It’s a perfect option for those with a sweet tooth! -
Loaded Arepas: Fill with cooked meats, black beans, or sautéed veggies for a heartier meal.
Think of adding layers of protein and vegetables to make a complete meal in a single arepa. Each bite will be packed with nutrition and flavor. -
Air-Fried Goodness: For a healthier cooking method, use an air fryer to achieve a crispy exterior without additional oil.
The air fryer can give you the crunch you love while keeping those flavors intact. It’s a win-win for health enthusiasts! -
Seasonal Ingredients: Swap out cheese for seasonal veggies or use pumpkin puree mixed with spices for a fall-inspired twist.
Being adaptable with ingredients means you can enjoy arepas year-round, updating them with the seasons for a fresh take every time. -
Serve with Style: Elevate your meal by pairing with a refreshing mango salsa or guacamole to enhance the flavors.
Delicious dipping options can transform your arepas gathering into a memorable feast. These toppings bring a burst of freshness that beautifully complements the cheesy treat!
Why not complement your arepas with some refreshing sides like a zesty Coconut Chicken Rice or serve them alongside some delicious Bacon Jalapeno Popper? The possibilities are endless!
Arepas con Queso Recipe FAQs
What type of masarepa should I use for Arepas con Queso?
It’s essential to use pre-cooked masarepa, which is specifically formulated for making arepas. Regular cornmeal won’t provide the same texture. If you can’t find white masarepa, yellow masarepa is a great substitute that offers a slightly different flavor while still being gluten-free.
How should I store leftovers of Arepas con Queso?
Store any leftover arepas in an airtight container in the refrigerator for up to 3 days. This prevents them from drying out and keeps them moist and delicious. I often reheat them in a toaster oven, which helps restore their crispy exterior without compromising the tenderness inside.
Can I freeze Arepas con Queso?
Absolutely! To freeze, arrange cooked and cooled arepas in a single layer on a baking sheet and freeze them until solid. Once frozen, transfer them to a freezer-safe bag or container. They can be stored in the freezer for up to 3 months. When you’re ready to enjoy them, simply reheat in a toaster oven or skillet until warmed through and crispy.
What should I do if my arepas fall apart while cooking?
If your arepas are falling apart, it might be due to the dough being too dry or not sealed properly. Make sure to adjust the moisture by adding warm water until the dough becomes pliable. When sealing, ensure that you firmly pinch the edges to keep the cheesy filling intact while cooking.
Are Arepas con Queso suitable for people with gluten allergies?
Yes! Arepas con Queso are made from masarepa, which is gluten-free, making them a great option for anyone with gluten allergies or sensitivities. However, always double-check your specific ingredients to ensure there’s no cross-contamination, especially with the cheeses and any additional fillings you choose.
How long do Arepas con Queso last at room temperature?
If you’re serving Arepas con Queso at a gathering, they can stay at room temperature for about 2 hours. Beyond that, they should be refrigerated to maintain freshness. Enjoy these cheesy delights while they’re warm for the best experience!
Melt-in-Your-Mouth Arepas con Queso - A Colombian Delight
Ingredients
Equipment
Method
- In a medium bowl, thoroughly mix 2 cups of masarepa and 1 teaspoon of sea salt until evenly combined.
- Add 1 cup of crumbled Cotija cheese and 2 tablespoons of softened butter to the dry ingredients and blend well.
- Gradually pour in about 1 cup of warm water while kneading the dough until smooth and non-sticky.
- Divide the dough into eight equal pieces, roll into balls, and flatten into discs about 5 inches in diameter.
- Place a generous portion of shredded mozzarella in the center of each disc, cover with another disc and pinch the edges to seal.
- Heat a skillet over medium-low heat and add 1-2 tablespoons of oil or butter. Cook each arepa for 4-5 minutes until golden.
- Remove the Arepas con Queso from the skillet and serve them hot, optionally adding a pat of butter on top.
Leave a Reply