
As I stood in my kitchen, the tantalizing aroma of searing beef wafted through the air, instantly transporting me to the bustling trattorias of Italy. That’s the magic of preparing Melt in Yo Mouth Beef Braciole—a dish that wraps tender beef around a treasure trove of flavorful fillings. This Italian classic not only delights the senses but also serves as a customizable canvas for your culinary creativity, allowing you to experiment with different ingredients! The best part? It’s surprisingly easy to make and creates a stunning centerpiece that will have your loved ones begging for seconds. Are you ready to discover how simple it is to elevate your dinner with this savory delight? Let’s dive in!

Why is Beef Braciole a Must-Try?
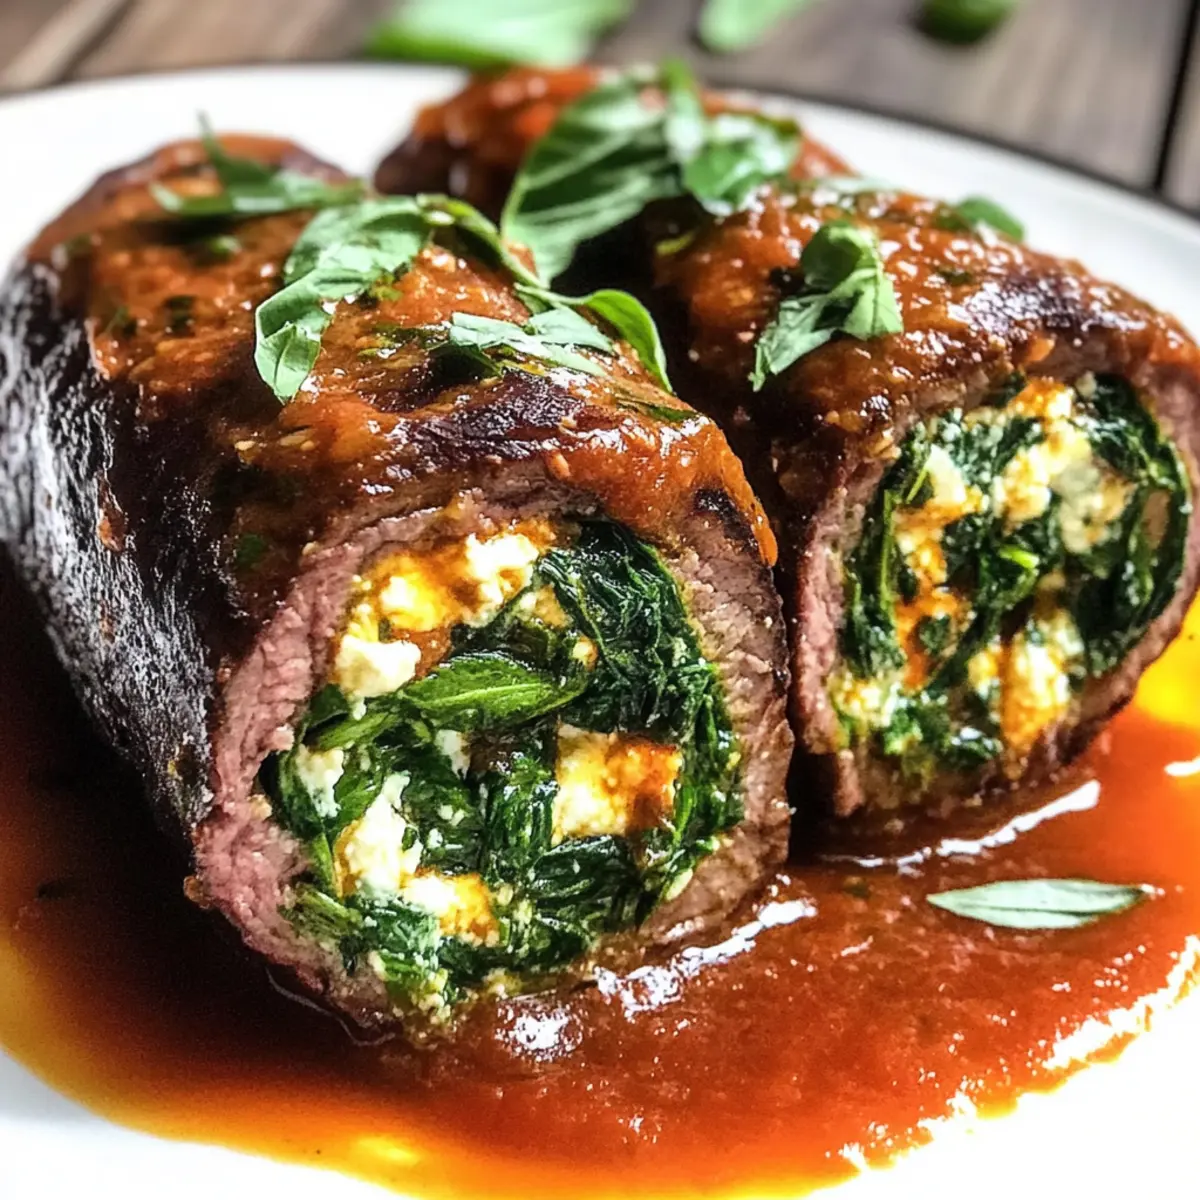
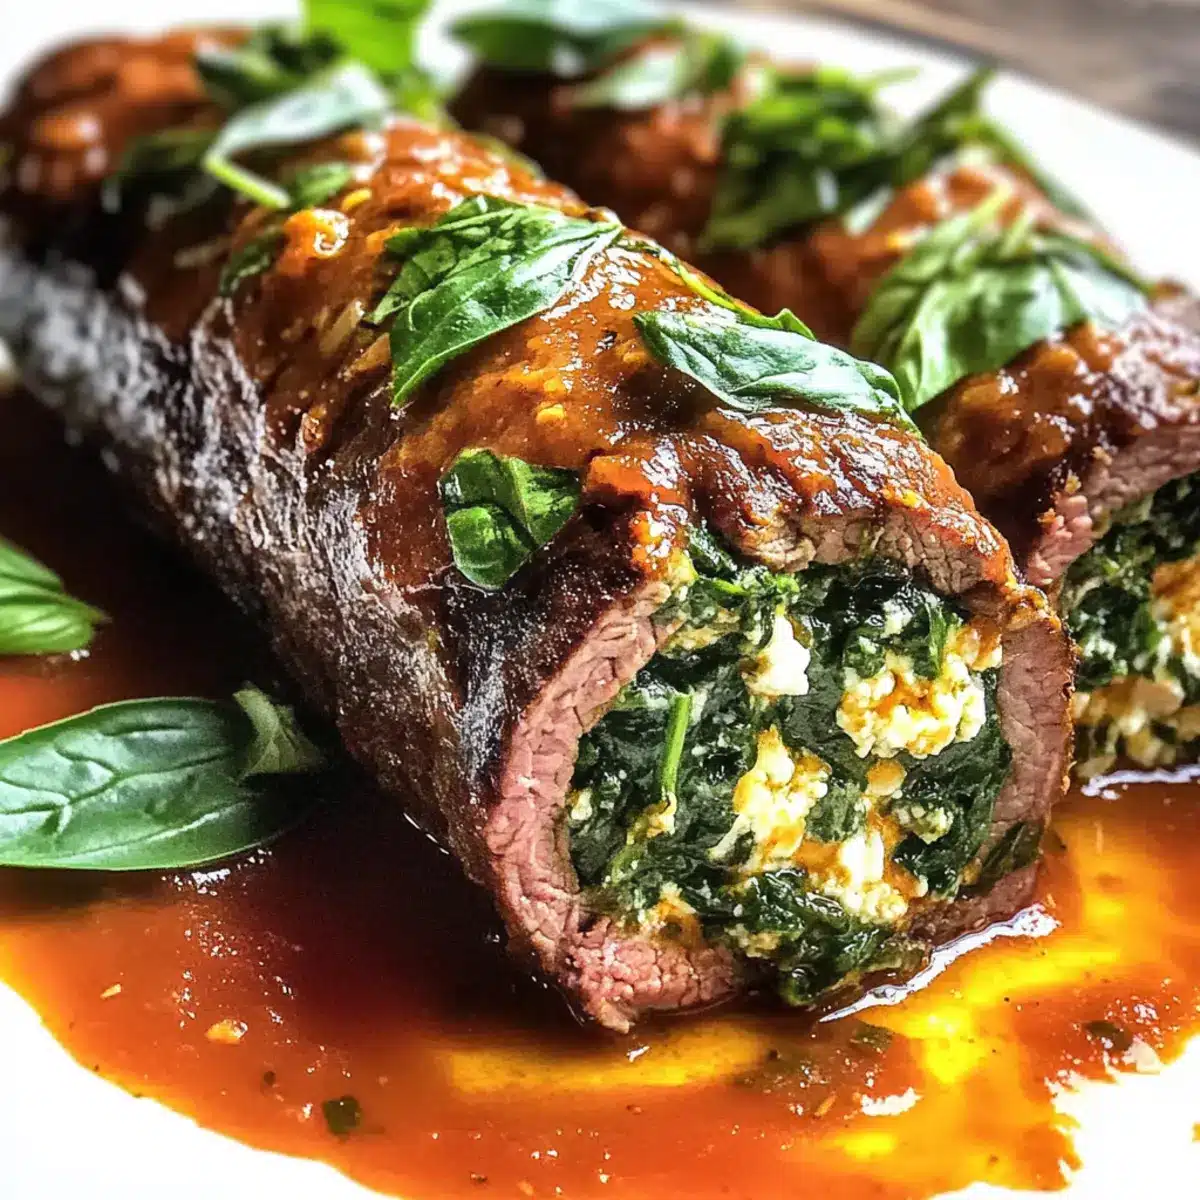
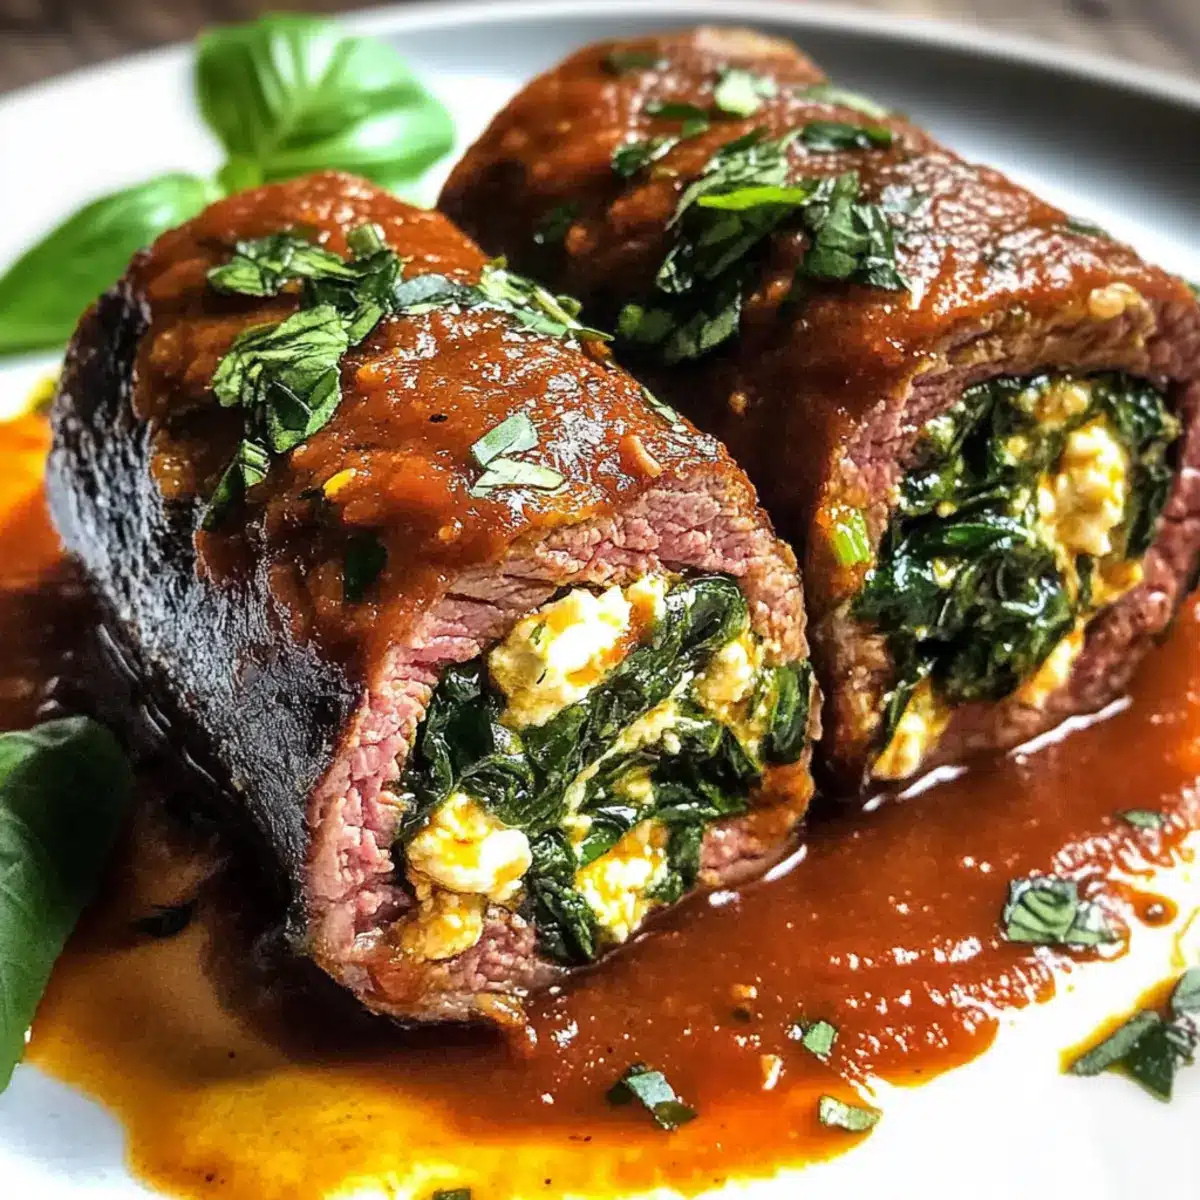
Rich, Flavorful Filling: Beef Braciole is packed with a delicious stuffing of spinach, ricotta, and fragrant herbs, tantalizing your taste buds with every bite.
Customizable Options: Want to make it your own? Feel free to swap in your favorite ingredients like mushrooms or spicy sausage, just like with our Garlic Butter Beef for an exciting twist!
Impressive Presentation: This dish isn’t just flavorful; it’s a showstopper at the dinner table. Slice it open to reveal the mouthwatering filling and enjoy the compliments!
Quick to Prepare: With straightforward steps, this recipe can be on the table in under an hour. Perfect for busy nights when you still want to impress!
Comfort Food Awaits: Melt in Yo Mouth Beef Braciole embodies comfort and warmth, making it a fantastic choice for family gatherings or cozy evenings at home. Pair it with a fresh salad for a balanced meal, and you’ll be in heaven!
Beef Braciole Ingredients
For the Beef
• Beef Flank Steak – The main ingredient that guarantees tenderness when cooked to perfection; consider sirloin for a leaner option.
For the Filling
• Fresh Spinach – Adds vibrant color and nutritional benefits; substitute with kale for a different texture if desired.
• Ricotta Cheese – Provides the creamy goodness of the filling; mozzarella works nicely for a variation in flavor.
• Grated Parmesan Cheese – Introduces a delightful salty kick to the dish; Pecorino Romano makes a suitable substitute.
• Breadcrumbs – Essential for binding the filling and adds necessary texture; opt for gluten-free breadcrumbs for a gluten-free variant.
• Minced Garlic – Infuses the filling with a rich depth of flavor; garlic powder can serve as a quick substitute if needed.
• Fresh Basil and Parsley – Contribute brightness and aromatic freshness; use dried herbs in smaller amounts if fresh isn’t available.
For Seasoning
• Salt and Pepper – Indispensable for enhancing flavors; adjust according to your personal taste.
For Cooking
• Marinara Sauce – Elevates flavor; opt for homemade or a high-quality store-bought variety for the best results.
• Olive Oil – Used for searing to perfection; you can replace it with vegetable oil if it’s what you have on hand.
For Assembling
• Toothpicks or Kitchen Twine – Vital for securing the rolled beef braciole to keep that delicious filling inside while cooking.
With these ingredients in hand, you’re on the road to creating an unforgettable Beef Braciole that will leave your family and friends asking for more!
Step‑by‑Step Instructions for Melt in Yo Mouth Beef Braciole
Step 1: Preheat the Oven
Begin by preheating your oven to 350°F (175°C), ensuring it reaches the desired temperature before baking the braciole. This step is crucial for achieving the perfect texture during the cooking process. While the oven heats up, prepare your beef flank steak for seasoning, making sure you have all your ingredients ready for the next steps.
Step 2: Prepare the Flank Steak
Lay your pounded flank steak flat on a clean surface, generously seasoning both sides with salt and pepper to enhance its flavor. Use a meat mallet or rolling pin to ensure an even thickness, which will help the steak cook evenly and ensure a tender result. This preparation sets the foundation for your Melt in Yo Mouth Beef Braciole’s mouthwatering taste.
Step 3: Make the Filling
In a medium bowl, combine fresh spinach, ricotta cheese, grated Parmesan, breadcrumbs, minced garlic, and chopped basil and parsley. Mix these ingredients well until they form a cohesive filling that is both rich and flavorful. The bright colors and fragrant herbs will invite you to dive in, adding a delightful layer to your braciole.
Step 4: Assemble the Braciole
Spread the cheese filling evenly over the seasoned flank steak, leaving a small border around the edges. Carefully roll the steak tightly, ensuring the stuffing stays inside, and secure it with toothpicks or kitchen twine to hold everything together. This step is vital for maintaining the savory goodness of the beef braciole while it cooks.
Step 5: Sear the Braciole
Heat a tablespoon of olive oil in an oven-safe skillet over medium-high heat. Once the oil shimmers, add the rolled braciole and sear it for 3-4 minutes on each side until beautifully browned. This creates a lovely crust that locks in the flavors, enhancing the overall deliciousness of your Melt in Yo Mouth Beef Braciole.
Step 6: Add Marinara Sauce
After searing, pour your marinara sauce over the braciole, covering it generously. Lower the heat and cover the skillet to trap the aromas and moisture. This step will allow the flavors to meld beautifully while ensuring your beef stays tender and juicy during its time in the oven.
Step 7: Bake the Braciole
Transfer the covered skillet to your preheated oven and bake for 30-35 minutes. Use a meat thermometer to check for doneness; the internal temperature should reach 145°F (63°C). Once done, the braciole will have a golden-brown exterior and a tantalizing aroma that fills your kitchen with warmth.
Step 8: Rest and Serve
After baking, remove the skillet from the oven and let the braciole rest for 5-10 minutes. This resting period allows the juices to redistribute, ensuring every slice is moist and flavorful. Once rested, slice the beef braciole and serve it warm, showcasing the delicious filling and enjoying the delightful flavors of this traditional Italian dish.
Make Ahead Options
Melt in Yo Mouth Beef Braciole is a fantastic option for meal prep enthusiasts! You can prepare the filling (spinach, ricotta, Parmesan, breadcrumbs, garlic, and herbs) up to 24 hours in advance; simply refrigerate it in an airtight container. Additionally, you can roll the braciole and secure it with toothpicks or twine a day ahead, preventing any loss of flavor by keeping it covered in the fridge. When you’re ready to serve, just sear the braciole, pour the marinara sauce over, and bake according to the recipe instructions. This way, you’ll enjoy tender, flavorful beef braciole with minimal effort during your busy weeknights!
How to Store and Freeze Beef Braciole
Fridge: Store leftover Beef Braciole in an airtight container for up to 3 days. This keeps it fresh and ready for quick meal options throughout the week.
Freezer: For longer storage, wrap the braciole tightly in plastic wrap and then in aluminum foil. It can be frozen for up to 3 months, maintaining its delicious flavor.
Reheating: To reheat, thaw the beef braciole overnight in the fridge, then reheat in a 350°F (175°C) oven for about 20-25 minutes to restore its juicy texture.
Make-Ahead Tip: Consider preparing your Beef Braciole in advance and refrigerating it overnight, allowing the flavors to meld beautifully before baking.
Beef Braciole: Customization Delight
Feel free to personalize your Beef Braciole with these delicious twists that will elevate your dish to a whole new level of flavor!
-
Dairy-Free: Substitute all dairy with cashew cream and nutritional yeast for a rich, creamy filling without the lactose.
-
Meat Options: Swap beef flank with pork or chicken for a different flavor profile; each offers a unique twist on this classic dish.
-
Add Heat: Mix in some crushed red pepper flakes or diced jalapeños in the filling for a spicy kick that tantalizes the taste buds.
-
Vegetarian Version: Utilize a mixture of roasted vegetables, like eggplant and zucchini, for a hearty, meatless filling that’s bursting with flavor.
-
Herb Explosion: Experiment with fresh herbs like oregano or thyme in place of basil for a fragrant, aromatic stuffing that warms the heart.
-
Nuts for Crunch: Add chopped walnuts or pine nuts to the filling to introduce a delightful crunch and an earthy flavor layer.
-
Savory and Sweet: Include a handful of raisins or dried cranberries for an unexpected sweet contrast to the savory filling, reminiscent of Sicilian traditions.
-
Cheesy Goodness: Mix in a blend of Gouda or fontina cheese with traditional ricotta for a creamy, melty sensation that takes this dish to the next level.
These variations will not only keep your meals exciting but also allow you to adjust to dietary preferences and seasonal ingredients. If you’re looking for more inspiration, don’t forget to try our exciting recipes like Garlic Butter Beef or check out some fantastic ideas with Thai Basil Beef for even more culinary delights! Enjoy your delicious journey in the kitchen!
Expert Tips for Perfect Beef Braciole
-
Marinate for Flavor: Marinate the flank steak in olive oil, garlic, and herbs for at least an hour, or overnight if you can, for enhanced tenderness and flavor.
-
Avoid Overcooking: Use a meat thermometer to check the beef’s internal temperature; overcooking can lead to dryness. Aim for 145°F (63°C).
-
Use a Sharp Knife: For a beautiful presentation, slice the braciole with a sharp knife to show off the savory filling, making each piece as tempting as the last.
-
Experiment with Fillings: Don’t hesitate to try different ingredients in your filling; customize your beef braciole with mushrooms, spicy sausage, or your favorite cheeses.
-
Check Seasoning: Season layers adequately; taste your filling before assembling, ensuring the flavor shines through in every delightful bite.
What to Serve with Melt in Yo Mouth Beef Braciole
Nothing pairs better with this savory Italian delight than sides that heighten its rich flavors and comforting essence.
- Creamy Polenta: Its smooth texture complements the beef’s tenderness, soaking up the marinara sauce beautifully for a heavenly taste experience.
- Arugula Salad: A fresh salad with peppery arugula and juicy cherry tomatoes adds a bright, crisp contrast to the dish’s richness.
- Roasted Vegetables: Seasonal vegetables tossed in olive oil and herbs provide a colorful, nutritious side that enhances the meal.
- Garlic Bread: This warm, buttery treat is perfect for mopping up any leftover marinara sauce, ensuring not a drop goes to waste.
- Risotto: A creamy parmesan risotto can elevate your dinner with its luxurious richness, pairing beautifully with the braciole’s flavors.
- Red Wine: A glass of Chianti or a medium-bodied red wine rounds out the meal, matching the savory notes of the beef perfectly.
- Tiramisu: End your meal on a sweet note with this classic Italian dessert, its coffee and cocoa flavors making every bite memorable.
- Grilled Asparagus: This tender vegetable adds a touch of elegance and its charred flavor complements the savory braciole delightfully.
- Stuffed Peppers: Colorful bell peppers stuffed with rice and herbs can bring an additional dimension to your dinner table.
- Caesar Salad: The crisp romaine and tangy dressing create a refreshing bite to balance the hearty flavor of the melt-in-your-mouth beef braciole.
Melt in Yo Mouth Beef Braciole Recipe FAQs
How do I select the right beef for braciole?
Absolutely! For Beef Braciole, choose a well-marbled cut like flank steak or even sirloin for a leaner option. Look for a piece that is even in thickness and has a nice layer of fat for tenderness. Freshness is key; avoid any cuts with dark spots or excessive redness, which can indicate the beef is starting to spoil.
What is the best way to store leftover beef braciole?
To store your leftover Beef Braciole, place it in an airtight container in the refrigerator. It will stay fresh for up to 3 days. For longer storage, you can wrap it tightly in plastic wrap and then in aluminum foil; it can last in the freezer for up to 3 months while still preserving its delicious flavors.
Can I freeze beef braciole? How do I do it?
Certainly! To freeze Beef Braciole, first allow it to cool completely after cooking. Then, wrap it tightly in plastic wrap to minimize air exposure, followed by a layer of aluminum foil for extra protection. Place the wrapped braciole in a freezer-safe bag or container, and it should be good for up to 3 months. When you’re ready to enjoy, just thaw it in the fridge overnight and reheat in the oven at 350°F (175°C) for about 20-25 minutes.
What should I do if my beef braciole turns out dry?
Very! If your beef braciole turns out dry, it could be due to overcooking. Always use a meat thermometer; the internal temperature should reach 145°F (63°C) for optimal juiciness. If you find that your braciole is still dry, you can try serving it with extra marinara sauce to help moisten the dish. For future attempts, consider marinating the flank steak before rolling it—this adds flavor and moisture.
Are there any dietary considerations with this recipe?
Absolutely! If you’re accommodating dietary restrictions, consider using gluten-free breadcrumbs for a gluten-free version of Beef Braciole. Also, watch for lactose intolerance; substituting ricotta cheese with a dairy-free version, like cashew cheese, can provide a similar texture. Always check for specific allergies, especially those related to herbs and spices.
Savory Beef Braciole: A Tender Italian Wonder at Home
Ingredients
Equipment
Method
- Preheat your oven to 350°F (175°C).
- Lay the pounded flank steak flat, seasoning both sides with salt and pepper.
- In a medium bowl, combine spinach, ricotta, Parmesan, breadcrumbs, minced garlic, basil, and parsley.
- Spread the filling over the flank steak, roll tightly, and secure with toothpicks or twine.
- Heat olive oil in a skillet and sear the braciole for 3-4 minutes on each side.
- Pour marinara sauce over the braciole, lower the heat, and cover the skillet.
- Bake in the preheated oven for 30-35 minutes, checking until the internal temperature reaches 145°F (63°C).
- Allow the braciole to rest for 5-10 minutes before slicing and serving.
Leave a Reply