
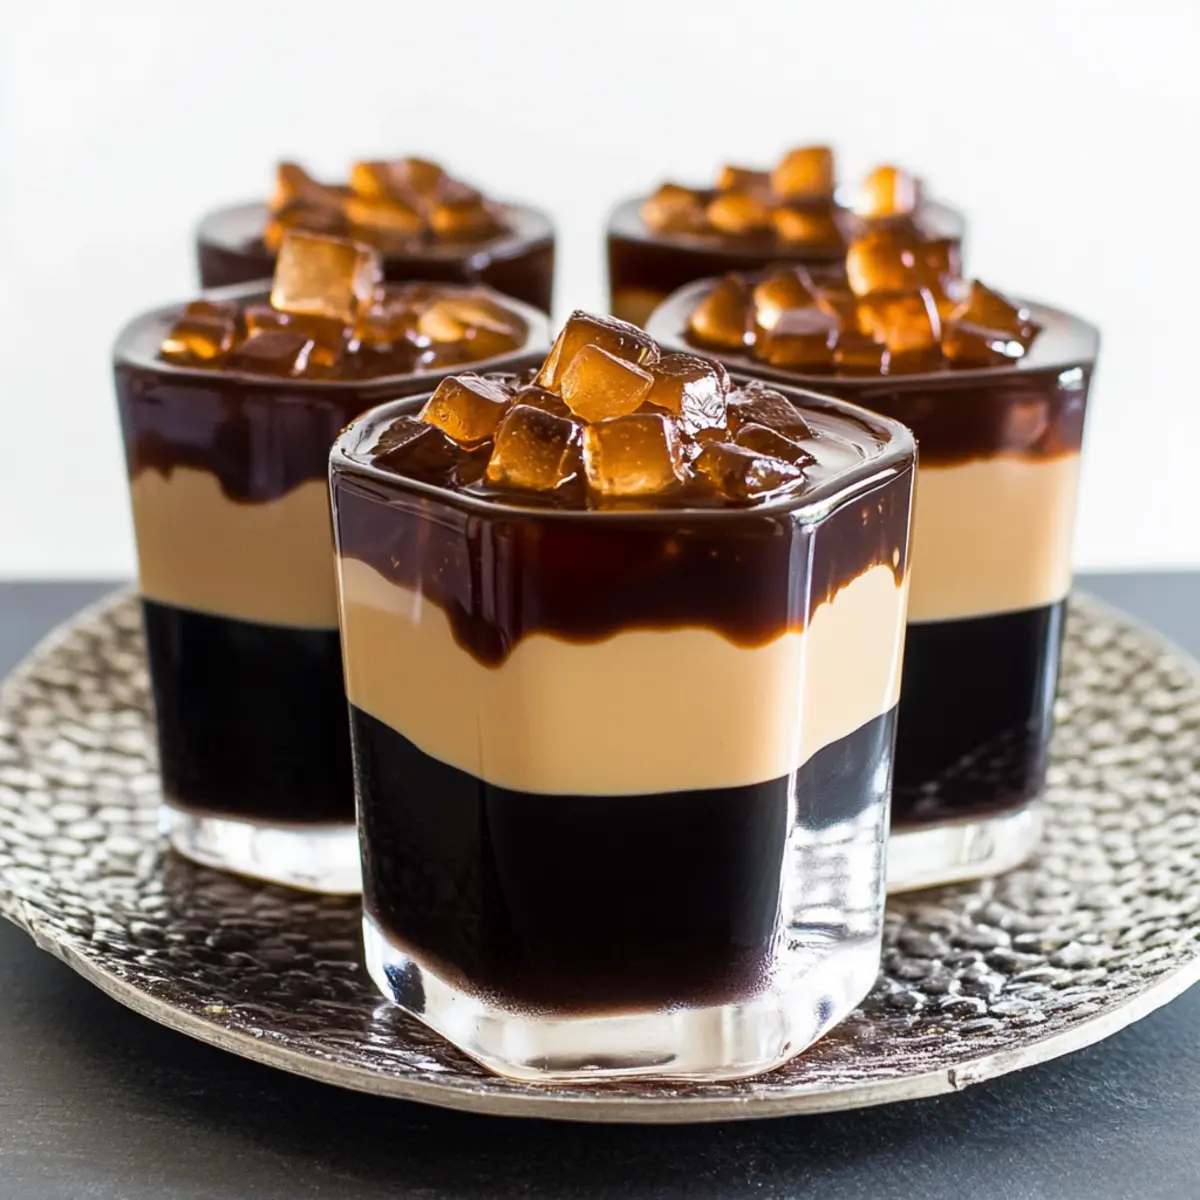
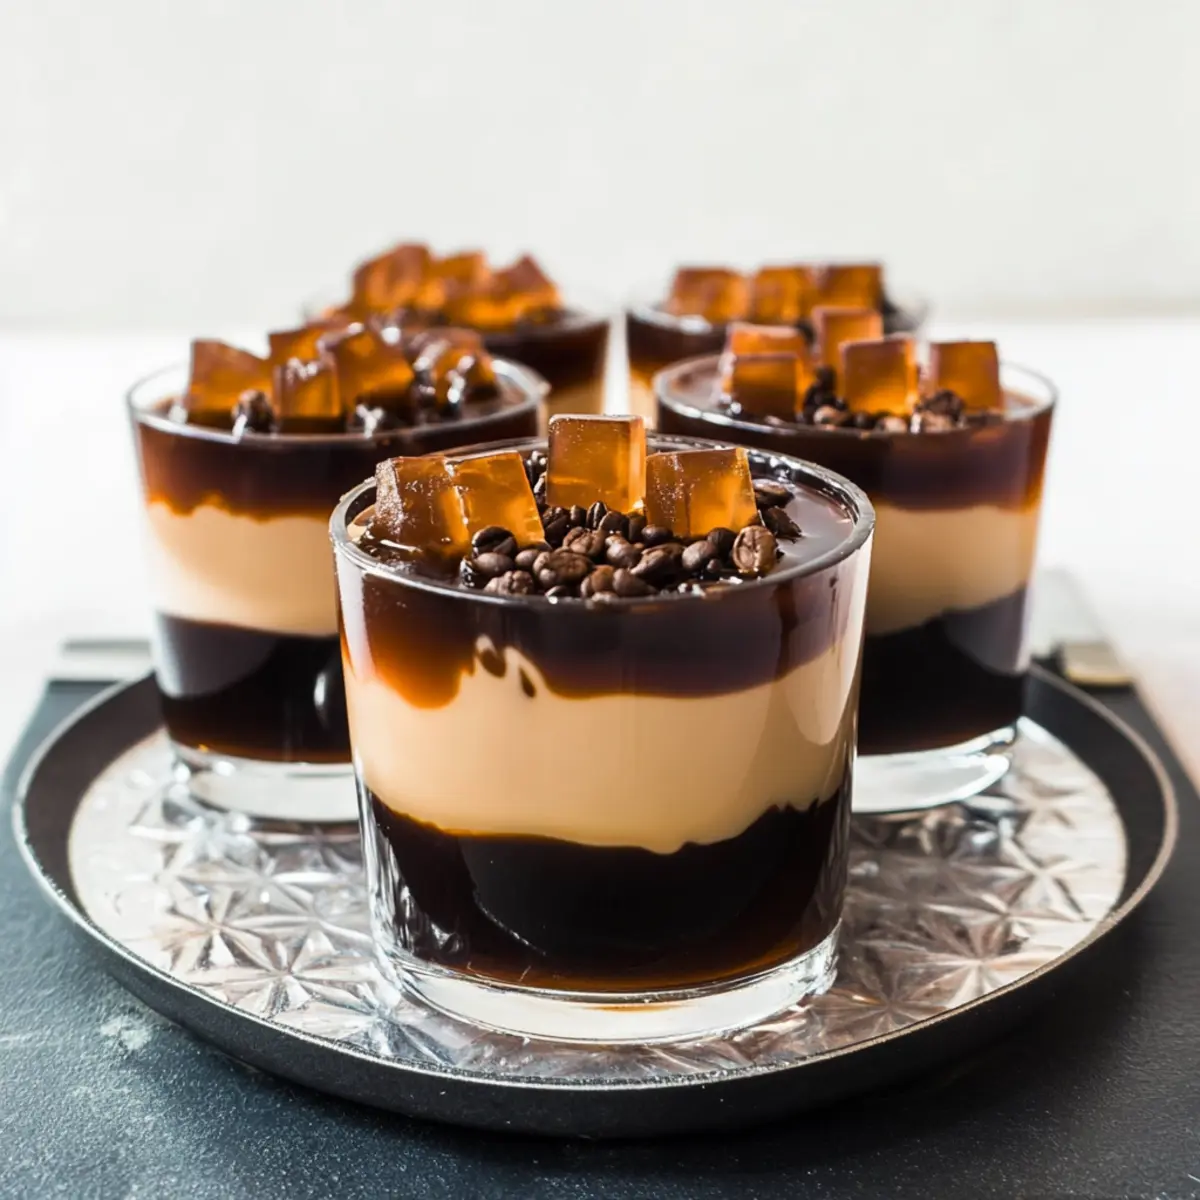
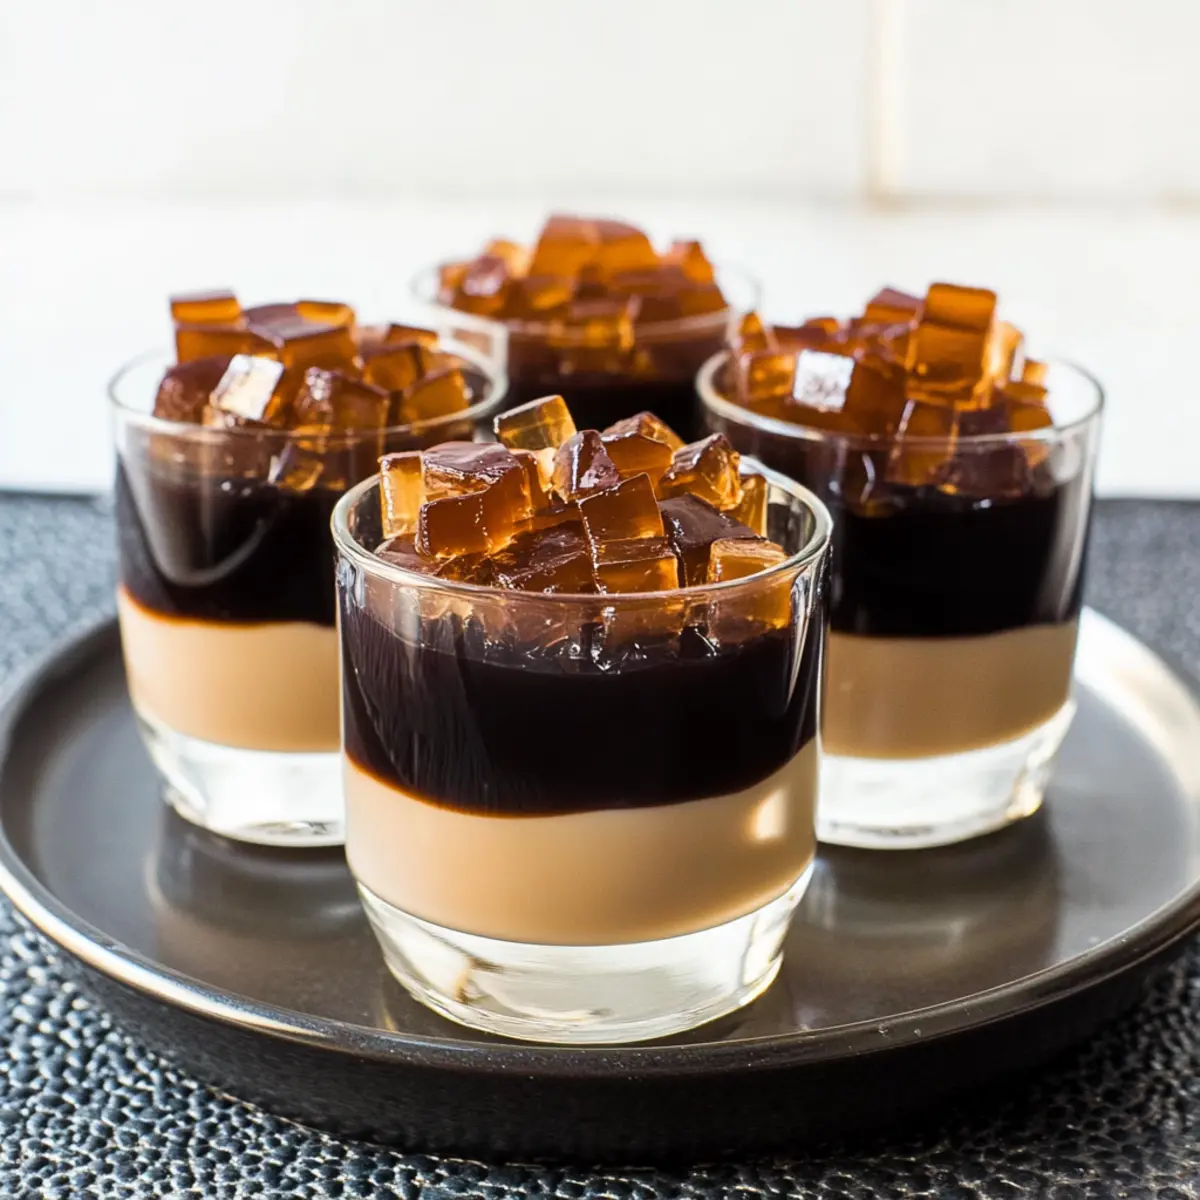
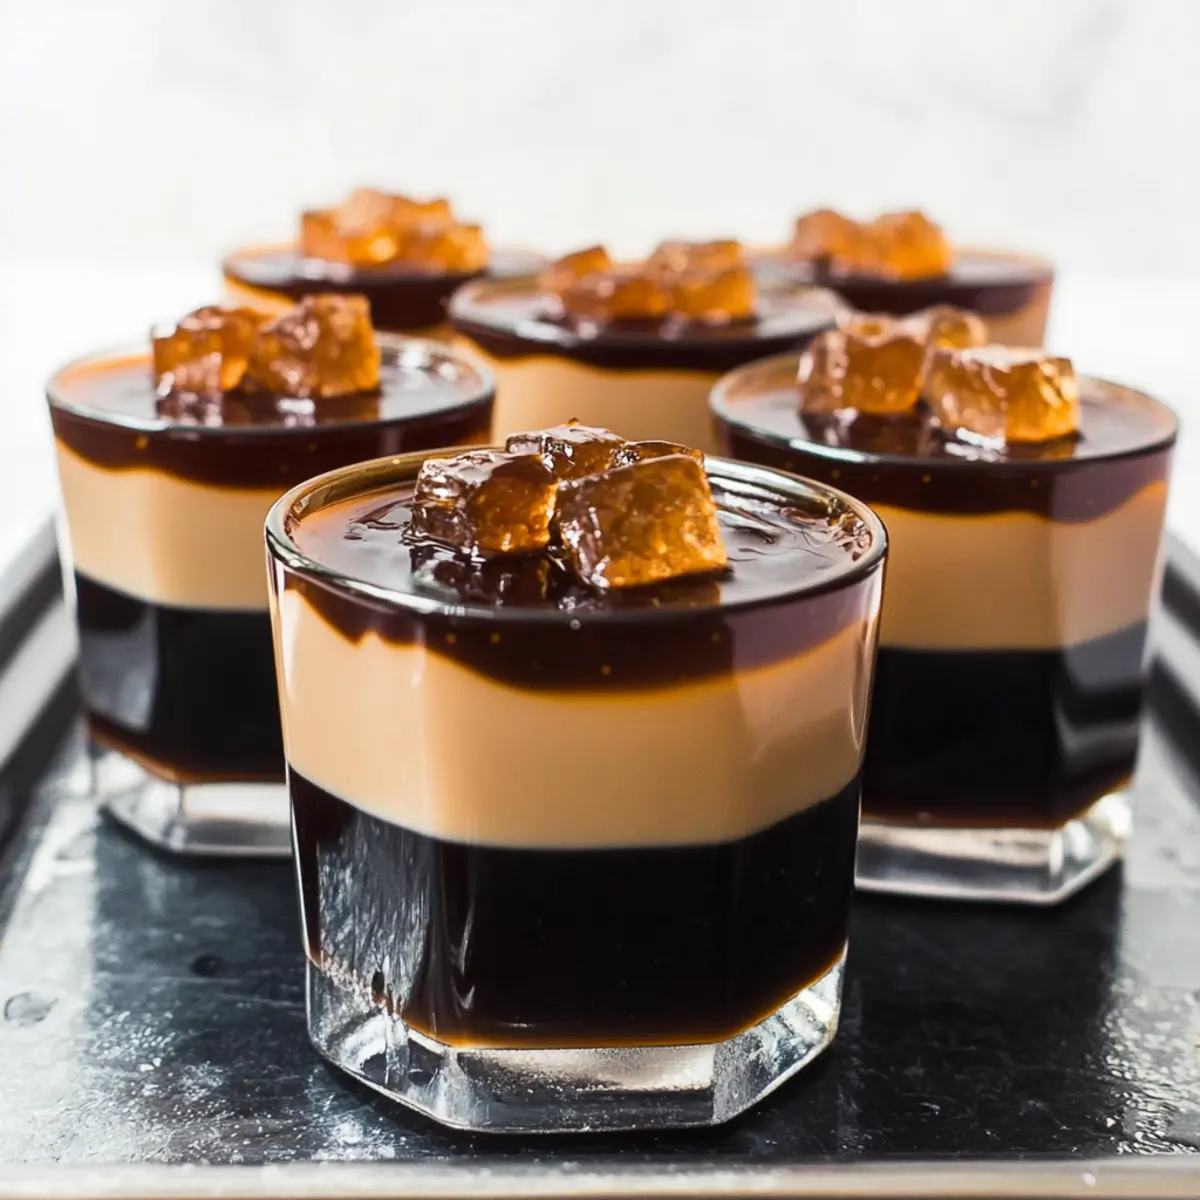
There’s something oddly satisfying about making a dessert that feels light yet indulgent at the same time. If you’re a coffee lover like me, you’re in for a treat with this easy homemade Coffee Jelly. This recipe is a delightful riff on traditional desserts, featuring a beautifully layered combination of bold black coffee jelly and a creamy milk layer that’s sure to impress. Not only is it quick to prepare, but it’s also vegetarian-friendly, making it a fantastic option for a crowd. Plus, serving it chilled in delightful jelly cubes takes this dessert to a whole new level of refreshment. Have you ever thought about transforming your favorite coffee into a playful dessert?
Why is Coffee Jelly a Must-Try?
Uniqueness: This Coffee Jelly offers a fun twist on classic desserts, infusing coffee lovers’ favorite beverage into a delightful treat.
Layered Perfection: With its rich black coffee base and creamy milk layer, each bite delivers a perfect blend of flavors and textures.
Quick & Easy: In just a few simple steps, you’ll have a stunning dessert ready to impress guests or satisfy cravings.
Crowd-Pleasing Treat: Ideal for gatherings, this vegetarian dessert appeals to diverse palates, making it a guaranteed hit.
Customize Your Experience: Feel free to adapt this recipe by experimenting with different coffee types or sweetened condensed milk flavors. Try pairing with an Espresso Cheesecake Decadent for an unforgettable coffee-themed dessert spread!
Coffee Jelly Ingredients
For the Black Coffee Jelly
• Agar Agar Powder – A vegetarian gelling agent that creates the jelly texture; it’s widely available at Asian markets.
• Sugar – Sweetens the coffee; feel free to adjust based on your sweetness preference.
• Instant Coffee Granules – Provides a robust coffee flavor; using brewed coffee is possible, but adjust the water ratio accordingly.
• Water – The essential base for your jelly; there are no substitutes for it.
For the Milk Coffee Layer
• Sweetened Condensed Milk – Adds creaminess and sweetness to the milk layer; opt for evaporated milk for a lighter alternative.
• Water – Used to blend with the remaining jelly mixture; it forms the luscious milk layer essential for this Coffee Jelly.
Step‑by‑Step Instructions for Coffee Jelly
Step 1: Prepare Molds
Begin by washing and drying your jelly molds thoroughly to ensure they are clean and ready for pouring. This step is crucial for making sure your Coffee Jelly releases easily once set. Once dry, set them aside on a flat surface where they can remain undisturbed.
Step 2: Cook Jelly Base
In a medium-sized pot, combine sugar and agar agar powder, stirring them together. Add 4 cups of water and the instant coffee granules. Heat over low to medium heat, stirring continuously for about 8-10 minutes, until the mixture is fully dissolved and starts to simmer gently. Watch for a clear liquid that indicates it’s ready.
Step 3: Set Black Coffee Jelly
Pour approximately 2-2.5 cups of the cooked jelly mixture into a shallow dish. Allow the mixture to cool to room temperature before transferring it to the refrigerator. Refrigerate for at least 1-2 hours, or until it is firm and set. You’ll know it’s ready when the surface feels solid to touch.
Step 4: Layer Jelly
Once the black coffee jelly is set, carefully scoop half of it into your prepared molds, ensuring no air bubbles remain by gently tapping the molds. Refrigerate these molds for an additional 15-20 minutes to allow this layer to harden slightly before adding the next layer.
Step 5: Prepare Milk Coffee Layer
In the same pot used earlier, mix the remaining jelly mixture with sweetened condensed milk, stirring over low heat until combined and warm, but not boiling. Keep this mixture on the stove as you’ll need it soon for layering in your Coffee Jelly dessert.
Step 6: Assemble Layers
With the black jelly layer firm to the touch, take the warm milk coffee mixture and pour it gently over the black jelly in the molds. Use a spoon to create an even layer, then pour in any additional black coffee jelly cubes for added texture before it sets completely.
Step 7: Add Topping & Chill
Finally, cut any remaining black jelly into small cubes and place them on top of the milk layer. Return the molds to the refrigerator and chill for at least 3-4 hours, or until everything is fully set and the jelly is wobbly and firm.
Expert Tips for Coffee Jelly
• Mix Properly: Make sure to combine agar agar with sugar before adding it to the water. This prevents clumps and ensures a smooth Coffee Jelly.
• Test Temperature: Keep the jelly mixture warm while layering to prevent it from setting too quickly. This makes it easier to create beautiful layers.
• Avoid Overrefrigeration: Don’t let the black coffee jelly sit too long before adding the milk layer, or it may become too firm to bond well.
• Grease Molds: Lightly grease your molds with cooking oil to help the jelly release easily once set, allowing for perfect presentation.
• Store Wisely: To maintain freshness, store any leftover Coffee Jelly in a covered container in the fridge, preventing it from drying out and keeping it tasty.
Coffee Jelly Variations & Substitutions
Feel free to explore your creativity and personalize this dessert in delightful ways!
-
Dairy-Free: Use coconut milk instead of sweetened condensed milk for a tropical twist.
-
Flavored Coffee: Swap instant coffee granules for espresso powder or cold brew for a different flavor profile. The nuances of coffee can create subtle shifts in taste that excite the palate.
-
Sugar Alternatives: Substitute regular sugar with honey or maple syrup for a natural sweetness; just adjust liquid ratios accordingly.
-
Textural Add-In: Incorporate crushed nuts or chocolate chips into the jelly while it sets for an extra crunch. Imagine the delightful contrast between smooth jelly and the satisfying bite of crunchy additions!
-
Minty Fresh: Add a few drops of peppermint extract to the milk layer for a refreshing twist that’s perfect for warm days.
-
Layered Fruit: Consider adding diced fruits like strawberries or berries between the layers for a burst of freshness. Complement your coffee jelly experience with bright notes of nature’s sweetest treats.
-
Spicy Kick: A dash of cayenne pepper in the coffee layer will bring a surprising heat that balances the sweetness. Just a hint will elevate your dessert to the next level.
-
Theme Pairing: Serve your coffee jelly alongside an indulgent Espresso Cheesecake Decadent for a truly coffee-lover’s feast that sings with flavor harmony!
Experimenting with these variations will not only give your coffee jelly a personal touch but will also make it an ever-exciting treat to savor time and again.
Make Ahead Options
These delightful Coffee Jelly desserts are perfect for busy home cooks looking to save time during meal prep! You can prepare the black coffee jelly base up to 24 hours in advance—simply follow the instructions through Step 3, then store it in an airtight container in the refrigerator to maintain its firmness. The milk coffee layer can also be made ahead by mixing it with the remaining jelly mixture (Step 5). For the freshest taste, layer the milk jelly and coffee jelly cubes just before serving. By prepping in advance, you’ll enjoy a beautifully presented dessert while saving yourself time time on a bustling day.
Storage Tips for Coffee Jelly
Fridge: Store your Coffee Jelly in an airtight container in the refrigerator for up to 4-5 days, ensuring it remains fresh and tasty.
Freezer: You can freeze the jelly for longer storage, but it’s best enjoyed fresh. Thaw it in the fridge before serving if frozen, ideally within 1 month.
Reheating: There’s no need to reheat coffee jelly. Simply serve it chilled, and consider adding a dollop of whipped cream for an extra touch of indulgence.
Serving: Slice it directly from the storage container or use a spoon to scoop out individual servings, ensuring it’s kept cool until ready to enjoy.
What to Serve with Refreshing Coffee Jelly with Creamy Milk Layer
Enhance your delightful dessert experience with these perfect pairings, each designed to complement the flavors of your coffee jelly.
-
Whipped Cream: A dollop of freshly whipped cream adds a luscious, airy finish that balances the coffee’s richness beautifully.
-
Dark Chocolate Shavings: The bitter notes of dark chocolate amplify the coffee flavor, creating an indulgent harmony on your palate.
-
Vanilla Ice Cream: Creamy and cold, vanilla ice cream melts over the jelly, providing a delightful contrast to the smooth texture of the dessert.
-
Almond Biscotti: These crunchy treats offer a nutty flavor that pairs amazingly with coffee. Enjoy dipping them for a delightful experience.
-
Mint Leaves: Fresh mint offers a refreshing and vibrant touch, enhancing the dessert’s presentation and elevating the taste with a cooling note.
-
Hazelnut Coffee: Serve a cup of hazelnut coffee alongside your jelly for a comforting flavor fusion that every coffee lover will adore.
-
Fruit Salad: A fresh medley of seasonal fruits adds a burst of brightness, balancing the sweetness of the jelly while providing textural contrast.
-
Iced Coffee: Keep the coffee theme going with a chilled iced coffee on the side, perfect for sipping between bites of your luscious dessert.
-
Almond Milk Latte: A warm almond milk latte creates an inviting contrast to the chilled dessert, bridging flavors in the most delicious way.
Indulge in simplicity, and let your coffee jelly shine with these delightful pairings that elevate each bite!
Coffee Jelly Recipe FAQs
How do I select the right agar agar powder?
Absolutely! When choosing agar agar, ensure you opt for a high-quality, powdered form specifically labeled for culinary use. Look for it at Asian markets or health food stores. It should be fine and free from any clumps. Always check the expiration date for optimal results.
What are the best storage methods for leftover Coffee Jelly?
Very! Your Coffee Jelly can be stored in an airtight container in the fridge for up to 4-5 days. This helps maintain its smooth texture and flavor. If you’re concerned about it drying out, wrap it tightly with plastic wrap before sealing in a container for added protection.
Can I freeze Coffee Jelly, and how should I do it?
You can indeed freeze your Coffee Jelly! To do so, cut the jelly into cubes and place them in a freezer-safe container or a resealable plastic bag. Be sure to leave some space for expansion, as liquids do swell when frozen. It’s best consumed within 1 month, so label the container with the date you made it. To thaw, simply move it to the refrigerator overnight before serving.
What should I do if my jelly doesn’t set properly?
It happens to the best of us! If your jelly doesn’t set, it’s likely due to an incorrect agar agar-to-liquid ratio or the mixture not being heated sufficiently. Next time, ensure you dissolve the agar agar fully in water first. If it’s still liquid, reheat the mixture, add a little more agar agar (mixed with water), and simmer until the new batch is incorporated fully and starts to thicken.
Can I make substitutions if I have dietary restrictions?
Of course! If you’re making the Coffee Jelly for someone who is lactose intolerant, consider using a dairy-free condensed milk option. Furthermore, if anyone has allergies, check the packaging of your agar agar, coffee, and any substitute ingredients. This dessert is naturally vegetarian, so you can freely enjoy it without compromise!
What’s the best way to serve Coffee Jelly for gatherings?
Absolutely delightful! Serving your Coffee Jelly in individual cups makes an elegant presentation. Top each serving with a dollop of whipped cream and a few chocolate shavings for added indulgence. This adds a touch of flair and is sure to impress your guests at any gathering!
Delightful Coffee Jelly: A Creamy, Refreshing Dessert Treat
Ingredients
Equipment
Method
- Prepare Molds: Wash and dry jelly molds thoroughly. Set aside on a flat surface.
- Cook Jelly Base: Combine sugar and agar agar powder in a pot. Add water and coffee granules, heating over medium heat for 8-10 minutes until dissolved.
- Set Black Coffee Jelly: Pour 2-2.5 cups of mixture into shallow dish. Cool to room temperature and refrigerate for 1-2 hours until firm.
- Layer Jelly: Scoop half of the black jelly into molds, tapping to remove air bubbles. Refrigerate for 15-20 minutes.
- Prepare Milk Coffee Layer: In the same pot, mix remaining jelly mixture with sweetened condensed milk over low heat until warm, but not boiling.
- Assemble Layers: Pour warm milk coffee mixture over the firm black jelly in molds. Add any remaining black jelly cubes.
- Add Topping & Chill: Cut remaining black jelly into cubes and place on top. Refrigerate for 3-4 hours until set.
Leave a Reply