
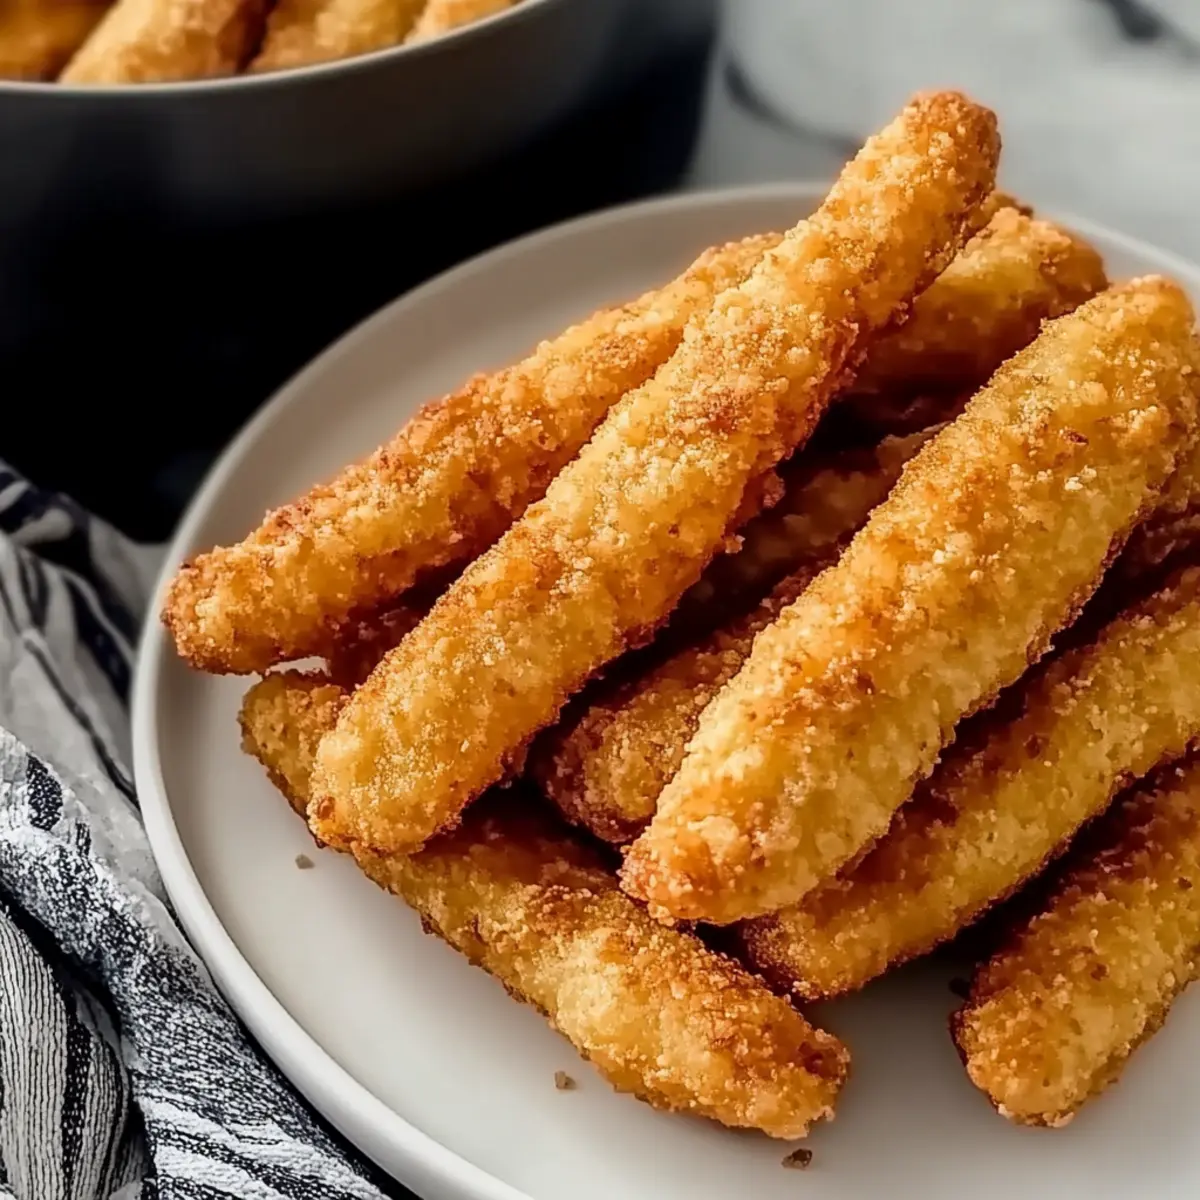
“Sipping a hot cup of coffee while watching my kids curb their usual dinner reluctance—that’s the kind of evening I’m always aiming for. Enter my Crispy Baked Canned Tuna Fish Sticks, a delightful solution that’s not only budget-friendly but a total game-changer for busy families. These little bites of joy come together in a flash, making weeknight meals a breeze. With a savory and cheesy interior, they charm even the pickiest eaters. Plus, they pack a protein punch, ensuring everyone leaves the table satisfied. Are you ready to elevate your dinner routine with a recipe that’s as fun to make as it is to eat? Let’s dive in!”

Why Will You Fall in Love?
Simplicity at Its Finest: This recipe uses just a handful of pantry staples, making it both quick and easy to whip up.
Kid-Friendly Appeal: With their cheesy goodness and fun shape, even the pickiest eaters will beg for seconds!
Versatile Variations: Feel free to tweak the ingredients or seasoning to match your family’s tastes. Whether you add some spice or go for a classic twist, the options are endless.
Nutritional Powerhouse: Each serving is packed with protein, giving you peace of mind while satisfying those little appetites. Pair them with Healthy Baked Feta for a balanced meal that everyone will love!
Crispy Delight: Baked to golden perfection, these fish sticks provide the satisfying crunch without the fuss of frying, making them a healthier choice. Want to try another tasty treat? Check out my Pumpkin Apple Baked Oatmeal for a sweet addition to your menu!
Baked Canned Tuna Fish Sticks Ingredients
For the Fish Sticks
• Canned Tuna – Choose tuna packed in water for a leaner protein source.
• Shredded Cheddar Cheese – Adds creaminess and flavor; mozzarella is a good substitute for a milder taste.
• Egg – Binds the ingredients together, ensuring your fish sticks hold their shape.
• Seasonings (salt, pepper, etc.) – Personalize the flavor to your preference; garlic powder or herbs work well!
• Crushed Pork Rinds – Creates a crispy exterior; swap for breadcrumbs or crushed potato chips if preferred.
Step‑by‑Step Instructions for Baked Canned Tuna Fish Sticks
Step 1: Preheat the Oven
Start by preheating your oven to 400°F (200°C). This temperature is essential for achieving that golden-brown crispiness on our Baked Canned Tuna Fish Sticks. While the oven heats up, gather your baking sheet and line it with parchment paper to ensure the fish sticks don’t stick and clean-up is a breeze.
Step 2: Mix the Ingredients
In a mixing bowl, combine thoroughly drained canned tuna, shredded cheddar cheese, one egg, and your desired seasonings. Mix until all ingredients are well incorporated, creating a cohesive mixture that will bind nicely when shaped. The mixture should feel slightly sticky, indicating it’s ready for the next step, which is shaping.
Step 3: Shape the Fish Sticks
With clean hands, take portions of the mixture and shape them into fish stick forms, about the size of your index finger. Ensure even sizing for uniform cooking; this step is crucial for achieving that perfect texture in each Baked Canned Tuna Fish Stick. Place the shaped sticks on a clean plate while you prepare the baking sheet.
Step 4: Arrange on the Baking Sheet
Transfer the shaped fish sticks onto the prepared parchment-lined baking sheet, ensuring they are spaced apart to allow proper airflow. This spacing helps them crisp up beautifully during baking. At this point, you can also give them a light spray of cooking oil for an extra crunchy texture.
Step 5: Bake to Perfection
Slide the baking sheet into your preheated oven and bake for 20 minutes. Keep an eye on the fish sticks as they bake; they should turn a beautiful golden brown and feel firm to the touch when finished. The cheesy goodness inside will be complemented by the lovely crispy exterior that makes these Baked Canned Tuna Fish Sticks irresistible.
Step 6: Cool and Serve
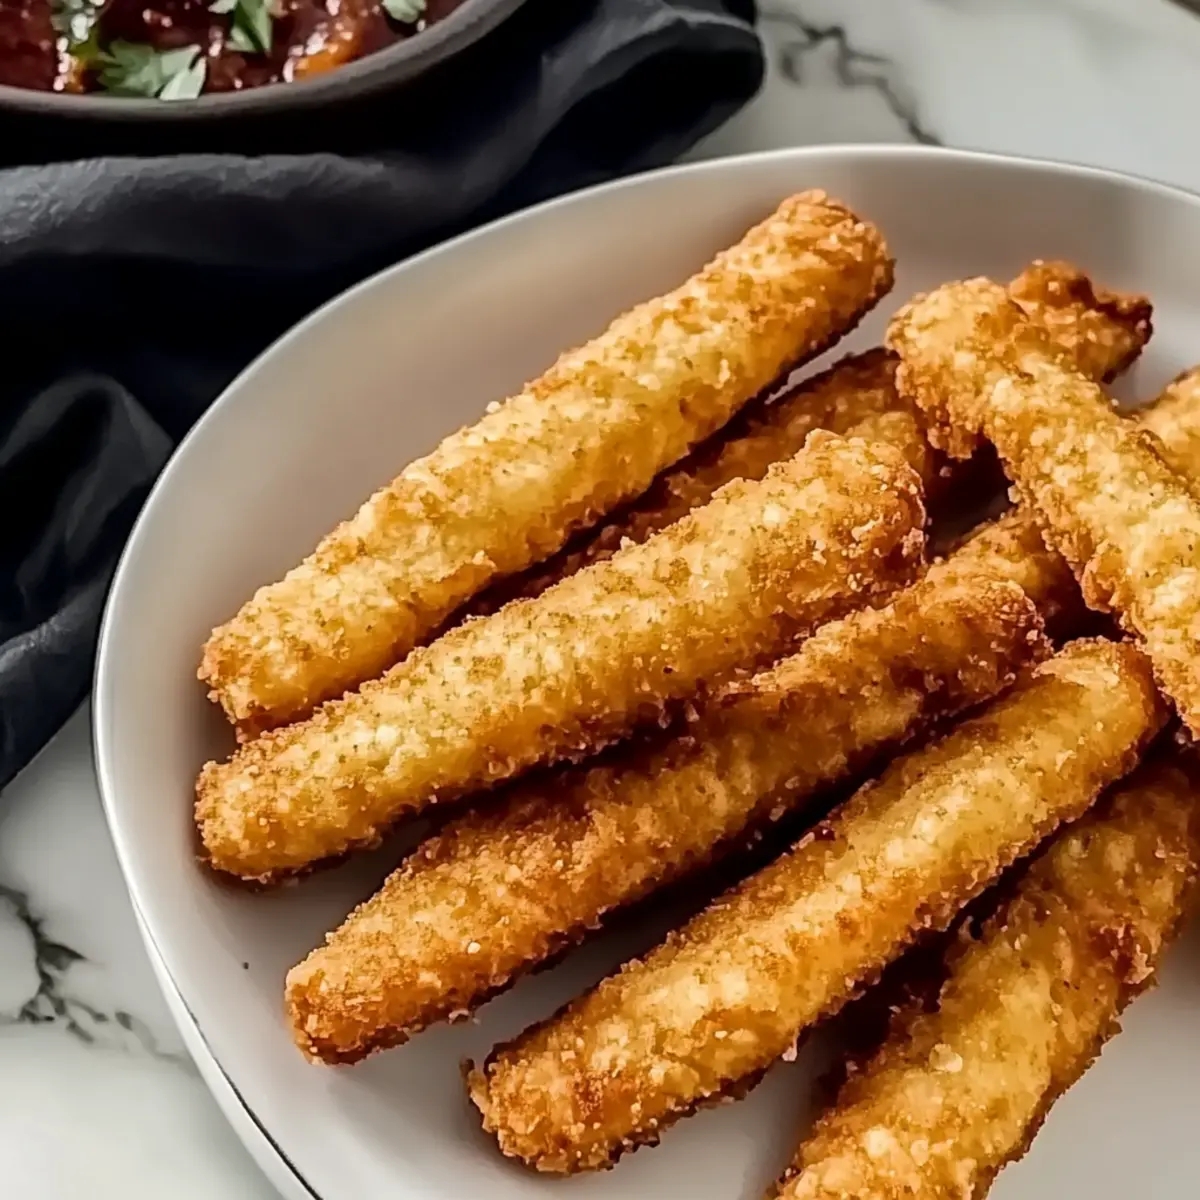
Once cooked, remove the baking sheet from the oven and let the fish sticks cool slightly before serving. This resting time allows them to set and prevents any burns. Pair with your favorite dipping sauce, such as ranch or tartar sauce, and watch as your family enjoys these delightful fish sticks!

What to Serve with Crispy Baked Canned Tuna Fish Sticks
Pair these delightful fish sticks with vibrant sides that will round out your meal and tantalize your taste buds.
-
Creamy Coleslaw: Adds a refreshing crunch that balances the crispy fish sticks, creating a perfect contrast in texture. The tangy flavors keep things lively!
-
Sweet Potato Fries: Their natural sweetness complements the savory fish sticks beautifully, providing a delightful twist on traditional fries. Plus, who doesn’t love a good dip?
-
Garden Salad: A fresh, mixed salad filled with colorful vegetables adds a wholesome touch. It’s light yet satisfying, and you can toss in your favorite dressing for extra zing!
-
Dipping Sauces: Serve with ranch dressing, tartar sauce, or zesty sriracha mayo. Each dip brings a unique flavor experience, making every bite exciting!
-
Steamed Broccoli: This nutritious side brings a tender green element that contrasts the fish sticks’ crunchiness, plus it’s packed with vitamins to keep your family healthy.
-
Lemonade or Iced Tea: Cool beverages like freshly squeezed lemonade or refreshing iced tea enhance the meal’s enjoyment and provide a lovely balance to the savory flavors.
Baked Canned Tuna Fish Sticks Variations
Embrace creativity in the kitchen with these exciting twists on the classic baked canned tuna fish sticks!
-
Cheese Swap: Try swapping out cheddar cheese for mozzarella or pepper jack for a spicy kick. Each option brings its unique zing to the dish.
-
Seasoning Adventures: Get adventurous with seasoning! Add garlic powder, Italian herbs, or even a dash of smoked paprika for a bold flavor profile. Your taste buds will thank you!
-
Breadcrumb Alternative: For a gluten-free option, replace crushed pork rinds with gluten-free breadcrumbs or crushed potato chips. This ensures everyone can join in on the fun!
-
Add Veggies: Mix in finely chopped spinach or bell peppers to boost nutrition and add color. Not only do they enhance the flavor, but they also introduce a delightful crunch.
-
Crispy Texture Boost: Sprinkle some grated Parmesan cheese on top before baking for an extra layer of flavor and crunch. It transforms your fish sticks into a gourmet treat!
-
Zesty Twist: Incorporate lemon zest into the mixture for a refreshing brightness that complements the tuna beautifully. A burst of citrus can elevate the overall flavor profile.
-
Sriracha Sensation: Spice things up by mixing in a teaspoon of sriracha or your favorite hot sauce. This is perfect for those who love a little heat with their meal!
-
Serving Suggestions: Pair these delicious fish sticks with a side of Blackened Catfish with Spicy Cheese Grits for a soul-satisfying meal that everyone will enjoy.
Let your culinary imagination run wild, and don’t hesitate to mix and match flavors to create your ideal baked canned tuna fish sticks!
Make Ahead Options
These Crispy Baked Canned Tuna Fish Sticks are perfect for meal prep, saving you time during busy weeknights! You can mix the tuna, cheese, egg, and seasonings up to 24 hours in advance; just cover and refrigerate the mixture until you’re ready to shape and bake. This allows the flavors to meld beautifully, making them even more delicious. For storing, shape the fish sticks and place them in an airtight container, separating layers with parchment paper to maintain crispiness; they can stay in the fridge for up to 3 days. When ready to serve, simply bake at 400°F (200°C) for 20 minutes, and enjoy restaurant-quality results with minimal effort!
Storage Tips for Baked Canned Tuna Fish Sticks
Fridge: Store leftovers in an airtight container for up to 3 days. To retain the crispy texture, place a paper towel inside to absorb moisture.
Freezer: For longer storage, freeze cooked fish sticks for up to 2 months. Arrange them in a single layer before transferring to a freezer-safe bag to preserve shape.
Reheating: To re-crisp, air fry at 350°F for 3-4 minutes or bake at 375°F for 5-7 minutes if refrigerated. For frozen sticks, add a few extra minutes until heated through.
Enjoy Anytime: With proper storage, you can savor your delicious baked canned tuna fish sticks as a quick meal option any day!
Expert Tips for Baked Canned Tuna Fish Sticks
Moisture Control: Ensure tuna is thoroughly drained and patted dry. Excess moisture can lead to soggy fish sticks, compromising their crispy texture.
Chill Before Shaping: Let the mixture rest in the fridge for at least 15 minutes before shaping. This helps the ingredients meld and improves the final texture of your baked canned tuna fish sticks.
Uniform Size: Shape the sticks to be uniform in size for even cooking. This means they will bake consistently, avoiding some being undercooked while others are overdone.
Don’t Overcrowd: Avoid placing too many fish sticks on the baking sheet. Leave space between them to promote airflow, resulting in a crispier finish for each piece.
Customize Seasoning: Don’t hesitate to personalize the flavor profile. Experiment with different spices or cheeses to create your perfect baked canned tuna fish sticks.
Baked Canned Tuna Fish Sticks Recipe FAQs
What type of canned tuna should I use?
Absolutely! For the best results, choose tuna packed in water, as it provides a lean protein source that’s perfect for our Baked Canned Tuna Fish Sticks. I recommend using skipjack tuna, which is lower in mercury, ensuring a healthier meal for you and your family.
How can I store leftover tuna fish sticks?
Very! To keep your leftover Baked Canned Tuna Fish Sticks fresh, store them in an airtight container in the fridge for up to 3 days. To help maintain their crispy texture, place a paper towel inside the container to absorb any moisture. This way, you can enjoy those tasty sticks without them getting soggy!
Can I freeze the fish sticks, and how do I do it?
Absolutely! For longer storage, you can freeze your cooked Baked Canned Tuna Fish Sticks for up to 2 months. Arrange them in a single layer on a baking sheet and freeze until firm. Then, transfer them to a freezer-safe bag. This prevents them from sticking together, making it easy to reheat just the right amount later on!
What can I do if the fish sticks fall apart while cooking?
Oh no! If you’re facing issues with your tuna fish sticks falling apart, ensure the tuna is thoroughly drained and patted dry to avoid excess moisture. I also suggest chilling the mixture in the fridge for about 15 minutes before shaping—this helps the ingredients bind together better. Lastly, make sure to shape them evenly for consistent cooking!
Are there any allergies I should be aware of with this recipe?
Very! If you’re making Baked Canned Tuna Fish Sticks for someone with dietary restrictions, be mindful of the eggs and cheese in the recipe, which are common allergens. For a vegan substitute, consider using flaxseed meal mixed with water in place of the egg. You can also opt for dairy-free cheese alternatives to accommodate lactose intolerances. Always double-check labels to keep everyone safe!
Crispy Baked Canned Tuna Fish Sticks Everyone Will Love
Ingredients
Equipment
Method
- Preheat your oven to 400°F (200°C) and line a baking sheet with parchment paper.
- In a mixing bowl, combine thoroughly drained canned tuna, shredded cheddar cheese, one egg, and your desired seasonings. Mix until well incorporated.
- Shape the mixture into fish stick forms, about the size of your index finger.
- Transfer the shaped fish sticks onto the prepared baking sheet, ensuring they are spaced apart.
- Bake for 20 minutes until golden brown and firm to the touch.
- Let the fish sticks cool slightly before serving with your favorite dipping sauce.
Leave a Reply